PHPのclassの書き方

関数(メソッド)はpublicで変数(プロパティ)はprivate

class hoge {
	public function hogeMethod(){}

	private $_hogeProperty;
}

$obj = new hoge();

echo "<pre>";
var_dump($obj);
echo "</pre>";

object(hoge)#1 (1) {
[“_hogeProperty”:”hoge”:private]=>
NULL
}

### マルチプルインスタンス

class hoge {
	public function setValue($i){
		$this->_value = $i;
	}

	private $_value;
}

$obj = new hoge();
$obj->setValue(10);

echo "<pre>";
var_dump($obj);
echo "</pre>";
$obj = new hoge();
$obj->setValue(10);
var_dump($obj);

$obj2 = new hoge();
$obj2->setValue(20);
var_dump($obj2);

ここまでは基礎。他の言語でもほぼ同じ。

php_valueとは

php.iniのファイルをApacheで上書きする

使い方例

php_value auto_prepend_file /path/to/my_prepend.php
php_value memory_limit 512M

なるほど、面白いですね。

smartyの書き方

<!DOCTYPE html>
<html lang="en">
<head>
	<meta charset="UTF-8">
	<meta name="viewport" content="width=device-width, initial-scale=1.0">
	<title>Document</title>
</head>
<body>
	Hello, <?php echo "Hpscript"; ?>!
</body>
</html>

### Smartyとは
テンプレートエンジン
高速コンパイルは一度だけ行われる
変更があったテンプレートファイルのみ再コンパイル
簡単に独自関数や変数の修飾子を作成できる
エンジン自体がカスタマイズできる
プラグイン機能も備えている

$ curl -sS https://getcomposer.org/installer | php
$ php composer.phar require smarty/smarty

index.php

<?php

require_once "vendor/autoload.php";
$smarty = new Smarty();
$smarty->setTemplateDir('templates')->setCacheDir('cache');
$smarty->display('index.tpl');
?>

template/index.tpl

{config_load file="test.conf" section="setup"}
{assign var="food" value="親子丼"}

<!DOCTYPE html>
<html lang="ja">
<head>
  <meta charset="UTF-8">
  <meta name="viewport" content="width=device-width, initial-scale=1.0">
  <meta http-equiv="X-UA-Compatible" content="ie=edge">
  <title></title>
</head>
<body style="background:{#grayBgColor#};">

<h1></h1>
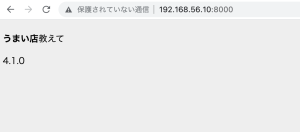
<p><b>うまい店</b>教えて</p>
{$smarty.version}
</body>
</html>

なるほど、テンプレートエンジンの話か

PHPのエラーログ

まず、php.iniの場所
$ php -r “echo phpinfo();” | grep “php.ini”
Configuration File (php.ini) Path => /etc/php/7.4/cli
Loaded Configuration File => /etc/php/7.4/cli/php.ini

$ cat /etc/php/7.4/cli/php.ini | grep error_log
; server-specific log, STDERR, or a location specified by the error_log
; Set maximum length of log_errors. In error_log information about the source is
;error_log = php_errors.log
;error_log = syslog
; to syslog. Only used when error_log is set to syslog.
; the message. Only used when error_log is set to syslog.
; OPcache error_log file name. Empty string assumes “stderr”.
;opcache.error_log=

あれ、コメントアウトされていて、出力されていない…?

$ sudo vi /etc/php/7.4/cli/php.ini
$ G
$ error_log = /var/log/php.log


ini_set('display_errors', "On");

$num1 = 2;
$num2 = 0;

try {
	echo calc1($num1, $num2);
} catch (Exception $e){
	echo $e->getMessage();
	error_log("[". date('Y-m-d H:i:s') . "]". "保存に失敗しました。\n", 3, "/var/www/html/debug.log");
}

function calc1($a, $b){
	if ($b == 0){
		throw new Exception("エラー");
	}
	return $a/$b;
}

$ sudo touch debug.log
$ sudo chmod 777 /var/www/html/debug.log
$ cat /var/www/html/debug.log
[2022-04-09 23:37:07]保存に失敗しました。

これで、エラーログを出力できる。

error_log("[". date('Y-m-d H:i:s') . "]". "保存に失敗しました。\n", 3, "/var/log/php.log");

なるほど、理解した。

PHPのtry & catch(Exception $e)の挙動

ini_set('display_errors', "On");

$num1 = 2;
$num2 = 0;

try {
	echo calc1($num1, $num2);
} catch (Exception $e){
	echo $e->getMessage();
}

function calc1($a, $b){
	if ($b == 0){
		throw new Exception("エラー");
	}
	return $a/$b;
}

http://192.168.56.10:8000/
エラー

function calc1($a, $b){
	// if ($b == 0){
	// 	throw new Exception("エラー");
	// }
	return $a/$b;
}

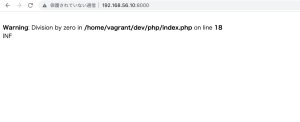
http://192.168.56.10:8000/
Warning: Division by zero in /home/vagrant/dev/php/index.php on line 18
INF

なるほど、そういうことか、表示が違うのね…

phpspreadsheetを使いたい

$ curl -sS https://getcomposer.org/installer | php
$ php composer.phar require phpoffice/phpspreadsheet

require 'vendor/autoload.php';

use PhpOffice\PhpSpreadsheet\Spreadsheet;
use PhpOffice\PhpSpreadsheet\Writer\Xlsx;

$spreadsheet = new Spreadsheet();
$sheet = $spreadsheet->getActiveSheet();

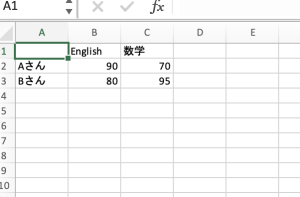
$sheet->setCellValue('B1', 'English');
$sheet->setCellValue('C1', '数学');
$sheet->setCellValue('A2', 'Aさん');
$sheet->setCellValue('A3', 'Bさん');
$sheet->setCellValue('B2', '90');
$sheet->setCellValue('B3', '80');
$sheet->setCellValue('C2', '70');
$sheet->setCellValue('C3', '95');

$writer = new Xlsx($spreadsheet);
$writer->save('score.xlsx');

なるほどー

PHPExcelを使ってみよう

github: https://github.com/PHPOffice/PHPExcel

なんか古そうだかDLしてみる
$ git clone https://github.com/PHPOffice/PHPExcel.git

<?php

require_once './PHPExcel/Classes/PHPExcel.php';

$objBook = new PHPExcel();

$objSheet = $objBook->getActiveSheet();

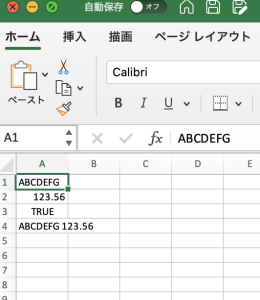
$objSheet->setCellValue('A1', 'ABCDEFG');
$objSheet->setCellValue('A2', 123.56);
$objSheet->setCellValue('A3', TRUE);
$objSheet->setCellValue('A4', '=IF(A3, CONCATENATE(A1, " ", A2), CONCATENATE(A2, " ", A1))');
$objWriter = PHPExcel_IOFactory::createWriter($objBook, "Excel2007");
$objWriter->save('test.xlsx');
exit();
?>

$ sudo apt-get install php-zip

うん、OK

[CentOS8.3] php8.0のインストール

centOS8.3にphp8.0をインストールします。

# cat /etc/redhat-release
CentOS Linux release 8.3.2011

# dnf install https://rpms.remirepo.net/enterprise/remi-release-8.rpm
# dnf module list php
CentOS Linux 8 – AppStream
Name Stream Profiles Summary
php 7.2 [d] common [d], devel, minimal PHP scripting language
php 7.3 common [d], devel, minimal PHP scripting language
php 7.4 common [d], devel, minimal PHP scripting language

Remi’s Modular repository for Enterprise Linux 8 – x86_64
Name Stream Profiles Summary
php remi-7.2 common [d], devel, minimal PHP scripting language
php remi-7.3 common [d], devel, minimal PHP scripting language
php remi-7.4 common [d], devel, minimal PHP scripting language
php remi-8.0 common [d], devel, minimal PHP scripting language

# dnf install php80
# dnf install php80-php-cli php80-php-pdo php80-php-fpm php80-php-json php80-php-mysqlnd php80-php-mbstring php80-php-xml
# php80 -v
# sudo alternatives –install /usr/bin/php php /usr/bin/php80 1
# php -v
PHP 8.0.9 (cli) (built: Jul 29 2021 12:53:58) ( NTS gcc x86_64 )
Copyright (c) The PHP Group
Zend Engine v4.0.9, Copyright (c) Zend Technologies

OK^^

simplexml_load_file() でRSSHubから取得できない時

ブラウザからは閲覧できるが、simplexml_load_fileで取得できない。

$rss = simplexml_load_file('https://rsshub.app/36kr/newsflashes');
print_r($rss);

こちらの記事を参考に、ユーザエージェントを指定します。
https://stackoverflow.com/questions/26896633/why-simplexml-load-file-can-not-use-some-xml-rss

$ch = curl_init('https://rsshub.app/36kr/newsflashes');
curl_setopt($ch, CURLOPT_RETURNTRANSFER, true);

curl_setopt($ch, CURLOPT_USERAGENT, 'Mozilla/5.0 (Windows NT 6.3; Win64; x64) AppleWebKit/537.36 (KHTML, like Gecko) Chrome/37.0.2049.0 Safari/537.36');

$feed = curl_exec($ch);
$rss = new SimpleXMLElement($feed);

これでテストしてOKです。
サーバ側でどうやって制御してるのかはきになるところです。