【Rust】OpenAIの画像生成AIを使ってみる

open ai reference
https://platform.openai.com/docs/api-reference/images/create
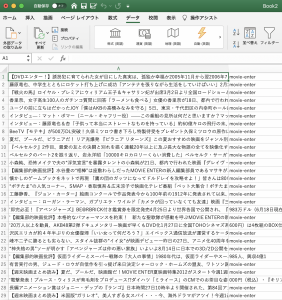
なんじゃこりゃ…

use std::io::{stdout, Write};
use curl::easy::{Easy, List};
use dotenv::dotenv;
use std::env;


fn main() {
    let _ = dotenv();
    let auth = format!("Authorization: Bearer {}", &env::var("OPENAI_API_KEY").unwrap());
    let mut list = List::new();
    list.append("Content-Type: application/json").unwrap();
    list.append(&auth).unwrap();
    
    let mut handle = Easy::new();
    handle.url("https://api.openai.com/v1/images/generations").unwrap();
    handle.post(true).unwrap();
    handle.http_headers(list).unwrap();

    let post_field_bytes = "{ \"model\": \"dall-e-3\", \"prompt\": \"A cute baby sea otter\", \"n\": 1, \"size\": \"1024x1024\"}".as_bytes();
    handle.post_fields_copy(post_field_bytes).unwrap();

    handle.write_function(|data| {
    stdout().write_all(data).unwrap();
    Ok(data.len())
    }).unwrap();

    handle.perform().unwrap();

}

Compiling sample v0.1.0 (/home/vagrant/dev/rust/sample)
Finished `dev` profile [unoptimized + debuginfo] target(s) in 0.58s
Running `target/debug/sample`
{
“created”: 1738034805,
“data”: [
{
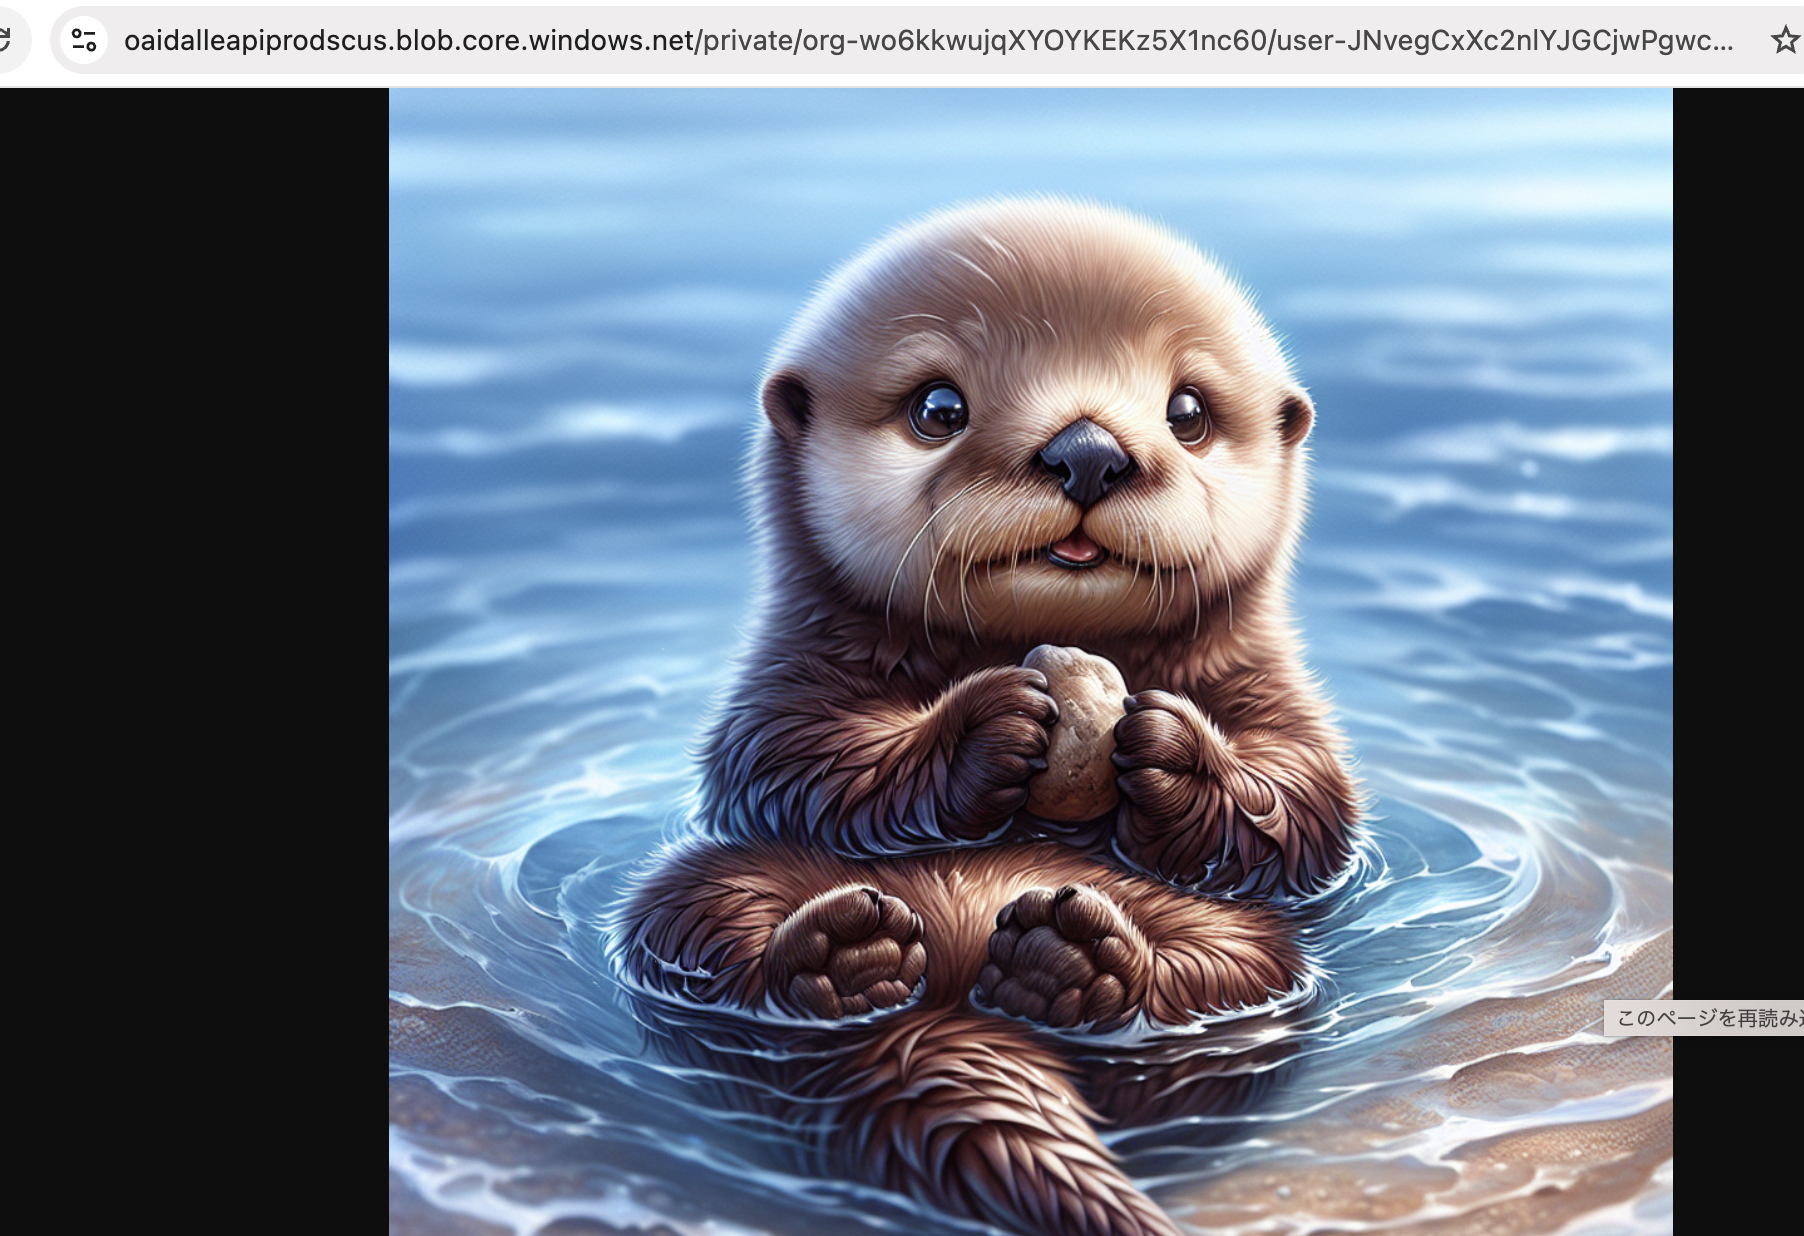
“revised_prompt”: “Imagine a charming depiction of a baby sea otter. This adorable little creature is floating on its back in the gentle waves of a clear blue ocean. Its fur, a shade of rich brown, is slick and slightly wet from its playful activities in the water. The otter’s bright, curious eyes are looking directly towards us, as if inviting us to join the fun. It is holding a small, smooth pebble with its tiny paws, perhaps preparing to break open a shell for a feast. The entire image exudes a sense of playfulness, innocence and natural beauty.”,
“url”: “https://oaidalleapiprodscus.blob.core.windows.net/private/org-wo6kkwujqXYOYKEKz5X1nc60/user-JNvegCxXc2nlYJGCjwPgwcv7/img-Z6WR4EMZFstjPwV7BQriTyyf.png?st=2025-01-28T02%3A26%3A45Z&se=2025-01-28T04%3A26%3A45Z&sp=r&sv=2024-08-04&sr=b&rscd=inline&rsct=image/png&skoid=d505667d-d6c1-4a0a-bac7-5c84a87759f8&sktid=a48cca56-e6da-484e-a814-9c849652bcb3&skt=2025-01-28T00%3A53%3A13Z&ske=2025-01-29T00%3A53%3A13Z&sks=b&skv=2024-08-04&sig=V2MXStLlOGdaaB7OOT65JzvSFLRA9zOMHOLN8UPOg1o%3D”
}
]
}

面白いんだけど、サービスとして提供するのは抵抗あるな…

【Rust】OpenAIのAPIを使ってみる

APIキーをenvファイルに設定しなければならないので、OSSとして使うのは無理があるな…

use dotenv::dotenv;
use std::env;
use openai_api_rust::*;
use openai_api_rust::chat::*;
use openai_api_rust::completions::*;

fn main() {
    let _ = dotenv();
    let auth = Auth::new(&env::var("OPENAI_API_KEY").unwrap());
    let openai = OpenAI::new(auth, "https://api.openai.com/v1/");
    let body = ChatBody {
        model: "gpt-3.5-turbo".to_string(),
        max_tokens: Some(100),
        temperature: Some(0_f32),
        top_p: Some(0_f32),
        n: Some(2),
        stream: Some(false),
        stop: None,
        presence_penalty: None,
        frequency_penalty: None,
        logit_bias: None,
        user: None,
        messages: vec![Message { role: Role::User, content: "有名なキャラクターは?".to_string() }],
    };
    let rs = openai.chat_completion_create(&body);
    let choice = rs.unwrap().choices;
    let message = &choice[0].message.as_ref().unwrap();
    println!{"{}", message.content};
}

Finished `dev` profile [unoptimized + debuginfo] target(s) in 1.14s
Running `target/debug/sample`
有名なキャラクターには、以下のようなものがあります。

– ミッキーマウス(ディズニーキャラクター)
– マリオ(任天堂のゲーム「スーパーマリオブラザーズ」の主人公)
– ピカチュウ(ポケモンの一匹)

Python・Mecab・ディープラーニングを用いたテキストのジャンル分類

$ pip3 install numpy
$ pip3 install scikit-learn
$ pip3 install pandas

scikit-learnはpythonで使用できる機械学習ライブラリ
ニュースコーパスは livedoorニュースコーパス を使用します。
livedoor ニュースコーパス

$ ls
text
$ cd text
$ ls
CHANGES.txt dokujo-tsushin livedoor-homme smax
README.txt it-life-hack movie-enter sports-watch
app.py kaden-channel peachy topic-news

app.py

import os, os.path
import csv

f = open('corpus.csv', 'w')
csv_writer = csv.writer(f, quotechar="'")
files = os.listdir('./')

datas = []
for filename in files:
	if os.path.isfile(filename):
		continue

	category = filename
	for file in os.listdir('./'+filename):
		path = './'+filename+'/'+file
		r = open(path, 'r')
		line_a = r.readlines()

		text = ''
		for line in line_a[2:]:
			text += line.strip()
		r.close()

		datas.append()
		print(text)
csv_writer.writerows(datas)
f.close()

$python3 app.py

以下のようなCSVファイルが生成されます。

### NNの仕組み
– 全てのテキストを形態素に分解し、全ての単語を把握した後、全ての単語に対してテキストに出現するかと言うベクトルを作成する。
– その後、ニューラルネットワークに対し、このベクトルを入力とし、出力をカテゴリとして学習を行う

nlp_tasks.py

# -*- coding: utf-8 -*-
#! /usr/bin/python3
import MeCab
from sklearn.feature_extraction.text import CountVectorizer

def _split_to_words(text):
	tagger = MeCab.Tagger('-O wakati')
	try:
		res = tagger.parse(text.strip())
	except:
		return[]
	return res

def get_vector_by_text_list(_items):
	count_vect = CountVectorizer(analyzer=_split_to_words)
	box = count_vect.fit_transform(_items)
	X = box.todense()
	return [X,count_vect]

models というフォルダを作成する

main.py

# -*- coding: utf-8 -*-
#! /usr/bin/python3
import pandas as pd
import numpy as np
from sklearn.preprocessing import LabelEncoder
from sklearn.externals import joblib
import os.path
import nlp_tasks

from sklearn.neural_network import MLPClassifier # アルゴリズムのmlp

def train():
	classifier = MyMLPClassifier()
classifier.train('corpus.csv')

def predict():
	classifier = MyMLPClassifier()
	classifier.load_model()
	result = classifier.predict(u"競馬の3歳馬日本一を決めるG1レース、「第88回日本ダービー」が行われ、4番人気のシャフリヤールが優勝しました。")
	print(result)

class MyMLPClassifier():
	model = None
	model_name = "mlp"

	def load_model(self):
		if os.path.exists(self.get_model_path())==False:
			raise Exception('no model file found!')
		self.model = joblib.load(self.get_model_path())
		self.classes = joblib.load(self.get_model_path('class')).tolist()
		self.vectorizer = joblib.load(self.get_model_path('vect'))
		self.le = joblib.load(self.get_model_path('le'))

	def get_model_path(self, type='model'):
		return 'models/'+self.model_name+"_"+type+".pkl"

	def get_vector(self,text)
		return self.vectorizer.transform()


	def train(self, csvfile):
		df = pd.read_csv(cavfile,names=('text','category'))
		X, vectorizer = nlp_tasks.get_vector_by_text_list(df["text"])

		le = LabelEncoder()
		le.fit(df['category'])
		Y = le.transform(df['category'])

		model = MLPClassifier(max_iter=300, hidden_layer_sizes=(100,),verbose=10,)
		model.fit(X, Y)

		# save models
		joblib.dump(model, self.get_model_path())
		joblib.dump(le.classes_, self.get_model_path("class"))
		joblib.dump(vectorizer, self.get_model_path("vect"))
		joblib.dump(le, self.get_model_path("le"))

		self.model = model
		self.classes = le.classes_.tolist()
		self.vectorizer = vectorizer

	def predict(self, query):
		X = self.vectorizer.transform([query])
		key = self.model.predict(X)
		return self.classes[key[0]]

if __name__ == '__main__':
	train()
	#predict()

$ ls
corpus.csv main.py models nlp_tasks.py text

$ python3 main.py
Iteration 1, loss = 4.24610757
Iteration 2, loss = 2.08110509
Iteration 3, loss = 1.70032200
Iteration 4, loss = 1.49572560
// 省略
Iteration 136, loss = 0.00257828
Training loss did not improve more than tol=0.000100 for 10 consecutive epochs. Stopping.

if __name__ == '__main__':
    # train()
    predict()

$ python3 main.py
sports-watch

まじかーーーーーーーーーーーーーーーーーー
Sugeeeeeeeeeeeeeeeeeeeeeeeeeeeeeee

単純パーセプトロン

線形分類器の出力を-100, -200などの数値ではなく、確率で出力する
W^TX

0~1の間の値を取るようにシグモイド関数(sigmoid function)を使う
a = 1 / 1+exp(-a)
a = w1x1 + w2x2 + w3x3 + w4x4

このような分類器を単純パーセプトロンと呼び、もっとも簡単なニューラルネットワークである
どのような確率で出力されるかは特徴ベクトルxと重みベクトルwによって決まる

クロスエントロピー: 2つの確率分布の間に定義される尺度

なるほど^^

[OpenCV4.5.0] 画像をランダムフォレストで学習して判定したい3 ~ 判定

学習データを coffee.pkl に保存します。

clf = RandomForestClassifier()
clf.fit(x_train, y_train)

joblib.dump(clf, 'coffee.pkl')

学習データの画像とは別に判定したいターゲット画像を用意します。

fire_11.jpg

black_11.jpg

georgia_11.jpg

学習データを作ったように同じようリサイズ、リシェイプして判定(predict)します。

import cv2
import joblib

def predict_coffee(filename):
	clf = joblib.load("coffee.pkl")

	path = "img/target/"
	img = cv2.imread(path + filename)
	img = cv2.resize(img, (48, 64))
	img = img.reshape((-1, 9216))
	res = clf.predict(img)

	if res[0] == 0:
		print(filename + " = BLACK無糖")
	elif res[0] == 1:
		print(filename + " = FIRE微糖")
	else:
		print(filename + " = Georgia blend")
	

predict_coffee("black_11.jpg")
predict_coffee("fire_11.jpg")
predict_coffee("georgia_11.jpg")

$ python3 app.py
black_11.jpg = BLACK無糖
fire_11.jpg = FIRE微糖
georgia_11.jpg = Georgia blend

やば。。。。
blackに関しては、”Black”の文字ないのに判定できちゃうんだ。。。

ちょっと人生頑張ってみるわ。。

[OpenCV4.5.0] 画像をランダムフォレストで学習して判定したい2 ~学習

画像を用意済み。

画像サイズは864x1152pxなので、(48, 64)にします。
データラベルは、FIRE微糖=0、Georgia blend=1、BLACK無糖=2 とします。
リサイズして、一次元に展開して配列に入れる。

import cv2
import os, glob
import joblib

from sklearn.model_selection import train_test_split
from sklearn import datasets, metrics
from sklearn.ensemble import RandomForestClassifier
from sklearn.metrics import accuracy_score


image_size = (48, 64) # 864:1152(3:4)の画像の為
path_black = "img/black"
path_fire = "img/fire"
path_georgia = "img/georgia"

x = [] # 画像
y = [] # ラベル

def read_dir(path, label):
	files = glob.glob(path + "/*.jpg")
	for f in files:
		img = cv2.imread(f)
		img = cv2.resize(img, image_size)
		img_data = img.reshape(-1, )
		x.append(img_data)
		y.append(label)

read_dir(path_black, 0)
read_dir(path_fire, 1)
read_dir(path_georgia, 2)

x_train, x_test, y_train, y_test = train_test_split(x, y, test_size=0.2)

clf = RandomForestClassifier()
clf.fit(x_train, y_train)

y_pred = clf.predict(x_test)
print(accuracy_score(y_test, y_pred))

6回テストしてaccuracy_scoreはこんな感じ。平均して91%くらい。
$ python3 app.py
0.8333333333333334
$ python3 app.py
1.0
$ python3 app.py
1.0
$ python3 app.py
1.0
$ python3 app.py
0.6666666666666666
$ python3 app.py
1.0

91%の精度ってどうなんだろう。画像を取る角度を一定にすれば、もっと精度は上がりそうな気がする。

[OpenCV4.5.0] 画像をランダムフォレストで学習して判定したい1 ~写真の用意

まず画像の用意から。
缶コーヒーで(1)FIRE微糖、(2)Georgia blend、(3)BLACK無糖を用意する。

続いて、各缶コーヒーの写真を取る。取り敢えず、10枚ずつ位。
(1)FIRE微糖

(2)Georgia blend

(3)BLACK無糖

どの写真がどの缶コーヒーかラベリングをしたいので、画像の名前を変更する。
fireは fire_${i}.jpg、 Georgia blendは georgia_${i}.jpg、BLACK無糖は black_${i}.jpgにする。

centos8
imgフォルダの中にblack, fire, georgiaフォルダを作成し、その中にそれぞれの画像を入れる。

続いて、これらの画像を学習していきます。

[sklearn] 手書き数字のデータセットから学習

まずmatplotlibとsklearnを入れます。

$ sudo pip3 install matplotlib
$ sudo pip3 install sklearn

scikit-learnに付属しているHandwritten Digits Data Setを使います。

import matplotlib.pyplot as plt

from sklearn import datasets
digits = datasets.load_digits()

d0 = digits.images[0]
print(d0)

$ python3 app.py
[[ 0. 0. 5. 13. 9. 1. 0. 0.]
[ 0. 0. 13. 15. 10. 15. 5. 0.]
[ 0. 3. 15. 2. 0. 11. 8. 0.]
[ 0. 4. 12. 0. 0. 8. 8. 0.]
[ 0. 5. 8. 0. 0. 9. 8. 0.]
[ 0. 4. 11. 0. 1. 12. 7. 0.]
[ 0. 2. 14. 5. 10. 12. 0. 0.]
[ 0. 0. 6. 13. 10. 0. 0. 0.]]

### 画像の学習

from sklearn.model_selection import train_test_split # 学習用データとテスト用データに分割
from sklearn import datasets, svm, metrics # データセット、SupportVectorMachine, metrics
from sklearn.metrics import accuracy_score

digits = datasets.load_digits()
x = digits.images # 画像
y = digits.target # 数字
x = x.reshape((-1, 64)) # 画像の二次元配列を一次元配列に変換

x_train, x_test, y_train, y_test = train_test_split(x, y, test_size=0.2)

# データ学習
clf = svm.LinearSVC()
clf.fit(x_train, y_train)

y_pred = clf.predict(x_test) # 学習データを元にテスト画像から数字を予測
print(accuracy_score(y_test, y_pred)) # 答えと予想の精度を確認

92%の精度
$ python3 app.py
/usr/local/lib64/python3.6/site-packages/sklearn/svm/_base.py:977: ConvergenceWarning: Liblinear failed to converge, increase the number of iterations.
“the number of iterations.”, ConvergenceWarning)
0.9277777777777778

手順としては、
(1)画像をピクセルの二次元配列データにして、データセットとラベルをセットに保存
(2)上記データセットを集める
(3)ピクセルの二次元配列を一次元配列に変換し、学習用データとテスト用データに分割する
(4)SVMで学習用データを学習
(5)テストデータから正解を予測
(6)制度をチェックする

### 学習済みデータの保存/呼び出し
※from sklearn.externals import joblibだとバインドされないので注意

import joblib
# 学習用データの保存
joblib.dump(clf, 'digits.pkl')

呼び出し

import joblib
clf = joblib.load("digits.pkl")

$ python3 app.py
0.9777777777777777

なるほど、OpenCVで画像を二次元配列にするわけだな
フローはほぼ理解した

MSEとR^2

MSEとR^2 って、六本木のバーのような名前ですが、
Mean Squared Error: MSE
→残差の2乗平均を取ったもの
1/n*nΣi=1(y実測値i – y予想値i)^2
あれ、MSEって、テストデータと検証データのnが一緒でないといけない??

決定係数: R^2
R^2 = 1 – MSE – / 1/n*nΣi=1(y実測値i – y予想値i)^2 (0≦R^2≦1)

MSE

from sklearn.metrics import mean_squared_error
y_true = [4, -0.2, 3, 6]
y_pred = [3.5, 0.0, 2, 8]

print(mean_squared_error(y_true, y_pred))

[vagrant@localhost python]$ python app.py
1.3225

R^2

from sklearn.metrics import r2_score
y_true = [4, -0.2, 3, 6]
y_pred = [3.5, 0.0, 2, 8]

print(r2_score(y_true, y_pred))

[vagrant@localhost python]$ python app.py
0.7365537848605578

交差検証法

統計学において標本データを分割し、その一部を解析して、残る部分で解析のテストを行い、解析の妥当性の検証・確認に当てる
→ これ以上標本を集めるのが困難な場合に有効

主な種類
– ホールドアウト検証
初期標本群から事例を無作為に抽出
– K-分割交差検証
標本群をK個に分割し、その一つをテスト事例、残りを訓練事例
– Leave-one-out cross validation
標本群から一つだけ抜き出し、残りを訓練。これを全事例が一回ずつテスト事例になるよう繰り返す

色々手法があるが、やはり信ぴょう性にはデータ量が物を言うような印象