Githubのcommitは以下のように書く
Fixed bug *, Added new, Changed, Updated, Removed, Simplified, Restructured, Rewrote
e.g.
Fixed a bug where the "paste as text" option in the Paste Plugin didn't work.
OSSのchange logの書き方は非常に参考になる。
ソフトウェアエンジニアの技術ブログ:Software engineer tech blog
随机应变 ABCD: Always Be Coding and … : хороший

Githubのcommitは以下のように書く
Fixed bug *, Added new, Changed, Updated, Removed, Simplified, Restructured, Rewrote
e.g.
Fixed a bug where the "paste as text" option in the Paste Plugin didn't work.
OSSのchange logの書き方は非常に参考になる。
公式ドキュメント:
Mastering Issues
公式を読むと、Milestones, Labels, Assignees, Notifications, mentions, References, Search, Overviews, Reportsなどの機能がある。
Github Markdown:Mastering Markdown
– 一つのissueに一つの事柄
– 画像はドラッグ&ドロップで貼り付けられる
書き方
– 概要、作業手順、チェック項目は出来るだけ細かく書く
– ブランチ名にissueの番号を使う
— feature${issueNumber}
$ git branch feature${id}
$ git checkout feature${id}
$ git branch
pull requestをmergeしたらissueはcloseする。
### vagrant環境(ローカル)
$ git init
$ git status
$ git add .
$ git commit -m “application to the github”
### リポジトリの作成
– プライベートリポジトリ作成
$ git remote add origin https://github.com/${username}/${repositoryName}.git
### git push
$ git push -u origin master
Username for ‘https://github.com’: ${username}
Password for ‘https://${username}@github.com’
↓
remote: Invalid username or password.
パスワードを正しく入力してもエラーが出ます。
### 解決方法
Github右上のハンバーガーメニュー -> “Settings” -> right menu “Developer Settings” -> Personal access tokens -> generate token
Full control of private repositoriesにチェックを入れて、tokenを発行
発行されたトークンをパスワードに入力すれば、pushできます。
Username for ‘https://github.com’: ${username}
Password for ‘https://${username}@github.com’ : ${generated token}
github 公式
https://help.github.com/en/github/authenticating-to-github/creating-a-personal-access-token-for-the-command-line
username, passwordは間違ってないのだから、エラーメッセージに”Invalid username or password”って出すの辞めて欲しい。反面教師にしよう。
git hub wikiにプロジェクトのドキュメントを書いていく
記事単位のブログと違って、ページ単位だから、ノウハウ系のドキュメントはブログよりも管理しやすく、後から振り返る時も分かり易いかも。。
ブログはメモ、トラブルシューティング、自由日記みたいな感じだが、github wikiはどちらかというと、体系立てて、よりフォーマルな記述か。。
githubでリポジトリを作った後、以下の手順でpushする
$ git init
$ git commit –allow-empty -m “first commit”
$ git remote add origin https://github.com/${username}/${repository}.git
$ git push -u origin master
空リポジトリをgit cloneして、そこからgit pushするわけではないのね。
道理で、git cloneした後に、${repository}/.git をmvコマンドでcurrentに移動するのはなんかおかしいな~と思ってた。。
yum installだとgit 1.7.1が入り、テンションだだ下がりなので、最新のgitをgzファイルからインストールします。
# git install
# 依存ライブラリインストール
$ sudo yum -y install gcc curl-devel expat-devel gettext-devel openssl-devel zlib-devel perl-ExtUtils-MakeMaker autoconf
# インストール場所に移動
$ cd /usr/local/src/
# ダウンロード対象を確認(https://mirrors.edge.kernel.org/pub/software/scm/git/)
# 今回は git-2.19.2.tar.gzを使う
$ sudo wget https://mirrors.edge.kernel.org/pub/software/scm/git/git-2.19.2.tar.gz
# ファイル解凍
$ sudo tar xzvf git-2.12.2.tar.gz
# 不要ファイル削除
$ sudo rm -rf git-2.19.2.tar.gz
# 移動してmake
$ cd git-2.19.2
$ sudo make prefix=/usr/local all
$ sudo make prefix=/usr/local install
# git version確認
$ git –version
git version 2.19.2
ふぅ
pull = fetch + merge origin/master
What is “git fetch”?
For git, there are two repositories: remote and local. Fetch is a command that brings the latest information from the remote repository to the local repository. Fetching does not mean that the file is updated like pull. Only the local repository is updated.
[vagrant@localhost test]$ git –version
git version 1.7.1
[vagrant@localhost test]$ git clone https://github.com/githubix/test.git
Initialized empty Git repository in /home/vagrant/local/app/test/test/test/.git/
remote: Enumerating objects: 45, done.
remote: Total 45 (delta 0), reused 0 (delta 0), pack-reused 45
Unpacking objects: 100% (45/45), done.
[vagrant@localhost test]$ ls
test
[vagrant@localhost test]$ git log origin/master
commit e4c42320159a32a377eb60249f9d5277f809c1bd
Author: githubix <@hotmail.com>
Date: Mon Jul 1 23:16:01 2019 +0900
Update test.php
commit 180cf3fcce48d905ede71a57ed0bd3973e1f90c8
Author: githubix <@hotmail.com>
Date: Mon Jan 28 08:45:42 2019 +0900
Update test.php
commit 812d49e3beb82bafe3699787ade3de5bf5d2f48f
Author: githubix <@hotmail.com>
Date: Fri Jan 25 09:09:15 2019 +0900
Update test.php
commit 5b3c59d4795b3a73e8723b35ffa58b2a6c262974
[vagrant@localhost test]$ git fetch –all
Fetching origin
なんか理解が足りんな。。
What is waffle.io??
A tool that can visualize GitHub issues and pull requests as signs. By making the status of Issue and Pullrequest into a signboard, it becomes possible to grasp each progress on one screen.
https://waffle.io/${Github usename}/${Github repository name}
You can use Waffle simply by accessing in this way.
あれ、終わってね??

First of all, as a basic concept of git diff, the basic behavior of “git diff” is “display of changes made in the working tree”.
Then, if you do not specify the comparison source, you can specify “comparison source” as an argument, but by default, the difference when compared with “index” → ”working tree” with “index” as the comparison source and it will display.
[vagrant@localhost tests]$ git diff
diff –git a/sample.txt b/sample.txt
deleted file mode 100644
index 106287c..0000000
— a/sample.txt
+++ /dev/null
@@ -1 +0,0 @@
-Hello Git!
diff –git a/tests/test b/tests/test
— a/tests/test
+++ b/tests/test
@@ -1 +1 @@
-Subproject commit 180cf3fcce48d905ede71a57ed0bd3973e1f90c8
+Subproject commit 180cf3fcce48d905ede71a57ed0bd3973e1f90c8-dirty
[vagrant@localhost tests]$ git diff –name-only
sample.txt
tests/test
あれ?
[vagrant@localhost test]$ git diff –name-only
addfile.txt
[vagrant@localhost test]$
OK、理解した。
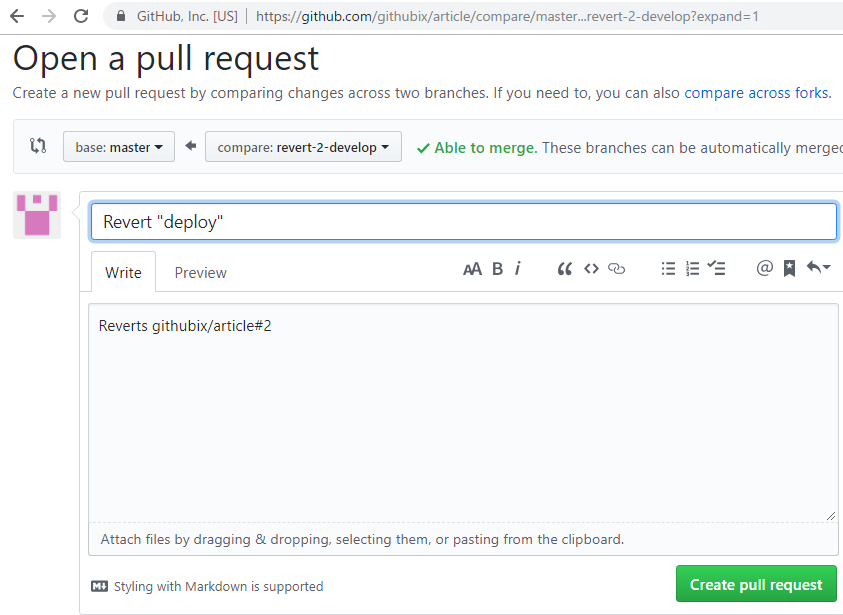
Those that pushed to the remote repository can not be rewound to the past state, or other members may start working. (It is possible to use supplementary git reset)
Roll back by executing the following command and pushing the processing opposite to the pushed contents.
git revert <commit id>
git revert bd912e1
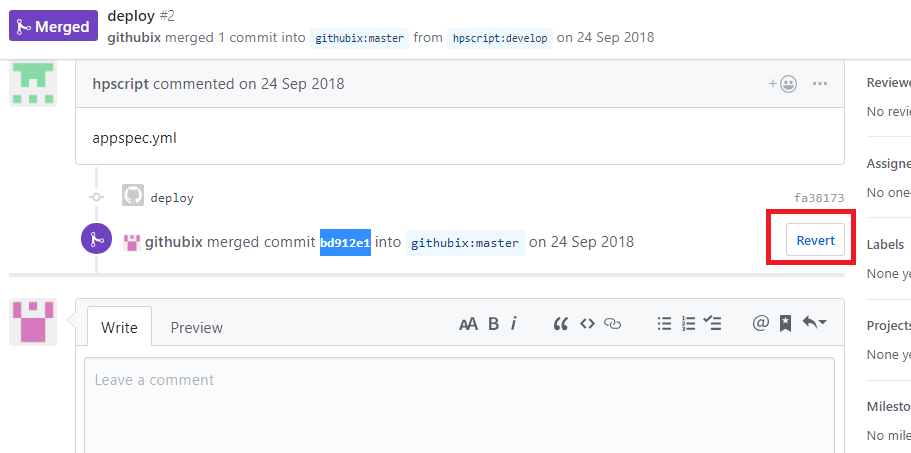
When if it is merged, execute the command.
git revert-m 1 <commit_ID>
git revert-m 1 bd912e1