[コンパイラ]加減算ができるコンパイラ

5+20-4のような式をアセンブラで書く

.intel_syntax noprefix
.global main

main:
	mov rax, 5
	add rax, 20
	sub rax, 4
	ret

$ cc -o tmp tmp.s
$ ./tmp
$ echo $?
21

これをCで書く

#include <stdio.h>
#include <stdlib.h> // strtol

int main(int argc, char **argv){
	if(argc != 2){
		fprintf(stderr, "引数の個数が正しくありません\n");
		return 1;
	}

	char *p = argv[1];

	printf(".intel_syntax noprefix\n");
	printf(".global main\n");
	printf("main:\n");
	printf("	mov rax, %ld\n", strtol(p, &p, 10)); // ldはlong d, strtolは文字列をlongに変換

	while(*p){
		if(*p == '+'){
			p++;
			printf("	add rax, %d\n", strtol(p, &p, 10));
			continue;
		}

		if(*p == '-'){
			p++;
			printf("	sub rax, %d\n", strtol(p, &p, 10));
			continue;
		}

		fprintf(stderr, "予期しない文字です: '%c'\n", *p);
		return 1;
	}

	printf("	ret\n");
	return 0;
}

strtolは数値を読み込んだ後、第2引数のポインタをアップデートして、読み込んだ最後の文字の次の文字を指すように値を更新

$ make
$ ./9cc ‘5+20-4’
.intel_syntax noprefix
.global main
main:
mov rax, 5
add rax, 20
sub rax, 4
ret

[コンパイラ]テストスクリプト

test.sh

#!bin/bash
assert(){
	expected="$1"
	input="$2"

	./9cc "$input" > tmp.s
	gcc -o tmp tmp.s
	./tmp
	actual="$?"

	if [ "$actual" = "$expected" ]; then
		echo "$input => $actual"
	else
		echo "$input => $expected expected, but got $actual"
		exit 1
	fi
}

assert 0 0
assert 42 42

echo OK

$ ls
9cc 9cc.c test.sh tmp tmp.s
$ sudo chmod a+x test.sh
$ sh test.sh
0 => 0
42 => 42
OK

Makefile

CFLAGS=-std=c11 -g -static

9cc: 9cc.c

test: 9cc
	sh test.sh

clean:
	rm -f 9cc *.o *~ tmp*

.PHONY: test clean

[コンパイラ]初めてのコンパイラ作成

GCCの構文解析は、再帰下降構文解析法(recursive descent parsing)を使っている

下記のシンプルなアセンブリもコンパイラと言える。

.intel_syntax noprefix
.globl main

main:
        mov rax, 42
        ret

### Intel記法とAT&T記法

mov rbp, rsp // intel
mov %rsp, %rbp // AT&T ...結果レジスタが第二引数にくる

mov rax, 8 // intel
mov $8, %rax // AT&T ...数字には$をつける

mov [rbp + rcx * 4 - 8], rax // intel
mov %rax, -8(rbp, rcx, 4) // AT&T 

### コンパイラの作成

#include <stdio.h>
#include <stdlib.h>

int main(int argc, char **argv){
	if(argc != 2){
		fprintf(stderr, "引数の個数が正しくありません\n");
		return 1;
	}

	printf(".intel_syntax noprefix\n");
	printf(".global main\n");
	printf("main:\n");
	printf("	mov rax, %d\n", atoi(argv[1]));
	printf("	ret\n");
	return 0;
}
$ gcc -o 9cc 9cc.c
$ ./9cc 345 > tmp.s
$  cat tmp.s
.intel_syntax noprefix
.global main
main:
	mov rax, 345
	ret

$ gcc -o tmp tmp.s
$ ./tmp
$ echo $?
89

あれ? 345が89になるな。何故だ? あ、0〜255の範囲でないと行けないからですな。

[コンパイラ]アセンブリ

### 関数のアセンブリ変換
呼び出した関数が終了した後に、元々実行していたアドレス(リターンアドレス)に戻ってくる必要がある
リターンアドレスはメモリ上のスタックに保存される
スタックは、スタックの一番上のアドレスを保持する1つの変数のみを使って実装できる
スタックトップを保持している記憶領域をスタックポインタという

c

#include <stdio.h>

int plus(int x, int y){
	return x + y;
}

int main(){
	return plus(3, 4);
}

アセンブリ

.intel_syntax noprefix
.globl plus, main

plus:
		add rsi, rdi
		mov rax, rsi
		ret

main:
        mov rdi, 3
        mov rsi, 4
        call plus
        ret

第一引数はRDIレジスタ、第二引数はRSIレジスタに入れる約束になっている
callは関数を呼び出す。具体的にはアドレスをスタックにプッシュし、ジャンプ
addはrsiレジスタに上書きされて保存される
返り値はRAXに入れることになっている
retでスタックからアドレスを1つポップ

CPUはメモリを読み書きすることでプログラムの実行を進めていく

[コンパイラ]CPUの命令とアセンブリ

コンパイラは、構文解析、中間パス、コード生成というステージがある
コンパイラが動作するマシンのことを「ホスト」、コンパイラが出力したコードが動作するマシンのことを「ターゲット」という
ホストとターゲットが異なるコンパイラをクロスコンパイラという

### CPU
現在実行中の命令アドレスをCPU内部に保持していて、そのアドレスから命令を読み出して、そこに書かれていることを行い、そして次の命令を読み出して実行する
現在実行中のアドレスのことをプログラムカウンタ(PC)やインストラクションポインタ(IP)という
cpuが実行するプログラム形式そのもののことを機械語(machine code)という
CPUの分岐命令(branch instruction)を使うと、次の命令以外の任意のアドレスに設定することができる(ジャンプ、分岐) eg.if文やループ文など
プログラムカウンタ以外にも少数のデータ保存領域を持っており、レジスタと呼ぶ
2つのレジスタの値を使って何らかの演算を行い、結果をレジスタに書き戻すというフォーマットになっている
命令を命令セットアーキテクチャ(instruction set architecture)という
x86-64命令セットはAMD64、Intel64, x64などと呼ばれることがある
-> awsでインスタンスを作ろうとするとき “64-bit x86″と表示されるが、このx86は命令セットのこと

### アセンブラ
アセンブリは機械語にほぼそのまま1対1で対応する言語
$ objdump -d -M intel /bin/ls

/bin/ls: file format elf64-x86-64

Disassembly of section .init:

0000000000003758 <_init@@Base>:
3758: 48 83 ec 08 sub rsp,0x8
375c: 48 8b 05 7d c8 21 00 mov rax,QWORD PTR [rip+0x21c87d] # 21ffe0 <__gmon_start__>
3763: 48 85 c0 test rax,rax
3766: 74 02 je 376a <_init@@Base+0x12>
3768: ff d0 call rax
376a: 48 83 c4 08 add rsp,0x8
376e: c3 ret

——–
3758: 48 83 ec 08 sub rsp,0x8
3758はメモリのアドレス
48 83 ec 08は命令の機械語
sub rsp,0x8はアッセンブリ rspから8を引く

### Cとアセンブラ

#include <stdio.h>

int main(int argc, char** argv[]){

	return 42; // 終了コード

}

$ gcc -o test test.c
$ ./test
$ echo $?  // 終了コードは$?にセットされる
42

### アセンブリファイルの作成
アセンブリファイルの拡張子は.s

.intel_syntax noprefix
.globl main
main:
	mov rax, 42
	ret

プログラミング勉強の良いところは、後からどんどん繋がってくることだな

configureの作成

cc コンパイラオプション
% cc [<オプション>] <ファイル名> [<ライブラリ>]

srcdir: コンパイルされるソースに対するディレクトリ
.ac: ユーザーのアクセス権限を証明

#!/bin/bash
cat >>Makefile.am <

# ビルドしてインストール
bin_PROGRAMS=test

#コンパイルする際のコンパイルオプション
#../configureなどルートディレクトリ以外で実行した時のインクルードディレクトリ
test_CFLAGS=-g -l @srcdir@/include/

#test_LDADDはライブラリ
test_LDADD= -lm

#ソースコード
test_SOURCES=test.c 

#ライブラリ用設定
include_HEADERS=test.h 
#ライブラリ作成する際のライブラリ名
lib_LIBRARIES=libtest.a 
#libtest.aのソースコード
libtest_a_SOURCES

#ビルドしないがインストールするファイル
#prefixオプションで指定したディレクトリ以下の/share/パッケージ名に配置
pkgdata_DATA=setting
#C言語からdesineとして参照
AM_CFLAGS= -DEVENTTABLE_CSV=""$(pkgdatadir)/setting""

#再帰的にmakeを実行
SUBDIRS= subdir subdir2/subsubdir 
EOF 
vim Makefile.am 
autoscan 
touch NEWS README AUTHORS ChangeLog 
awk '{if(/AC_INIT/){print "AC_INIT(FULL-PACKAGE-NAME, 0.0.1, name@hoge.jp)";print"AM_INIT_AUTOMAKE"}else{print $0}}' configure.scan >
congifure.ac 
vim configure.ac 
aclocal 
autoheader
autoconf
automake -a -c

configureスクリプト

configureスクリプトで設定する項目は、インストールディレクトリ、コンパイラやそのオプション、機能や追加オプションのオン・オフ、ソフトウェア実行時の設定のデフォルト値

インストールディレクトリの設定は、「–prefix=dirname」

$ ./configure --prefix=/opt/hello-2.7
$ make
$ sudo make install

vagrant@vagrant-ubuntu-trusty-64:~/other/hello-2.7$ /opt/hello-2.7/bin/hello
Hello, world!

–prefixを指定しないと、/usr/localにインストール。/usr/localはos標準外のソフトをインストール

shareディレクトリはプロセッサーのアークテクチャに寄らないファイル

./configure

vagrant@vagrant-ubuntu-trusty-64:~/other$ wget http://ftp.gnu.org/gnu/hello/hello-2.7.tar.gz
vagrant@vagrant-ubuntu-trusty-64:~/other$ tar zxvf hello-2.7.tar.gz
vagrant@vagrant-ubuntu-trusty-64:~/other$ cd hello-2.7
vagrant@vagrant-ubuntu-trusty-64:~/other/hello-2.7$ ls
ABOUT-NLS ChangeLog configure.ac gnulib man src
aclocal.m4 ChangeLog.O contrib INSTALL NEWS tests
AUTHORS config.in COPYING Makefile.am po THANKS
build-aux configure doc Makefile.in README TODO

慣習としてドキュメントは全て大文字

Makefile.am, Makefile.inはあるが、Makefileはありませんね。
環境に合わせたmakefileを作成するのが.congifureです。


Makefile.amは、プログラマが作成した定義ファイルでautomakeがMakefile.inを作成する。Makefile.inがMakefileを作成する

bitcoin/Makefile.amも、.configureでmakefileを作成する為のファイルですね^^ なるほどーすげー知識いるなー

./configureを実行します
vagrant@vagrant-ubuntu-trusty-64:~/other/hello-2.7$ ./configure
.
.
.
config.status: creating Makefile
config.status: creating contrib/Makefile
config.status: creating doc/Makefile
config.status: creating gnulib/lib/Makefile
config.status: creating man/Makefile
config.status: creating po/Makefile.in
config.status: creating src/Makefile
config.status: creating tests/Makefile
config.status: creating config.h
config.status: executing depfiles commands
config.status: executing po-directories commands
config.status: creating po/POTFILES
config.status: creating po/Makefile

vagrant@vagrant-ubuntu-trusty-64:~/other/hello-2.7$ ./configure | grep ‘checking’ | wc -l
202

あれ、よく見たら、Makefile.amとかみんなで作ってるけど。。。configureやmakefileまで作るレベルにならにゃいかん、ってことか。。

GNU

GNU hello
http://www.gnu.org/software/hello/
https://github.com/avar/gnu-hello

wgetのバージョンを見ます
vagrant@vagrant-ubuntu-trusty-64:~/bitcoin$ wget -V
GNU Wget 1.15 built on linux-gnu.

+digest +https +ipv6 +iri +large-file +nls +ntlm +opie +ssl/openssl

Wgetrc:
/etc/wgetrc (system)
Locale:
/usr/share/locale
Compile:
gcc -DHAVE_CONFIG_H -DSYSTEM_WGETRC=”/etc/wgetrc”
-DLOCALEDIR=”/usr/share/locale” -I. -I../../src -I../lib
-I../../lib -D_FORTIFY_SOURCE=2 -I/usr/include -g -O2
-fstack-protector –param=ssp-buffer-size=4 -Wformat
-Werror=format-security -DNO_SSLv2 -D_FILE_OFFSET_BITS=64 -g -Wall
Link:
gcc -g -O2 -fstack-protector –param=ssp-buffer-size=4 -Wformat
-Werror=format-security -DNO_SSLv2 -D_FILE_OFFSET_BITS=64 -g -Wall
-Wl,-Bsymbolic-functions -Wl,-z,relro -L/usr/lib -lssl -lcrypto
-ldl -lz -lidn -luuid ftp-opie.o openssl.o http-ntlm.o
../lib/libgnu.a

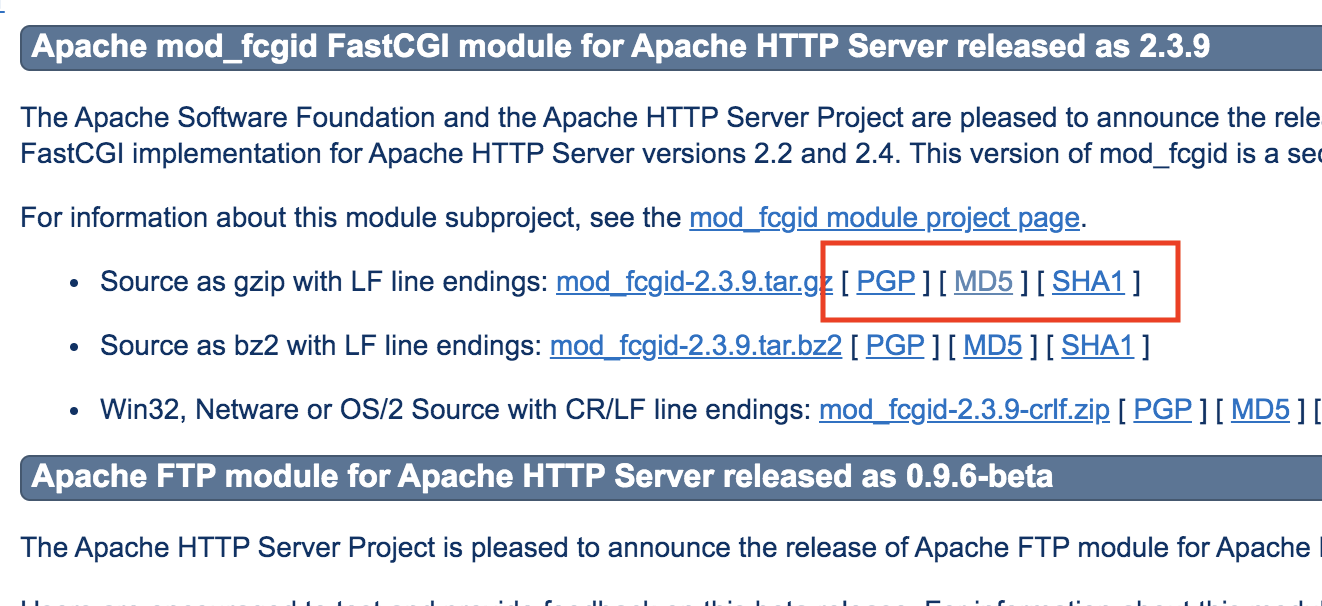
PGP, MD5, SHA1はチェックサム

e.g. ece4c66f0c05d216fc96969fcf3d1add *mod_fcgid-2.3.9.tar.gz
md5sumで確認する
$ md5sum -b httpd-2.2.19.tar.gz

vagrant@vagrant-ubuntu-trusty-64:~/bitcoin$ dpkg -l gnupg
Desired=Unknown/Install/Remove/Purge/Hold
| Status=Not/Inst/Conf-files/Unpacked/halF-conf/Half-inst/trig-aWait/Trig-pend
|/ Err?=(none)/Reinst-required (Status,Err: uppercase=bad)
||/ Name Version Architecture Description
+++-==============-============-============-=================================
ii gnupg 1.4.16-1ubun amd64 GNU privacy guard – a free PGP re

vagrant@vagrant-ubuntu-trusty-64:~/bitcoin$ gpg –list-keys
gpg: directory `/home/vagrant/.gnupg’ created
gpg: new configuration file `/home/vagrant/.gnupg/gpg.conf’ created
gpg: WARNING: options in `/home/vagrant/.gnupg/gpg.conf’ are not yet active during this run
gpg: keyring `/home/vagrant/.gnupg/pubring.gpg’ created
gpg: /home/vagrant/.gnupg/trustdb.gpg: trustdb created

make

main.c

main()
{
	hello();
}

hello.c

#include <stdio.h>
 
hello()
{
  printf("Hello, World!\n");
}

Makefile

hello: main.o hello.o

helloがターゲット

vagrant@vagrant-ubuntu-trusty-64:~/bitcoin$ make
cc -c -o hello.o hello.c
cc -c -o main.o main.c
cc hello.o main.o -o hello
vagrant@vagrant-ubuntu-trusty-64:~/bitcoin$ ./hello
Hello, World!

時間かかったー、これだけに30分費やした。。

vagrant@vagrant-ubuntu-trusty-64:~/bitcoin$ touch hello.c
vagrant@vagrant-ubuntu-trusty-64:~/bitcoin$ make
cc -c -o hello.o hello.c
cc hello.o main.o -o hello

ほう。

hello: main.o hello.o
clean:
	rm -f *.o hello

vagrant@vagrant-ubuntu-trusty-64:~/bitcoin$ make clean
rm -f *.o hello
vagrant@vagrant-ubuntu-trusty-64:~/bitcoin$ ls
hello.c main.c Makefile

all, test, install, cleanなどがある