[AWS CloudFormation] MySQLのRDSを構築する

AWSTemplateFormatVersion: "2010-09-09"
Description:
  RDS for MySQL Create

Metadata:
  "AWS::CloudFormation::Interface":
    ParameterGroups:
      - Label:
          default: "Project Name Prefix"
        Parameters:
          - PJPrefix
      - Label:
          default: "RDS Configuration"
        Parameters:
          - DBInstanceName
          - MySQLMajorVersion
          - MySQLMinorVersion
          - DBInstanceClass
          - DBInstanceStorageSize
          - DBInstanceStorageType
          - DBName
          - DBMasterUserName
          - DBPassword
          - MultiAZ

    ParameterLabels:
      DBInstanceName:
        default: "DBInstanceName"
      MySQLMajorVersion:
        default: "MySQLMajorVersion"
      MySQLMinorVersion:
        default: "MySQLMinorVersion"
      DBInstanceClass:
        default: "DBInstanceClass"
      DBInstanceStorageSize:
        default: "DBInstanceStorageSize"
      DBInstanceStorageType:
        default: "DBInstanceStorageType"
      DBName:
        default: "DBName"
      DBMasterUserName:
        default: "DBUserName"
      DBPassword:
        default: "DBPassword"
      MultiAZ:
        default: "MultiAZ"

# ------------------------------------------------------------#
# Input Parameters
# ------------------------------------------------------------# 
Parameters:
  PJPrefix:
    Type: String

  DBInstanceName:
    Type: String
    Default: "rds"
  MySQLMajorVersion:
    Type: String
    Default: "8.0"
    AllowedValues: ["5.7","8.0"]
  MySQLMinorVersion:
    Type: String
    Default: "28"
  DBInstanceClass:
    Type: String
    Default: "db.t3.micro"
  DBInstanceStorageSize:
    Type: String
    Default: "30"
  DBInstanceStorageSize:
    Type: String
    Default: "30"
  DBInstanceStorageType:
    Type: String
    Default: "gp2"
  DBName:
    Type: String
    Default: "db"
  DBMasterUserName:
    Type: String
    Default: "dbuser"
    NoEcho: true
    MinLength: 1
    MaxLength: 16
    AllowedPattern: "[a-zA-Z][a-zA-Z0-9]*"
    ConstraintDescription: "must begin with a letter and contain only alphanumeric characters."
  DBPassword:
    Default: "password"
    NoEcho: true
    Type: String
    MinLength: 8
    MaxLength: 41
    AllowedPattern: "[a-zA-Z0-9]*"
    ConstraintDescription: "must begin with a letter and contain only alphanumeric characters."
  MultiAZ:
    Default: "false"
    Type: String
    AllowedValues: ["true", "false"]

Resources:
# ------------------------------------------------------------#
#  DBInstance MySQL
# ------------------------------------------------------------#
  DBInstance:
    Type: "AWS::RDS::DBInstance"
    Properties:
      DBInstanceIdentifier: !Sub "${PJPrefix}-${DBInstanceName}"
      Engine: MySQL
      EngineVersion: !Sub "${MySQLMajorVersion}.${MySQLMinorVersion}"
      DBInstanceClass: !Ref DBInstanceClass
      AllocatedStorage: !Ref DBInstanceStorageSize
      StorageType: !Ref DBInstanceStorageType
      DBName: !Ref DBName
      MasterUsername: !Ref DBMasterUserName
      MasterUserPassword: !Ref DBPassword
      DBSubnetGroupName: !Ref DBSubnetGroup
      PubliclyAccessible: false
      MultiAZ: !Ref MultiAZ
      PreferredBackupWindow: "18:00-18:30"
      PreferredMaintenanceWindow: "sat:19:00-sat:19:30"
      AutoMinorVersionUpgrade: false
      DBParameterGroupName: !Ref DBParameterGroup
      VPCSecurityGroups:
        - !Ref RDSSecurityGroup
      CopyTagsToSnapshot: true
      BackupRetentionPeriod: 7
      Tags:
        - Key: "Name"
          Value: !Ref DBInstanceName
    DeletionPolicy: "Delete"

# ------------------------------------------------------------#
#  DBParameterGroup
# ------------------------------------------------------------#
  DBParameterGroup:
    Type: "AWS::RDS::DBParameterGroup"
    Properties:
      Family: !Sub "MySQL${MySQLMajorVersion}"
      Description: !Sub "${PJPrefix}-${DBInstanceName}-param"

# ------------------------------------------------------------#
#  SecurityGroup for RDS (MySQL)
# ------------------------------------------------------------#
  RDSSecurityGroup:
    Type: "AWS::EC2::SecurityGroup"
    Properties:
      VpcId: { "Fn::ImportValue": !Sub "${PJPrefix}-vpc" }
      GroupName: !Sub "${PJPrefix}-${DBInstanceName}-sg"
      GroupDescription: "-"
      Tags: 
        - Key: "Name"
          Value: !Sub "${PJPrefix}-${DBInstanceName}-sg"
# Rule
      SecurityGroupIngress:
        - IpProtocol: tcp
          FromPort: 3306
          ToPort: 3306
          CidrIp: { "Fn::ImportValue": !Sub "${PJPrefix}-vpc-cidr" }


# ------------------------------------------------------------#
#  DBSubnetGroup
# ------------------------------------------------------------#
  DBSubnetGroup:
    Type: "AWS::RDS::DBSubnetGroup"
    Properties:
      DBSubnetGroupName: !Sub "${PJPrefix}-${DBInstanceName}-subnet"
      DBSubnetGroupDescription: "-"
      SubnetIds:
        - { "Fn::ImportValue": !Sub "${PJPrefix}-private-subnet-a" }
        - { "Fn::ImportValue": !Sub "${PJPrefix}-private-subnet-c" }

# ------------------------------------------------------------#
# Output Parameters
# ------------------------------------------------------------#
Outputs:
#DBInstance
  DBInstanceID:
    Value: !Ref DBInstance
    Export:
      Name: !Sub "${PJPrefix}-${DBInstanceName}-id"

  DBInstanceEndpoint:
    Value: !GetAtt DBInstance.Endpoint.Address
    Export:
      Name: !Sub "${PJPrefix}-${DBInstanceName}-endpoint"

  DBName:
    Value: !Ref DBName
    Export:
      Name: !Sub "${PJPrefix}-${DBInstanceName}-dbname"

これはヤバいわ
なかなかやりおる

AWS Aurora入門

Amazon Auroraとは?
-> MySQL及びPostgreSQLに互換性を持った完全マネージド型のリレーショナルデータベース
-> MySQLの5倍、PostgreSQLの3倍のスループットを発揮
-> ストレージは10GBから最大64TBまで自動スケール

### 構成
Primary/Secondary構成とは異なり、クラスタ単位で構成される
クラスタエンドポイント、読み取りエンドポイント、カスタムエンドポイントがある

### 実際に作ってみる
– 前準備のrds-subnet-groupとrds security group作るまでに少し時間がかかった…

$ sudo yum install https://dev.mysql.com/get/mysql80-community-release-el7-3.noarch.rpm
$ rpm –import https://repo.mysql.com/RPM-GPG-KEY-mysql-2022
$ sudo yum install –enablerepo=mysql80-community mysql-community-server

$ mysql -h database-1.hoge.ap-northeast-1.rds.amazonaws.com –ssl-ca=.ssh/rds-ca-2019-root.pem -u admin -p

うおおおおおおおおおお
なんか超久しぶりだから焦りまくった…

Auroraでregional clusterとwriter instanceの違いがイマイチよくわからんが…
keep going

[RDS] snapshotから別のDBを起動する

### 1. RDS作成
まず、RDSでpostgreSQLを作成し、EC2から接続してデータを挿入します。

$ psql -h xxxxxx.*.ap-northeast-1.rds.amazonaws.com -U root -d postgres

CREATE TABLE playground (
    equip_id serial PRIMARY KEY,
    type varchar (50) NOT NULL,
    color varchar (25) NOT NULL,
    location varchar(25) check (location in ('north', 'south', 'west', 'east', 'northeast', 'southeast', 'southwest', 'northwest')),
    install_date date
);

INSERT INTO playground (type, color, location, install_date) VALUES ('slide', 'blue', 'south', '2022-04-28');
INSERT INTO playground (type, color, location, install_date) VALUES ('swing', 'yellow', 'northwest', '2022-08-16');

postgres=> SELECT * FROM playground;

### 2. snapshotsからrestore
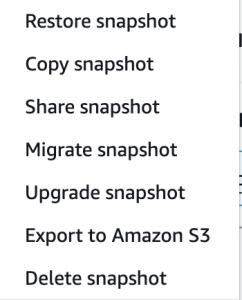
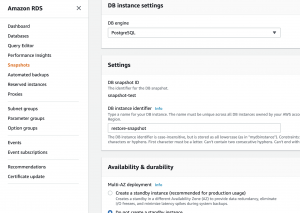
RDSのsnapshotsでsnapshotsを作成し、少し時間を置いてから、restoreを押下します。

するとDB作成時と同じ様な設定画面が表示される。

create databaseをすると元のDBとは別のDBが作成される

### restoreしたRDSに接続
endpointをコピーして、新しいDBの方に接続
$ psql -h xxxxxx.*.ap-northeast-1.rds.amazonaws.com -U root -d postgres
postgres=> SELECT * FROM playground;
equip_id | type | color | location | install_date
———-+——-+——–+———–+————–
1 | slide | blue | south | 2022-04-28
2 | swing | yellow | northwest | 2022-08-16
(2 行)

うおおおおおおおおおおおおおおお
これは凄い
完全に理解した

[AWS RDS] Postgresを作成し、pg_dumpでbackupを取得する

### 前準備
VPC, subnetを作って、EC2の作成

### DB用のネットワーク作成
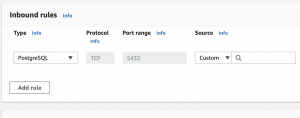
– Inbound rouleでPostgresとして、セキュリティグループはec2のセキュリティグループにする
 L これにより、ec2しかアクセスできないようになる

– EC2のVPCでpostgres用のsubnetを作成
 L 192.168.x.0/28とする

### RDSでpostgresの作成
– create database, postgres 13.3-R1
– db2.t.micro
– 作成に2~3分かかる。出来たら、endpointをメモ(hoge.fuga.ap-northeast-1.rds.amazonaws.com)

### EC2でpostgresのインストール
$ sudo yum update
$ sudo yum install -y postgresql.x86_64
// 接続
$ psql -h hoge.fuga.ap-northeast-1.rds.amazonaws.com -U root -d postgres
postgres=>

CREATE TABLE playground (
equip_id serial PRIMARY KEY,
type varchar (50) NOT NULL,
color varchar (25) NOT NULL,
location varchar(25) check (location in (‘north’, ‘south’, ‘west’, ‘east’, ‘northeast’, ‘southeast’, ‘southwest’, ‘northwest’)),
install_date date
);

INSERT INTO playground (type, color, location, install_date) VALUES (‘slide’, ‘blue’, ‘south’, ‘2022-04-28’);
INSERT INTO playground (type, color, location, install_date) VALUES (‘swing’, ‘yellow’, ‘northwest’, ‘2022-08-16’);

postgres=> SELECT * FROM playground;
equip_id | type | color | location | install_date
———-+——-+——–+———–+————–
1 | slide | blue | south | 2022-04-28
2 | swing | yellow | northwest | 2022-08-16

### バックアップの取得
$ sudo pg_dump -U root -h hoge.fuga.ap-northeast-1.rds.amazonaws.com -p 5432 postgres -f /home/ec2-user/test.sql
パスワード:
pg_dump: サーババージョン: 13.3、pg_dump バージョン: 9.2.24
pg_dump: サーババージョンの不整合のため処理を中断しています

なんやと! EC2のpostgresのバージョンをRDSのバージョンと合わせないといけないらしい

$ sudo yum install gcc
$ sudo yum install readline-devel
$ sudo yum install zlib-devel
$ cd /usr/local/src
$ sudo wget https://ftp.postgresql.org/pub/source/v13.3/postgresql-13.3.tar.gz
$ sudo tar -xvzf postgresql-13.3.tar.gz
$ cd postgresql-13.3
$ ./configure –prefix=/usr/local/postgresql-13.3/ –with-pgport=5432
$ make
$ sudo make install

再度バックアップの取得
$ /usr/local/postgresql-13.3/bin/pg_dump -U root -h hoge.fuga.ap-northeast-1.rds.amazonaws.com -p 5432 postgres -f /home/ec2-user/test.sql
$ cd /home/ec2-user/
$ ls
test.sql

うおおおおおおおおおおおおおおおおおおお
すげえ感動した

[AWS RDS] バックアップサイクルと保持期間

データベース(Amazon RDS)のバックアップ設定
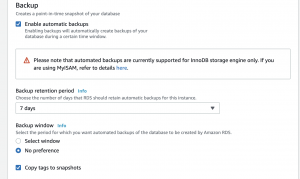
– バックアップサイクル 1回/日
– バックアップ保持期間 7日

このほか、RDSでは自動バックアップ(自動スナップショット)に加えて、5分毎にデータベース変更ログのアーカイブが自動で行われる

なるほど、バックアップからの復旧もカバーしとかないとあかんのか。
障害対応は神経使うな。

[AWS RDS] 1からの作成手順

1.subnetを2つ作成
rds-test-subnet-1a
rds-test-subnet-1c

2.ルートテーブルの作成
rds-test-routetable
L 作成したsubnet(rds-test-subnet-1a, rds-test-subnet-1c)を紐付ける

3.RDS用のSubnet group作成
rds-test-subnet-group
– 作成したsubnet(rds-test-subnet-1a, rds-test-subnet-1c)を紐付ける

4.RDS用のSecurity group作成
rds-test-security-group
L inbound ruleでsshログインできる様にしておく
L Type:MYSQL/Aurora, Protocol: TCP, Port Range: 3306

6. vpc
DNS hostnames ->Enable

5.RDSの作成
– rds-test-database
– MySQL8.0.20, db.t3.micro, General Purpose(SSD)20 GiB

6. rds-ca-2019-root.pem
rds-ca-2019-root.pemをダウンロードして、.sshに置く

7. ecからログインする
mysql -h ${endpoint}.ap-northeast-1.rds.amazonaws.com –ssl-ca=rds-ca-2019-root.pem -u root -p

vagrantからやると上手くいかんな。。。 

MultiAZのRDSを作成し、EC2からRDSに接続する方法

RDS用にavailability zoneが異なる二つのsubnetと、InternetGatewayに接続しないroute table, RDS用のsecuirtyグループを作成して、EC2と同じVPCの中にRDSを作成する。

## Private subnetの作成
privateなsubnetを二つ作成する。その際に、subnetのAvailability Zoneは別々にする。VPCは同じ

192.168.2.0/28(dev-subnet-private1)
 L ap-northeast-1a
192.168.3.0/28(dev-subnet-private2)
 L ap-northeast-1c

※以前作成したpublicなsubnet

192.168.1.0/28(dev-subnet-public) 
 L ap-northeast-1a

## Private route tableの作成
name:private-routetable
Private route tableにPrivate Subnetを紐付け

## RDS用のSubnet group作成
Services -> RDS -> Subnet group
name: ${appname}-subnet-group
vpc: 同じ
add subnet: private subnetを追加

192.168.2.0/28(dev-subnet-private1)
 L ap-northeast-1a
192.168.3.0/28(dev-subnet-private2)
 L ap-northeast-1c

## RDS用のSecurity group作成
name: rds-security-group
inbound rules:
Type:MYSQL/Aurora
Protocol: TCP
Port Range: 3306
Source: dev-security-group(ec2のセキュリティグループ)

### DB作成
MySQL
8.0.17(最新)
db.t.micro
General Purpose(SSD)
20 GiB
Subnet group: ${appname}-subnet-group
Security Group:rds-security-group

### EC2からDBインスタンスにログイン
1. EC2にssh
ssh ec2-user@*** -i ~/.ssh/***.pem

2. /.sshにrds-ca-2019-root.pemを配置

3. EC2からRDSにssh接続
mysql -h ${endpoint}.ap-northeast-1.rds.amazonaws.com –ssl-ca=.ssh/rds-ca-2019-root.pem -u root -p

Enter password:
Welcome to the MySQL monitor. Commands end with ; or \g.
Your MySQL connection id is 16
Server version: 8.0.17 Source distribution

Copyright (c) 2000, 2020, Oracle and/or its affiliates. All rights reserved.

Oracle is a registered trademark of Oracle Corporation and/or its
affiliates. Other names may be trademarks of their respective
owners.

Type ‘help;’ or ‘\h’ for help. Type ‘\c’ to clear the current input statement.

mysql>

この後.envファイルを編集します。

DB_CONNECTION=mysql
DB_HOST=${endpoint}.ap-northeast-1.rds.amazonaws.com
DB_PORT=3306
DB_DATABASE=${db_name}
DB_USERNAME=hoge
DB_PASSWORD=hogehoge

migrateして、上手くいけば、ec2からMySQLに入り、初期データを入れる為、クエリを実行します。
// 省略
Query OK, 1 row affected (0.01 sec)

HA(high availability)

HA refers to high availability, and to minimize the frequency and time that functions and services provided by the system are stopped or interrupted. Also, a system (HA) or a system configuration(HA configuration) in which such measures are taken may be simply referred to as HA.
In a narrow sense, multiple computers are bundled and operated in an integrated manner, and clustering technology that makes them behave as if they are one computer prevents the whole from stopping even if one stops. It refers to the state(HA cluster).

In a broad sense, it includes all techniques such as redundancy and multiplexing (duplexing) of equipment and systems, data replication and automatic switching, and a hot standby configuration and cold standby configuration in which two systems of the same system are prepared in some cases, HA may be promoted using database replication and the like (and their combination).

RDSのエラーログ

cliでRDSのログを確認するには、describe-db-log-files

aws rds describe-db-log-files --db-instance-identifier rds001

jsonから、ログのみに変更することも可

aws rds describe-db-log-files --db-instance-identifier rds001 --filename-contains error --output text

エラーログはmysql-error-running.logという名前で1時間ごとに出力される。
エラーログの中身は download-db-log-file-portionというコマンドを使う。

aws rds download-db-log-file-portion --db-instance-identifier rds001 --log-file-name error/mysql-error-running.log.6

– Error logs are written to the mysql-error.log file.
– mysql-error.log is flushed every 5minutes.
– The flushed content is added to mysql-error-running.log
– mysql-error-running.log is rotated hourly.
– Rotaed logs are kept for 24 hours.
– Each log file has UTC time appended to the file name(% H of rotated UTC time)
– Writing to the error log is only performed at startup, at shutdown, and at error detection.

なんだこりゃ、超重要やんけ。

binlogの保存期間

– RDSのbinlogの保存期間はデフォルト値では、NULLになっている。

binlogの保存期間を変更する際は、call mysql.rds_set_configurationで変更する。ふむふむ。

mysql> call mysql.rds_set_configuration('binlog retention hours', 24);