LinearLayoutのverticalとhorizontal

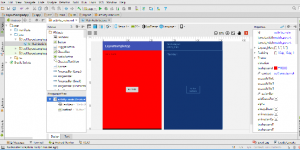
LinearLayoutのvertical中に、LinearLayoutのhorizontalで、tableのようなレイアウトを実現しています。

<?xml version="1.0" encoding="utf-8"?>
<LinearLayout xmlns:android="http://schemas.android.com/apk/res/android"
    xmlns:tools="http://schemas.android.com/tools"
    android:id="@+id/activity_main"
    android:layout_width="match_parent"
    android:layout_height="match_parent"
    android:paddingBottom="@dimen/activity_vertical_margin"
    android:paddingLeft="@dimen/activity_horizontal_margin"
    android:paddingRight="@dimen/activity_horizontal_margin"
    android:paddingTop="@dimen/activity_vertical_margin"
    android:orientation="vertical"
    tools:context="self.stopwatchapp.MainActivity">

    <TextView
        android:layout_width="match_parent"
        android:layout_weight="1"
        android:layout_height="0dp"
        android:gravity="center"
        android:textSize="64sp"
        android:textStyle="bold"
        android:id="@+id/timerLabel"
        android:text="00:00.000" />

    <LinearLayout
        android:layout_width="match_parent"
        android:layout_weight="1"
        android:orientation="horizontal"
        android:layout_height="0dp">

    <Button
        android:layout_width="0dp"
        android:layout_weight="1"
        android:text="Start"
        android:id="@+id/startButton"
        android:onClick="startTimer"
        android:layout_height="wrap_content"
        />

        <Button
            android:layout_width="0dp"
            android:layout_weight="1"
            android:text="Stop"
            android:id="@+id/stopButton"
            android:onClick="stopTimer"
            android:layout_height="wrap_content"
            />

        <Button
            android:layout_width="0dp"
            android:layout_weight="1"
            android:text="Reset"
            android:id="@+id/resetButton"
            android:onClick="resetTimer"
            android:layout_height="wrap_content"
            />

    </LinearLayout>
</LinearLayout>

classはbooleanで判定しています。

        startButton = (Button) findViewById(R.id.startButton);
        stopButton = (Button) findViewById(R.id.stopButton);
        resetButton = (Button) findViewById(R.id.resetButton);

        setButtonState(true, false, false);


    }

    public void setButtonState(boolean start, boolean stop, boolean reset){
        startButton.setEnabled(start);
        stopButton.setEnabled(stop);
        resetButton.setEnabled(reset);
    }

AndroidManifest.xml

AndroidManifest.xmlのandroid:parentActivityNameで、Activityを元画面に戻します。

 <application
        android:allowBackup="true"
        android:icon="@mipmap/ic_launcher"
        android:label="@string/app_name"
        android:supportsRtl="true"
        android:theme="@style/AppTheme">
        <activity android:name=".MyForm">
            <intent-filter>
                <action android:name="android.intent.action.MAIN" />

                <category android:name="android.intent.category.LAUNCHER" />
            </intent-filter>
        </activity>
        <activity android:name=".MyResult"
            android:parentActivityName="self.namescoreapp.MyForm"></activity>
    </application>

また、strings.xmlにtextを記載し、activityのxmlからは@string/で呼び出しています。

<EditText
        android:layout_width="0dp"
        android:layout_height="wrap_content"
        android:id="@+id/myEditText"
        android:layout_weight="1"
        android:hint="@string/name_hint" />

    <Button
        android:layout_width="wrap_content"
        android:layout_height="wrap_content"
        android:onClick="getScore"
        android:id="@+id/myButton"
        android:text="@string/button_label" />

getIntentとgetStringExtra

Activity間のやりとりは、intentを用いて呼び出します。putExtraで、データを引き渡します。

            Intent intent = new Intent(this, MyResult.class);
            intent.putExtra(EXTRA_MYNAME, myName);
            startActivity(intent);

MyResult.java

        Intent intent = getIntent();
        String myName = intent.getStringExtra(MyForm.EXTRA_MYNAME);
        TextView nameLabel = (TextView) findViewById(R.id.nameLabel);
        nameLabel.setText(myName + "の点数は...");

findViewByIdとgetText().toString()

エラー処理にはsetErrorを使います。その他、ToastやDialogなどがあります。

public void getScore(View view){
        // edit text取得
        EditText myEditText = (EditText)findViewById(R.id.myEditText);
        String myName = myEditText.getText().toString().trim();
        if (myName.equals("")){
        /*
        setError, toast, dialog
         */
         myEditText.setError("Please enter your name!");
        } 

Layout->New->Activityで、新しいActivityを作成できます。
%e7%84%a1%e9%a1%8c

Java new Random()によるおみくじ

public void getOmikuji(View view) {
        // TextViewの取得
        TextView tv = (TextView) findViewById(R.id.myTextView);
        String[] results = {
                "大吉",
                "吉",
                "凶"
        };
        // 乱数の生成
        Random randomGenerator = new Random();
        int num = randomGenerator.nextInt(results.length); // 0-2
        // 結果の表示
        //        String result = Integer.toString(num);
        tv.setText(results[num]);
    }

テーマの変更
rsc -> values -> styles.xml

<style name="AppTheme" parent="Theme.AppCompat.Light.NoActionBar">
        <!-- Customize your theme here. -->
        <item name="colorPrimary">@color/colorPrimary</item>
        <item name="colorPrimaryDark">@color/colorPrimaryDark</item>
        <item name="colorAccent">@color/colorAccent</item>
    </style>

activity_main.xmlはstrings.xmlへの記載することが推奨されています。
rsc -> values -> strings.xml

<resources>
    <string name="app_name">おみくじアプリ</string>

    <string name="omikuji_label">あなたの運勢は...</string>
    <string name="score_label">____</string>
    <string name="button_label">おみくじを引く</string>
</resources>

Android Studioが重すぎるとき


上の画面を作るのに6時間程度費やしました。
さて、studioが重すぎる時の対応案です。コンパイラであるgradleに起因している可能性があります。
https://developer.android.com/studio/build/index.html

1.Prgram Files > Android > Android Studio > bin > studio64.exe.vmpoptions
編集
※アクセス権がない場合は、アクセス権を変更してください。

-Xms1024m
-Xmx2048m
-XX:MaxPermSize=512m

2. c:\users\name\AndroidStudioProjects\MyAppnameApp\gradle.property 
コメントアウト・追記

org.gradle.daemon=true
org.gradle.jvmargs=-Xmx2048m -XX:MaxPermSize=512m -XX:+HeapDumpOnOutOfMemoryError -Dfile.encoding=UTF-8
org.gradle.parallel=true
org.gradle.configureondemand=true

3.settingでgradleをオフラインモードに変更

4.Setting -> Editor -> General -> Code Completion
autopop系は全てチェックボックスを外す

コンパイルの時間やIDEの操作がモチベーションを左右しますね。

android table layout

dpとはdensity-independent pixelsの略です。
リフェレンス:https://developer.android.com/guide/practices/screens_support.html

match_parent: 親要素の幅
wrap_content: 中身の幅
dp:任意の幅

android:layout_width="match_parent"
android:layout_width="wrap_content"
android:layout_width="160dp"
android:layout_height="160dp"

余白
android:layout_margin
android:padding
android:gravity, layout_gravity

android:layout_marginBottom="80dp"
android:layout_marginLeft="40dp"
android:paddingTop="10dp"
android:gravity="bottom"
android:layout_gravity="right"

android:layout_weight

android:layout_weight="1"

使用例

    <Button
        android:layout_weight="1"
        android:text="hello_world"
        android:layout_width="wrap_content"
        android:layout_height="0dp"
        android:id="@+id/button2" />

    <Button
        android:layout_weight="1"
        android:text="hello_world"
        android:layout_width="wrap_content"
        android:layout_height="0dp"
        android:id="@+id/button2" />

    <Button
        android:layout_weight="1"
        android:text="hello_world"
        android:layout_width="wrap_content"
        android:layout_height="0dp"
        android:id="@+id/button2" />

RelativeLayout

android:id="@+id/a"
android:layout_centerInParent="true"

android:id="@+id/b"
android:text="b"
android:layout_width="wrap_content"
android:layout_height="wrap_content"
android:layout_alignLeft="@+id/a"
android:layout_below="@+id/a"

FrameLayout

    <ImageView
        android:text="a"
        android:layout_width="200dp"
        android:layout_height="200dp"
        android:background="#f8bbd0"
        android:layout_centerInParent="true"
        />

    <ImageView
        android:text="a"
        android:layout_width="100dp"
        android:layout_height="100dp"
        android:background="#448aff"
        android:layout_centerInParent="true"
        />

    <ImageView
        android:text="a"
        android:layout_width="50dp"
        android:layout_height="50dp"
        android:background="#c2185b"
        android:layout_centerInParent="true"
&#91;/xml&#93;

table layout
&#91;xml&#93;
    <TableRow
        android:layout_width="wrap_content"
        android:layout_height="wrap_content">
        <Button android:layout_width="wrap_content"
            android:layout_height="wrap_content" android:text="1"></Button>
        <Button android:layout_width="wrap_content"
            android:layout_height="wrap_content"
            android:layout_span="2"
            android:text="1"></Button>
    </TableRow>
    <TableRow
        android:layout_width="wrap_content"
        android:layout_height="wrap_content">
        <Button android:layout_width="wrap_content"
            android:layout_height="wrap_content" android:text="1"></Button>
        <Button android:layout_width="wrap_content"
            android:layout_height="wrap_content"
            android:layout_column="2"
            android:text="1"></Button>
    </TableRow>
    <TableRow
        android:layout_width="wrap_content"
        android:layout_height="wrap_content">
        <Button android:layout_width="wrap_content"
            android:layout_height="wrap_content" android:text="1"></Button>
        <Button android:layout_width="wrap_content"
            android:layout_height="wrap_content" android:text="1"></Button>
        <Button android:layout_width="wrap_content"
            android:layout_height="wrap_content" android:text="1"></Button>
    </TableRow>

Android LinearlayoutとRelativeLayout

Paletteでview要素を追加、Component treeからpropertiesを選択し、調整していきます。
%e7%84%a1%e9%a1%8c

activity_main.xmlでrelative.layoutをLinerLayoutに変更します。
LinearLayout(Viewを縦もしくは横の一方向に順番に配置)
RelativeLayout(View同士の位置関係から相対的に配置)

android:orientation=”horizontal”と、android:orientation=”vertical”でレイアウト順序を変更できます。

<?xml version="1.0" encoding="utf-8"?>
<LinearLayout xmlns:android="http://schemas.android.com/apk/res/android"
    xmlns:tools="http://schemas.android.com/tools"
    android:id="@+id/activity_main"
    android:layout_width="match_parent"
    android:layout_height="match_parent"
    android:orientation="horizontal"
    >

    <Button
        android:text="hello_world"
        android:layout_width="wrap_content"
        android:layout_height="wrap_content"
        android:id="@+id/button2" />

    <Button
        android:text="hello_world"
        android:layout_width="wrap_content"
        android:layout_height="wrap_content"
        android:id="@+id/button2" />

    <Button
        android:text="hello_world"
        android:layout_width="wrap_content"
        android:layout_height="wrap_content"
        android:id="@+id/button2" />

</LinearLayout>

Android studioのインストール

androidのサイトより、android studioをインストールします。ダウンロード・起動に相当の時間がかかります。また、メモリを沢山使用するので確認しておきましょう。

ADVでエミュレーターを立ち上げて、動作確認します。
%e7%84%a1%e9%a1%8c

shiftキーを2回押して、line numberをonに切り替えます。
%e7%84%a1%e9%a1%8c

androidはjavaで書いていきます。画面のクラスの読み込みは、R.idです。

public void changeLabel(View view){
        TextView tv = (TextView)findViewById(R.id.mytextview);
        tv.setText("Changed!");
    }

端末の発着信履歴を表示

public class CallLogActivity implements SensorEventListener {
	SensorManager sensorManager;
	@Override
	public void onCreate(Bundle savedInstanceState){
		super.onCreate(savedInstanceState);
		setContentView(R.layout.main);
		
		sensorManager = (SensorManager) getSystemService(SENSOR_SERVICE);
		
		Cursor c = getContentResolver().query(
				android.provider.CallLog.Calls.CONTENT_URI, null, null, null,
				android.provider.CallLog.Calls.DATE+ " DESC");
		startManagingCursor(c);
		ListAdapter adapter = new SimpleCursorAdapter(this,
				R.layout.calllog_row, c, new String[] {
				android.provider.CallLog.Calls.TYPE,
				android.provider.CallLog.Calls.NUMBER,
				android.provider.CallLog.Calls.CACHED_NAME },
				new int[] { R.id.type, R.id.number, R.id.name }) {
			@Override
			public void setViewImage(ImageView v, String value){
				switch (Integer.parseInt(value)){
				case android.provider.CallLog.Calls.INCOMING_TYPE:
					v.setImageDrawable(getResources().getDrawable(android.R.drawable.sym_call_incoming));
					break;
				case android.provider.CallLog.Calls.MISSED_TYPE:
					v.setImageDrawable(getResources().getDrawable(android.R.drawable.sym_call_missed));
					break;
				case android.provider.CallLog.Calls.OUTGOING_TYPE:
					v.setImageDrawable(getResources().getDrawable(android.R.drawable.sym_call_outgoing));
					break;
					default:
						break;
				}
			}
		};
		setListAdapter(adapter);
	}
	
	// activity
	@Override
	protected void onResume(){
		super.onResume();
		sensorManager.registerListener(this,
				sensorManager.getDefaultSensor(Sensor.TYPE_ACCELERAOMETER),
				SensorManager.SENSOR_DELAY_UI);
	}
	@Override
	protected void onStop(){
		sensorManager.unregisterListener(this);
		super.onStop();
	}
	
	@Override
	protected void onListItemClick(ListView l, View v, int position, long id){
		telTo(((TextView) v.findViewById(R.id.number)).getText());
	}
	
	public void onSensorChanged(SensorEvent event){
		switch(event.sensor.getType()){
		case Sencor.TYPE_ACCELEROMETER:
			if (getSelectedItemPosition() > -1){
				if (Math.abs(event.values[0]) > SensorManager.GRAVITY_EARTH
				|| Math.abs(event.values[1]) > SensorManager.GRAVITY_EARTH
				|| Math.abs(event.values[2]) > SensorManager.GRAVITY_EARTH) {
					telTo(((TextView) getListView().getChildAt(
							getSelectedItemPosition()).findViewById(R.id.number)).getText());
				}
			}
			default:
		}
}