[Go] Variables, Functions その2

#### function
– Named return values
names should be used to document the meaning of the return values.

func split(sum int)(x, y int) {
	x = sum * 4 / 9
	y = sum - x
	return
}

func main(){
	fmt.Println(split(17))
}

$ go build hello.go && ./hello
7 10

### Variables
The var statement declares a list of variables, as in function argument lists, the type is last.

var c, python, java bool

func main(){
	var i int
	fmt.Println(i, c, python, java)
}

initializer
short variable
L inside a function, the := short assignment statement can be used in place of var declaration with implicit type.

var i, j int = 1, 2

func main(){
	var c, python, java = true, false, "no!"
	k := 3
	fmt.Println(i, j, k, c, python, java)
}

$ go build hello.go && ./hello
1 2 3 true false no!

Basic types
L bool, string, int, uint, byte, rune, float32, float64, complex64, complex128

import (
	"fmt"
	"math/cmplx"
)

var (
	ToBe bool = false
	MaxInt uint64 = 1<<64 -1
	z complex128 = cmplx.Sqrt(-5 + 12i)
)

func main(){
	fmt.Printf("Type: %T Value: %v\n", ToBe, ToBe)
	fmt.Printf("Type: %T Value: %v\n", MaxInt, MaxInt)
	fmt.Printf("Type: %T Value: %v\n", z, z)
}

$ go build hello.go && ./hello
Type: bool Value: false
Type: uint64 Value: 18446744073709551615
Type: complex128 Value: (2+3i)

Zero values

package main
import "fmt"

func main(){
	var i int
	var f float64
	var b bool
	var s string
	fmt.Printf("%v %v %v %q\n", i, f, b, s)
}

$ go build hello.go && ./hello
0 0 false “”

Type conversions
– The expression T(v) converts the value v to the type T.

import (
	"fmt"
	"math"
)

func main(){
	var x, y int = 3, 4
	var f float64 = math.Sqrt(float64(x*x + y*y))
	var z uint = uint(f)
	fmt.Println(x, y, z)
}

$ go build hello.go && ./hello
3 4 5

Type inference
– The variable’s type is inferred from the value on the right hand side.

func main(){
	v := 42
	fmt.Printf("v is of type %T\n", v)
}

$ go build hello.go && ./hello
v is of type int

Constants
– constants are declared like variables, but with the const keyword.

const Pi = 3.14

func main(){
	const World = "世界"
	fmt.Println("Hello", World)
	fmt.Println("Hello", Pi, "Day")

	const Truth = true
	fmt.Println("Go rules", Truth)
}

$ go build hello.go && ./hello
Hello 世界
Hello 3.14 Day
Go rules true

Numeric Constants

const (
	Big = 1 << 100
	Small = Big >> 99
)

func needInt(x int) int {return x*10 + 1}
func needFloat(x float64) float64 {
	return x * 0.1
}

func main(){
	fmt.Println(needInt(Small))
	fmt.Println(needFloat(Small))
	fmt.Println(needFloat(Big))
}

$ go build hello.go && ./hello
21
0.2
1.2676506002282295e+29

ふう…
英語だと変な脳みそ使うね

[Go] Packages, Variables, Functions その1

Every Go is made up of packages. Programs start running in package main.

package main
import(
	"fmt"
	"math/rand"
) 

func main(){
	fmt.Println("My favorite number is", rand.Intn(10))
}

$ go build hello.go && ./hello
My favorite number is 1

### import
“factored” import statement

import(
	"fmt"
	"math"
) 

func main(){
	fmt.Printf("Now you have %g problems.\n", math.Sqrt(7))
}

$ go build hello.go && ./hello
Now you have 2.6457513110645907 problems.

### Exported names
A name is exported if it begins with a capital letter
it can not be used “math.pi”

import(
	"fmt"
	"math"
) 

func main(){
	fmt.Println(math.Pi)
}

### Functions
A function can take zero or more arguments.
The type comes after variable name.

func add(x int, y int) int {
	return x + y
}

func main(){
	fmt.Println(add(22, 34))
}

$ go build hello.go && ./hello
56

When two or more consecutive named function parameters share a type, can omit the type from all but the last

func add(x, y int) int {
	return x + y
}

function can return any number of results

func swap(x, y string)(string, string) {
	return y, x
}

func main(){
	a, b := swap("hello", "go")
	fmt.Println(a, b)
}

$ go build hello.go && ./hello
go hello

おおお、なんか凄いな

[Go] 初めてのGo言語

$ sudo yum install golang
$ go version
go version go1.15.14 linux/amd64

### 基礎

package main
import(
	"fmt"
) 

func main(){
	// var name string = "yamada"
	name := "yamada"

	fmt.Println(name)
}

$ go build hello.go && ./hello
yamada

なんか世界観が変わるな

import(
	"fmt"
	"time"
) 

func main(){

	fmt.Println("The time is", time.Now())
}

$ go build hello.go && ./hello
The time is 2021-09-16 07:03:44.729927623 +0900 JST m=+0.000027657

なるほど、Go言語とTypeScriptで攻めたい

【React 17.0.2】jsonからデータを取得する

まずjsonデータを作成します。適当に株価で作ります。

{
	"stocks": [
		{"id": 4563, "name":"アンジェス", "price": 780},
		{"id": 9318, "name":"アジア開発キャピタル", "price": 9},
		{"id": 8256, "name":"プロルート丸光", "price": 283},
		{"id": 4755, "name":"楽天グループ", "price": 1132},
		{"id": 9984, "name":"ソフトバンクグループ", "price": 7179}
	]
}

### ReactのClassで書く場合

<script type="text/babel">
		class App extends React.Component{
			constructor(props){
				super(props)
				this.state = {
					isLoaded: false,
					error: null,
					stocks: []
				}
			}

			componentDidMount(){
				fetch("http://192.168.34.10:8000/data.json")
				.then(res=> res.json())
				.then(
					(result) => {
						this.setState({
							isLoaded: true,
							stocks: result.stocks
						});
					},
					(error) => {
					this.setState({
						isLoaded: true,
						error: error
					});
				})
			}

			render(){
				if(this.state.error){
					return <div>Error: {this.state.error.message}</div>
				} else if(!this.state.isLoaded) {
					return <div>Loading...</div>
				} else {
					return (
						<ul>
							{this.state.stocks.map( stock =>(
									<li key={stock.id}>
										{stock.name} {stock.price}
									</li>
								))}
						</ul>
					);
				}
			}

		}

		const target = document.getElementById('app');
		ReactDOM.render(<App />, target);
	</script>

### function(関数)で書く場合

function App(){
			const [data, setData] = React.useState([]);

			React.useEffect(() => {
				fetch("http://192.168.34.10:8000/data.json")
					.then((resoponse) => resoponse.json())
					.then((data) =>{
						setData(data.stocks);
				});
			}, []);

			return(
				<ul>
					{data.map( stock =>(
							<li key={stock.id}>
								{stock.name} {stock.price}
							</li>
						))}
				</ul>
			);
		}

		const target = document.getElementById('app');
		ReactDOM.render(<App />, target);

結果は同じですが、関数型の方が遥かに書きやすいですね。

これをbitcoinで実装する

function App(){
			const [data, setData] = React.useState([]);

			React.useEffect(() => {
				fetch("https://blockchain.info/ticker")
					.then((resoponse) => resoponse.json())
					.then((data) =>{
						setData(data.JPY);
				});
			}, []);

			console.log(data);

			return(
				<h1>ビットコイン価格(JPY):{data.last}</h1>
			);
		}

settime intervalでやりたい。

【React 17.0.2】Hooks

### useState
React本体に関数コンポーネント専用の保存領域を作成してもらい、そこにあるデータを読み書きできる

			const[count, setCount] = useState(0);
			return (
				<div onClick={()=>setCount(count+1)}>{count}</div>
			);

複数の値を扱うときは、複数のuseStateを使う

			const[count, setCount] = useState(0);
			const[isRed, setIsRed] = useState(false);

			return (
				<div 
					style={isRed? {color: 'red'}: null}
					onClick={() => {
						setCount(count+1);
						setIsRed((count+1)%3 === 0);
				}}
				>
			{count}
			</div>
			);

hooksをifやfor文の中で使用してはいけない

### useMemo
useMemoは単純に値を保存するためのhook

			const Calculator = () => {
				const calcResult = useMemo(() => expensiveFunc(), []);

				return <div>{calcResult}</div>
			}

### useCallback
useCallback(func, []) と省略した書き方ができる

			const Button = React.memo((props) => {
				return <button onClick={props.onClick}>Click Me</button>
			});

			const App = () => {
				const onClick = useCallback(() => alert('Hi!'), []);
				return <Button onClick={onClick}/>
			}

### useEffect
コンポーネントのレンダリング後に実行される

			const Message = () => {

				const elem = document.querySelector('#message');
				console.log(elem);

				useEffect(() => {
					const elem = document.querySelector('#message');
					console.log(elem);
					elem.innerText = "Hello!"
				});

				return <div id="message"></div>
			}

### useRef
useStateの参照版。useRefを使うことでReact本体側に値を保存でき、オブジェクトでラップされる

			const Message = () => {

				const divRef = useRef(null);

				useEffect(() => {
					divRef.current.innerText = 'Hello!';
				}, []);

				return <div ref={divRef}></div>
			}

実装したい内容に応じて、Hookを使い分けるってことか。

【React 17.0.2】vue.jsとの比較

– Vueの場合はv-ifやv-showなどがあるが、Reactの場合は、if や for などの独自の制御構文は存在せず、mapメソッドや論理演算子で構造を表現する
– Vueではv-bind:classで記述するが、Reactの場合は className 属性を用いる
– イベントは@clickとかではなく、onClick={*} などとHTMLに似た構文が用いられる
– Vueではdata()メソッドの返却によって定義するが、ReactではuseStateフックを用いる
– フォーム処理では、vueではv-modelを扱うが、Reactでは自作する必要がある
– Componentはメソッドで書く必要はない
– computedは useMemoメソッドで似たような表現ができる
– フィルター機能はないので、関数で書く
– createdはないので、returnより前がcreatedにあたる
– useEffectフックを使って、マウント後に実行したい処理を登録する。再描画の処理も同様

とっつきやすさはvueの方があるが、reactは基本機能を提供しているので、使いこなしていけばreactも居心地が良くなりそう

【React 17.0.2】textareaのinput

<head>
	<meta charset="UTF-8">
	<meta name="viewport" content="width=device-width, initial-scale=1.0">
	<title>⚛️ React todo</title>
	<link rel="stylesheet" href="https://cdnjs.cloudflare.com/ajax/libs/bulma/0.8.2/css/bulma.min.css" />
	<style>
		* {
			margin: 0;
			padding: 0;
			box-sizing: border-box;
		}
		body {
			background-color: rgb(240, 240, 255);
		}
		.tweet {
			display: flex;
			background-color: white;
		}
		.tweet:not(:last-child){
			border-bottom: 1px solid rgb(200, 200, 200);
		}
		.icon-container {
			width: 1.5em;
			font-size: 3em;
			padding: 0.2em;
		}
		.body-container {
			flex: 1;
			padding: 0.5em;
		}
		.account-name {
			color: gray;
		}
	</style>
</head>
<body>
	<div id="app"></div>

	<script crossorigin src="https://unpkg.com/react@16/umd/react.development.js"></script>
	<script crossorigin src="https://unpkg.com/react-dom@16/umd/react-dom.development.js"></script>
	<script src="https://unpkg.com/@babel/standalone/babel.min.js"></script>

	<script type="text/babel">
		function Tweet(props){
			return (
				<div className="tweet">
					<div className="icon-container">{props.icon}</div>
					<div className="body-container">
						<div className="status-display">
							<div className="display-name">{props.displayName}</div>
							<div className="account-name">@{props.accountName}</div>
						</div>
						<div className="content">{props.content}</div>
					</div>
				</div>
			)
		}

		function App(){
			return (
				<div>
					<Tweet 
						icon="👶"
						displayName="モカ"
						accountName="mocca"
						content="まあギャンブルだよね。期待はしてる。" 
					/>
					<Tweet 
						icon="🦸"
						displayName="いがこ"
						accountName="igaco"
						content="「稼ぐ力」の実態を見極めないと" 
					/>
				</div>
			);
		}

		const target = document.getElementById('app');
		ReactDOM.render(<App />, target);
	</script>
</body>

– 状態管理

const[value, setValue] = React.useState('defalt');
setValue('new value');

useStateはデフォルト値を与えると、前にコンポーネント関数を呼び出した時の値と、値を更新するための関数を返却

inputできるようにします。

	<script type="text/babel">
		function Tweet(props){
			const[liked, setLike] = React.useState(false);
			const toggleLike = React.useCallback(() => setLike((prev)=> !prev), [setLike]);

			return (
				<div className="tweet">
					<div className="icon-container">{props.icon}</div>
					<div className="body-container">
						<div className="status-display">
							<div className="display-name">{props.displayName}</div>
							<div className="account-name">@{props.accountName}</div>
						</div>
						<div className="content">{props.content}</div>
						<div className="status-action">
							<span onClick={toggleLike}>{liked ? '❤️':'♡'}</span>
						</div>
					</div>
				</div>
			)
		}

		function Timeline(props){
			const tweetList = props.tweets.map((tw) => (
				<Tweet
					key={tw.id}
					icon={tw.icon}
					displayName={tw.displayName}
					accountName={tw.accountName}
					content={tw.content}
				/>
			));

			return <div className="timeline">{tweetList}</div>;
		}

		function TweetInput(props){
			const textareaRef = React.useRef(null);

			const sendTweet = React.useCallback(() => {
				if(textareaRef.current){
					props.addTweet({
						id: new Date().getTime(),
						icon: '☠️',
						displayName: '龍神',
						accountName: 'dragon',
						content: textareaRef.current.value
					});
				}
			}, [textareaRef.current, props.addTweet]);

			return (
				<div>
					<div><textarea className="tweet-textarea" ref={textareaRef}></textarea></div>
					<div><button onClick={sendTweet} className="send-tweet">Tweet</button></div>
				</div>
			);
		}

		function App(){
			const [tweets, setTweets] = React.useState([
				{
					id: 0,
					icon: '👶',
					displayName: 'モカ',
					accountName: 'mocca',
					content: 'まあギャンブルだよね。期待はしてる。'
				},
				{
					id: 1,
					icon: '🦸',
					displayName: 'いがこ',
					accountName: 'igaco',
					content: '「稼ぐ力」の実態を見極めないと'
				},
			]);

			const addTweet = React.useCallback((tweet) => setTweets((prev)=> [tweet, ...prev]), [setTweets]);

			return (
				<div>
					<TweetInput addTweet={addTweet} />
					<Timeline tweets={tweets}/>
				</div>
			);
		}

		const target = document.getElementById('app');
		ReactDOM.render(<App />, target);
	</script>

なるほど〜 なんか色々できそうだね

【React 17.0.2】カスタムフック

useState, useEffectの他に、カスタムフックを自作することもできる

カスタムフックのメリット
– UIと切り離したロジック抽出
– コンポーネント関数の肥大化抑制
– 複数のフック呼び出しを理論的単位でまとめられる

<script src="https://unpkg.com/@popperjs/core@2"></script>
	<script src="https://unpkg.com/tippy.js@6"></script>

	<script type="text/babel">
		function useTooltip(id, content){
			React.useEffect(() => {
				tippy(`#${id}`, {content});
			}, [id, content]);
		}

		function App(){
			useTooltip('myButton', 'Hello world!');
			useTooltip('myParagraph', 'This is another tooltip.');

			return(
				<>
					<button id="myButton">Hover me</button>
					<p>
						<span id="myParagraph">Hover me too!</span> 
					</p>
				</>
			);
		}

		const root = document.getElementById('root');
		ReactDOM.render(<App />, root);
	</script>

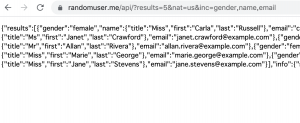
APIからJSONデータを取得

const API = 'https://randomuser.me/api/?results=5&nat=us&inc=gender,name,email';

		function useUsers(){
			const [users, setUsers] = React.useState([]);

			React.useEffect(() => {
				(async () => {
					const response = await
					fetch(API).then(res => res.json());
					setUsers(response.results);
				})();
			},[]);

			return users;
		}


		function App(){
			const users = useUsers();
			return(
				<table>
					<thead>
						<tr>
							<td>Name</td>
							<td>Gender</td>
							<td>Email</td>
						</tr>
					</thead>
					<tbody>
						{users.map(user=>(
							<tr key={user.email}>
								<td>{user.name.title}. {user.name.first} {user.name.last}</td>
								<td>{user.gender}</td>
								<td>{user.email}</td>
							</tr>
						))}
					</tbody>
				</table>
			);
		}

【React 17.0.2】副作用(side effect)に使うuseEffect

副作用(side effect)とは、JSXを返却する処理およびその状態やイベントハンドラの定義以外の処理

非同期通信など
– DOMの存在を前提とした処理
– stateの更新
– 副作用はuseEffectの中で実行される必要がある
L 状態の更新により再レンダリングが発生するので、無限ループを避けるため、適切な場所で行う必要がある

function Component(){
	React.useEffect(()=>{

		someSideEffects();
	}, [])
}

useEffectはレンダリングが完了した後に実行される

function Component(){
	React.useEffect(()=>{

		new ExternalLibrary('.target-class');
	}, []);

	return (
		// jsx...
	);
}

状態の更新に関しても無限ループが発生しないようにする

function Component(){
	const[val, setVal] = React.useState(0);

	React.useEffect(() =>{
		setVal(123);
	}, []);
}

useEffect()はレンダリングが開始された直後に実行される
第二引数の配列を省略すると、コールバックはレンダリング後に毎回実行される

	React.useEffect(() =>{
		document.title = 'Hello world';
	}, []);
function Component(){
	const[val, setVal] = React.useState(0);

	React.useEffect(() =>{
		document.title = `Hello. ${firstName} ${lastName}`;
	}, [firstName, lastName]);
}
function App(){
			const[num, setNum] = React.useState(0);

			const handleClick = () => setNum(num + 1);

			return (
				<>
					<button onClick={handleClick}>{num}</button>
					{num % 2 === 0 && <Children />}
				</>
			);
		}

		function Children(){
			React.useEffect(() =>{
				console.log('hello');

				return() => console.log('bye');
			}, []);

			return <p>I am a child.</p>;
		}

### 非同期処理

function User({userId}){
	const [user, setUser] = React.useState(null);

	React.useEffect(() => {
		fetch('/api/users/${userId}')
			.then(res => res.json())
			.then(json => setUser(json));
	}, [userId]);

	return user ? <h1>Hello, {user.name}</h1> : <p>Loading...</p>
}

thenの代わりに async/await構文を用いる場合は注意が必要

– DOM操作の例

function ImageSlider({id, images}){
	const [swiper, setSwiper] = React.useState(null);

	React.useEffect(() => {
		const instance = new Swiper('#${id}', {
			// options...
		});
		setSwiper(instance);
	}, [id]);

	React.useEffect(() => {
		swiper.update();
	}, [images]);

	return (
		<div id={id} className="swiper-container">
			<div className="swiper-wrapper">
				{images.map(image => (
					<div key={image.id} className="swiper-slide">
						<img src={image.url} alt={image.title} />
					</div>
				))}
			</div>
		</div>
	);
}

非同期処理の場合は、TimeIntervalで実装できるのだろうか。。。
何か道が遠いな。

【React 17.0.2】フォームとイベントハンドラの扱い

state と onChange でstateを更新する
L useStateで初期値を設定している

		function App(){
			const [name, setName] = React.useState('Jhon');

			const handleChange = e => setName(e.target.value);

			return(
				<>
					<h1>Hello, {name}</h1>
					<input value={name} onChange={handleChange} />
				</>
			);
		}

textareaもinputと同じ

<textarea value={val} onChange={handleChange} />

– radioボタンを使う場合

		function App(){
			const [val, setVal] = React.useState('cat');

			const handleChange = e => setVal(e.target.value);

			return(
				<>
					<label>
						<input
							type="radio"
							value="cat"
							onChange={handleChange}
							checked={val == 'cat'}
						/>
						猫
					</label>
					<label>
						<input
							type="radio"
							value="dog"
							onChange={handleChange}
							checked={val == 'dog'}
						/>
						犬
					</label>
					<p>Your Choice: {val}</p>
				</>
			);
		}

– checkbox
L 配列の場合はuseStateのところで[”]とする
L stateは変更できず、val.push(e.target.value)とはできない

function App(){
			const [val, setVal] = React.useState(['js']);

			const handleChange = e => {
				if(val.includes(e.target.value)){
					setVal(val.filter(item => item !== e.target.value));
				} else {
					setVal([...val, e.target.value]);
				}
			};

			return(
				<>
					<label>
						<input
							type="checkbox"
							value="js"
							onChange={handleChange}
							checked={val.includes('js')}
						/>
						JavaScript
					</label>
					<label>
						<input
							type="checkbox"
							value="python"
							onChange={handleChange}
							checked={val.includes('python')}
						/>
						Python
					</label>
					<label>
						<input
							type="checkbox"
							value="java"
							onChange={handleChange}
							checked={val.includes('java')}
						/>
						Java
					</label>
					<p>Your Choice: {val.join(', ')}</p>
				</>
			);
		}

以下のように書くこともできる

			const initialVal = {js: true, python: false, java: false};
			const [val, setVal] = React.useState(initialVal);

			const handleChange = e => {
				const newVal = Object.assign({}, val, {
					[e.target.value] : !val[e.target.value]
				});
				setVal(newVal);
			};

– select box
L onChangeとするところなどほぼ同じですね

function App(){
			const [val, setVal] = React.useState('react');

			const handleChange = e => setVal(e.target.value);

			return(
				<>
					<select value={val} onChange={handleChange}>
						<option value="react">React</option>
						<option value="vue">Vue.js</option>
						<option value="angular">Angular</option>
					</select>
					<p>Your Choice:{val}</p>
				</>
			);
		}

– コンポーネントのイベント処理

function Tab({ onChange }){
			return (
				<ul>
					<li onClick={()=> onChange(1)}>React</li>
					<li onClick={()=> onChange(2)}>Vue.js</li>
					<li onClick={()=> onChange(3)}>Angular</li>
				</ul>
			);
		}

		function App(){
			const [tab, setTab] = React.useState(1);

			const handleChange = val => setTab(value);

			return(
				<>
					<Tab onChange={handleChange} />

					<div hidden={tab !== 1}>
						A JavaScript library for building user interfaces
					</div>
					<div hidden={tab !== 2}>
						The Progressive JavaScript Framework
					</div>
					<div hidden={tab !== 3}>
						One framework. Mobile &amp; desktop.
					</div>
				</>
			);
		}

React.useState()の使い方は何となくわかってきたのう