onpaste=”return false”とする。
E-mail:
[/php]
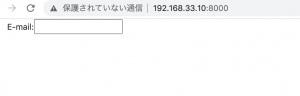
うlおおおおおおおお 確かにコピペが出来ない。すげええええええええええ
ソフトウェアエンジニアの技術ブログ:Software engineer tech blog
随机应变 ABCD: Always Be Coding and … : хороший

onpaste=”return false”とする。
E-mail:
[/php]
うlおおおおおおおお 確かにコピペが出来ない。すげええええええええええ
<body>
<div class="container">
<div class="row">
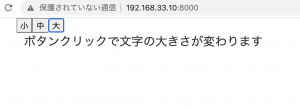
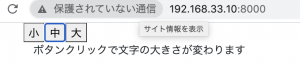
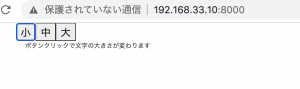
<button class="btn-s">小</button>
<button class="btn-m">中</button>
<button class="btn-l">大</button>
</div>
<div class="row">
<div class="col">
<p>ボタンクリックで文字の大きさが変わります</p>
</div>
</div>
</div>
<script
src="https://code.jquery.com/jquery-3.5.1.js"
integrity="sha256-QWo7LDvxbWT2tbbQ97B53yJnYU3WhH/C8ycbRAkjPDc="
crossorigin="anonymous"></script>
<script>
$(function(){
$('.btn-s').click(function(){
$("p").css('font-size','0.5em');
});
$('.btn-m').click(function(){
$("p").css('font-size','1em');
});
$('.btn-l').click(function(){
$("p").css('font-size','1.5em');
});
})
</script>
</body>
なんか難しいことやってるのかと思ったら、割と単純でワロタw
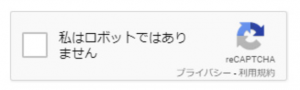
よくある「ボットではありません」というフォーム。
これを実装したい。
https://www.google.com/recaptcha/admin/create
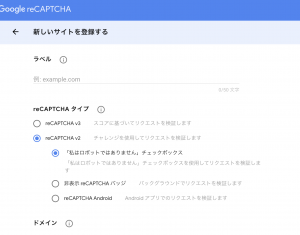
すると、サイトキーとシークレットキーが生成される。
### HTML側の表示
– g-recaptcha タグ(g-recaptcha クラスを指定した要素)を使って自動的に表示
<!DOCTYPE html>
<html lang="en">
<head>
	<meta charset="UTF-8">
	<title>reCAPTCHA widget</title>
	<meta name="viewport" content="width=device-width, initial-scale=1, shrink-to-fit=no">
    <link rel="stylesheet" href="https://maxcdn.bootstrapcdn.com/bootstrap/4.0.0-beta.2/css/bootstrap.min.css">
    <script>
    	var myAlert = function(response){
    		alert("checkbox is checked");
    	};
    </script>
</head>
<body>
	<div class="container">
		<form method="post" action="#">
			<div class="g-recaptcha" data-sitekey="***" data-callback="myAlert"></div>
		</form>
		<script src="https://www.google.com/recaptcha/api.js" async defer></script>
	</div>
	<script>
	</script>
</body>
</html>
dev環境ではなく、ドメイン上で実装します。
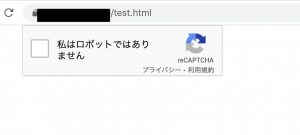
ほう、割とすぐ実装できる。
require_once('vendor/autoload.php');

\Stripe\Stripe::setApiKey('sk_test_*');

$sub_id = "sub_*";

\Stripe\Subscription::update(
  $sub_id,
  [
    'cancel_at_period_end' => true,
  ]
);
よっっしゃー
資料作るぞー
stripのdashboardで商品を追加して、api idをメモします。
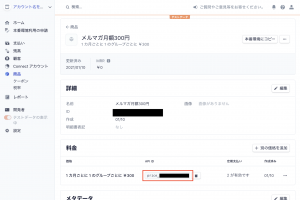
続いて、登録画面
-> これは普通の購入画面とほぼ一緒の書き方。
-> emailをpostする
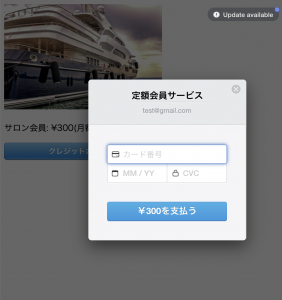
<body>
	<img src="img/boat.jpg" width="300px" height="200px"><br>
	<p>サロン会員: ¥<?php echo $price; ?>(月額課金)</p>
	<form action="/subscription.php" method="post">
		<input hidden name="name" value="<?php echo $name; ?>">
		<input hidden name="email" value="<?php echo $email; ?>">
		<script src="https://checkout.stripe.com/checkout.js" class="stripe-button"
			data-key="pk_test_*"
			data-image=""
			data-amount="<?php echo $price; ?>"
			data-name="<?php echo $name; ?>"
			data-description=""
			data-email="<?php echo $email; ?>"
			data-locale="auto"
			data-allow-remember-me="false"
			data-label="クレジットカードで登録する"
			data-currency="jpy"
			>
		</script>
	</form><br>
<!-- 	<form action="/banck.php" method="post">
		<button class="bank-btn">銀行振込で支払う</button>
	</form> -->
</body>
### サーバーサイド側
-customerを作るときは、emailとsourceのみ。payment_methodを設定するとエラーになる。
-echo $e;でエラー内容を表示しながら作業する
-\Stripe\Subscription::createのpriceのところで、先ほど取得したAPI IDを設定する
require_once('vendor/autoload.php');

\Stripe\Stripe::setApiKey('sk_*');

$sub_id = null;

try {
	$token = $_POST['stripeToken'];
	$name = $_POST['name'];
	$email = $_POST['email'];

	$customer = \Stripe\Customer::create([
	  'email' => $email,
      'source'  => $token,
	]);

	$subscription = \Stripe\Subscription::create([
        'customer' => $customer->id,
        'items' => [
            [
              'price' => 'price_*',
            ],
        ]
    ]);
	var_dump($subscription);

	$sub_id = $subscription->id;

	// // アプリケーション側のDB更新


	header("Location: /complete.php");
	exit;
}  catch(Exception $e){
	echo $e;
	// if($sub_id !== null){
	// 	// 例外が発生すればオーソリを取り消す
	// 	\Stripe\Refund::create(array(
	// 		'charge' => $sub_id,
	// 	));
	// }

	// header("Location: /error.html");
	// exit;
}
これでOK。
定額もショッピングも両方いけます。
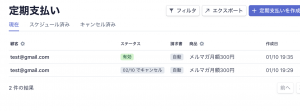
続いて、定額の解約を実装したい。
商品名、商品詳細、商品価格、購入者のemailアドレスを変数と持ちます。
フォーム画面
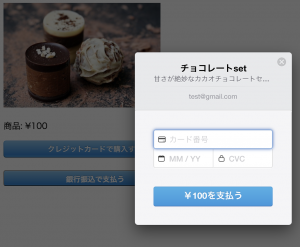
$name = "チョコレートset";
$description = "甘さが絶妙なカカオチョコレートセット";
$price = "100";
$email = "test@gmail.com";
?>
<!DOCTYPE html>
<html lang="en">
<head>
<meta charset="UTF-8">
<title>Document</title>
<style>
.stripe-button-el {
width: 350px;
max-width: 100%;
}
.stripe-button-el span {
font-size: 18px;
padding: 15px;
}
.bank-btn {
padding: 0 12px;
height: 30px;
line-height: 30px;
background: #1275ff;
background-image: linear-gradient(#7dc5ee,#008cdd 85%,#30a2e4);
font-size: 14px;
color: #fff;
font-weight: bold;
font-family: "Helvetica Neue",Helvetica,Arial,sans-serif;
text-shadow: 0 -1px 0 rgba(0,0,0,0.25);
box-shadow: inset 0 1px 0 rgba(255,255,255,0.25);
border-radius: 4px;
width: 350px;
max-width: 100%;
padding-bottom:20px;
}
</style>
</head>
<body>
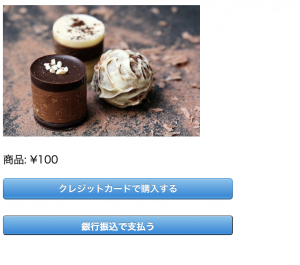
<img src="img/choco.jpg" width="300px" height="200px"><br>
<p>商品: ¥<?php echo $price; ?></p>
<form action="/charged.php" method="post">
<input hidden name="name" value="<?php echo $name; ?>">
<script src="https://checkout.stripe.com/checkout.js" class="stripe-button"
data-key="pk_test_*"
data-image=""
data-amount="<?php echo $price; ?>"
data-name="<?php echo $name; ?>"
data-description="<?php echo $description; ?>"
data-email="<?php echo $email; ?>"
data-locale="auto"
data-allow-remember-me="false"
data-label="クレジットカードで購入する"
data-currency="jpy"
>
</script>
</form><br>
<form action="/banck.php" method="post">
<button class="bank-btn">銀行振込で支払う</button>
</form>
</body>
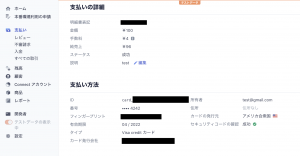
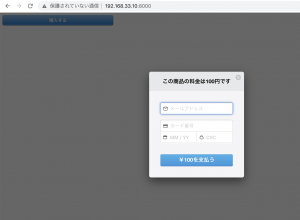
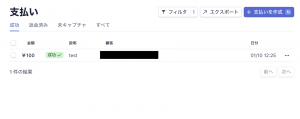
商品画面
クレジット入力画面
入金管理画面
何やこれ、完全に行けるやんけ。
ヨシっ、資料作ろうwww
### フォーム画面
index.php
	<form action="/charge.php" method="post">
		<script src="https://checkout.stripe.com/checkout.js" class="stripe-button"
			data-key="pk_test_*"
			data-amount="100"
			data-name="この商品の料金は100円です"
			data-locale="auto"
			data-allow-remember-me="false"
			data-label="購入する"
			data-currency="jpy"
			>
		</script>
	</form>
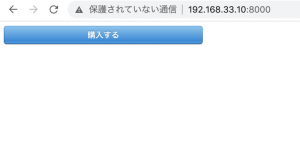
購入ボタン押下
stripeクレジットカードのテスト情報
https://stripe.com/docs/testing
stripeタグ属性
https://stripe.com/docs/legacy-checkout#integration-simple-options
### stripe-php
Github: stripe-php
$ composer require stripe/stripe-php
$ ls
composer.json composer.lock index.php vendor
### charged.php
require_once('vendor/autoload.php');

// シークレットキー
\Stripe\Stripe::setApiKey('pk_test_*');

$chargeId = null;

try {
	$token = $_POST['stripeToken'];
	$charge = \Stripe\Charge::create(array(
		'amount' => 100,
		'currency' => 'jpy',
		'description' => 'test',
		'source' => $token,
		'capture' => false,
	));
	$chargeId = $charge['id'];

	// アプリケーション側のDB更新

	// 売上確定
	$charge->capture();

	header("Location: /complete.html");
	exit;
}  catch(Exception $e){
	if($chargeId !== null){
		// 例外が発生すればオーソリを取り消す
		\Stripe\Refund::create(array(
			'charge' => $chargeId,
		));
	}

	header("Location: /error.html");
	exit;
}
complete.php
<!DOCTYPE html>
<html lang="en">
<head>
	<meta charset="UTF-8">
	<title>Complete</title>
</head>
<body>

</body>
</html>
あーこれ、上手くいきそうやな。
ちょっと実運用に近いフォームにカスタマイズしたい。
出力する
$orders = [
	'yamada' => ['a','b','c'],
	'tanaka' => ['b','f'],
	'sato' => ['a','g','b','f','h','i'],
	'goto' => ['e','f'],
	'kudo' => ['e','g'],
	'oba' => ['b','f','e'],
	'toda' => ['c'],
];

// 省略

foreach($data as $k => $v){
	arsort($v);
	$v = array_slice($v, 0, 5);
	echo $k ." を買った人はこんな商品も買っています=> ";
	foreach($v as $name => $num){
		echo $name . " ";
	}
	echo "<br>";
}
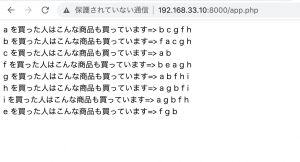
なんか大丈夫っぽいな。ksort($data);で、abcdef順にソートする。
Excelで出力したい。
$orders = [
	'yamada' => ['a','b','c'],
	'tanaka' => ['b','f'],
	'sato' => ['a','g','b','f'],
	'goto' => ['e','f'],
];

foreach($orders as $order => $products){
	foreach($products as $product){
		$togethers = (array_diff($products, array($product)));
		foreach($togethers as $together){
			// 一緒に買った商品の配列が既にある
			if($data[$product] != null){
				if(in_array($together, array_keys($data[$product]) )){
					echo "yes";
					foreach($data[$product] as $key => $value){
						if($key == $together){
							$data[$product][$key] += 1;
						}
					}
				} else {
					$data[$product] = array_merge($data[$product], array($together => 1));
				}
			// 一緒に買った商品の配列がない
			} else {
				$data[$product] = array($together => 1);
			}
		}
	}
}

echo "<pre>";
var_dump($data);
echo "</pre>";
aを買ってる人でbを買ってる人は2人いる。
bを買ってる人で、aを買ってる人は2人、fを買ってる人は2人
array(6) {
[“a”]=>
array(4) {
[“b”]=>
int(2)
[“c”]=>
int(1)
[“g”]=>
int(1)
[“f”]=>
int(1)
}
[“b”]=>
array(4) {
[“a”]=>
int(2)
[“c”]=>
int(1)
[“f”]=>
int(2)
[“g”]=>
int(1)
}
[“c”]=>
array(2) {
[“a”]=>
int(1)
[“b”]=>
int(1)
}
[“f”]=>
array(4) {
[“b”]=>
int(2)
[“a”]=>
int(1)
[“g”]=>
int(1)
[“e”]=>
int(1)
}
[“g”]=>
array(3) {
[“a”]=>
int(1)
[“b”]=>
int(1)
[“f”]=>
int(1)
}
[“e”]=>
array(1) {
[“f”]=>
int(1)
}
きゃあああああああああああああああ、ほぼほぼ出来たくさい。
こっからさらにソートして出力したい。 OK、カモン
各人の注文データがある
$orders = [
	'yamada' => ['a','b','c'],
	'tanaka' => ['b','f'],
	'sato' => ['a','g'],
	'goto' => ['e','f'],
];

foreach($orders as $order => $products){
	foreach($products as $product){
		echo $product;
	}
	echo "<br>";
}
abc
bf
ag
ef
こうすると、一緒に買われている商品が配列で入る。
$orders = [
	'yamada' => ['a','b','c'],
	'tanaka' => ['b','f'],
	'sato' => ['a','g','b'],
	'goto' => ['e','f'],
];

foreach($orders as $order => $products){
	foreach($products as $product){
		$togethers = (array_diff($products, array($product)));
		foreach($togethers as $together){
			if($data[$product] != null){
				$data[$product] = array_merge($data[$product], array($together => 1));
			} else {
				$data[$product] = array($together => 1);
			}

		}
	}
}
array(6) {
[“a”]=>
array(3) {
[“b”]=>
int(1)
[“c”]=>
int(1)
[“g”]=>
int(1)
}
[“b”]=>
array(4) {
[“a”]=>
int(1)
[“c”]=>
int(1)
[“f”]=>
int(1)
[“g”]=>
int(1)
}
[“c”]=>
array(2) {
[“a”]=>
int(1)
[“b”]=>
int(1)
}
[“f”]=>
array(2) {
[“b”]=>
int(1)
[“e”]=>
int(1)
}
[“g”]=>
array(2) {
[“a”]=>
int(1)
[“b”]=>
int(1)
}
[“e”]=>
array(1) {
[“f”]=>
int(1)
}
}
keyの値を足して、一緒に買われている回数まで出したい。
おうおう、もうちょいだ