Dockerの基本操作

### Ubuntu/trustyにdockerインストール済
$ sudo docker version
Client:
Version: 18.06.3-ce
API version: 1.38
Go version: go1.10.3
Git commit: d7080c1
Built: Wed Feb 20 02:27:13 2019
OS/Arch: linux/amd64
Experimental: false

Server:
Engine:
Version: 18.06.3-ce
API version: 1.38 (minimum version 1.12)
Go version: go1.10.3
Git commit: d7080c1
Built: Wed Feb 20 02:25:38 2019
OS/Arch: linux/amd64
Experimental: false
// 動作テスト
$ sudo docker run –name some-nginx -d -p 8080:80 nginx

### image一覧表示
$ sudo docker images
REPOSITORY TAG IMAGE ID CREATED SIZE
nginx latest 6678c7c2e56c 11 days ago 127MB

### Dockerコンテナ一覧
$ sudo docker ps -a
CONTAINER ID IMAGE COMMAND CREATED STATUS PORTS NAMES
615c9946da6d nginx “nginx -g ‘daemon of…” 2 hours ago Exited (0) About an hour ago some-nginx

### hello-world imageの起動
$ sudo docker run hello-world
LocalにDocker imageがなければDocker Hubに探しにいき、Docker imageをダウンロードする

### Docker imageのダウンロード
$ docker pull?hello-world

### Dockerコンテナの削除
$ sudo docker rm ${コンテナID}

### Docker imageの削除
$ sudo docker rmi ${ImageID}

※コンテナで使われていると、imageは削除できない
$ sudo docker rmi 667
Error response from daemon: conflict: unable to delete 6678c7c2e56c (must be forced) – image is being used by stopped container 615c9946da6d

### Nginx imageを使う
$ sudo docker pull nginx
$ sudo docker run -d –name nginx-container -p 8181:80 nginx
$ sudo docker stop nginx-container

顔検出の原理と処理ロジックのイメージ

顔検出は2001年「Viola & Johns」の「Rapid Object Detection using a Boosted Cascade of Simple Features」という論文でアルゴリズムが発表され急速に普及していった。
https://www.cs.cmu.edu/~efros/courses/LBMV07/Papers/viola-cvpr-01.pdf

要点
– Integral-ImageによるHaar-like検出器の高速演算
– AdaBoostによる検出能力の強化
– 多段フィルタ(cascade)による非顔領域の高速排除

画像の中の特定の領域をくり抜いて、顔か否かの判定を関数で行う
→ただし、顔を判定する領域の大きさは計算する側では決められず、一定でないため、計算量が膨大になる

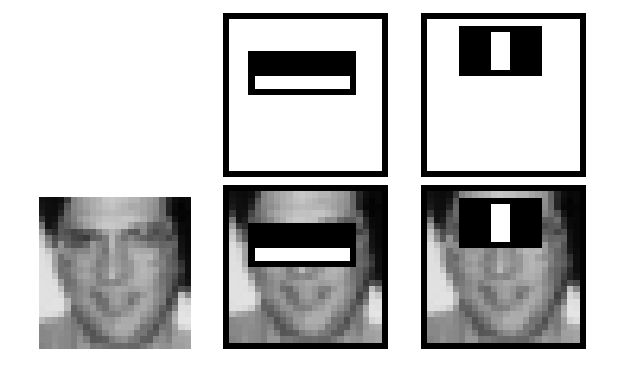
1.Haar-like検出器(Haar-like feature)
HaarウェーブレットにしてIntegral-Imageを組み合わせて高速化した
-> 目の辺りになる位置の上下に隣接する横長の長方形領域を切り出してそれぞれの領域の明度の平均をとる
-> 上の領域が明るくて下の領域が暗かったら顔画像の候補
-> 鼻筋の天辺よりは鼻筋の両脇の明るさの平均*4のほうが小さいことが多い

 これらの判断基準だけで、顔候補が一気に減る
 さらにIntegral-Imageを使うと、その計算が数回の加減算で可能になる。
 窓サイズを変えるのもコントラストの調整も、手間が急激に減る

ViolaとJonesの論文では200個の特徴を使うだけでも95%の精度を実現できると書いてある。

 上記を繰り返し処理するだけで、候補数が急減する
 これを多段フィルタ(cascade)による非顔領域の高速排除という

2. AdaBoostによる検出能力の強化
異なった視点から対象を選択する分類器を組み合わせる
目の判定、口の判定など数多の分類器の中から良いものを使用する

正解の画像を大量に用意して、分類器の精度をテストし、精度の高い分類器を良い分類器として採用する

主なHaar-lieの分類器
a. Edge features
b. Line features
c. Center-surround features

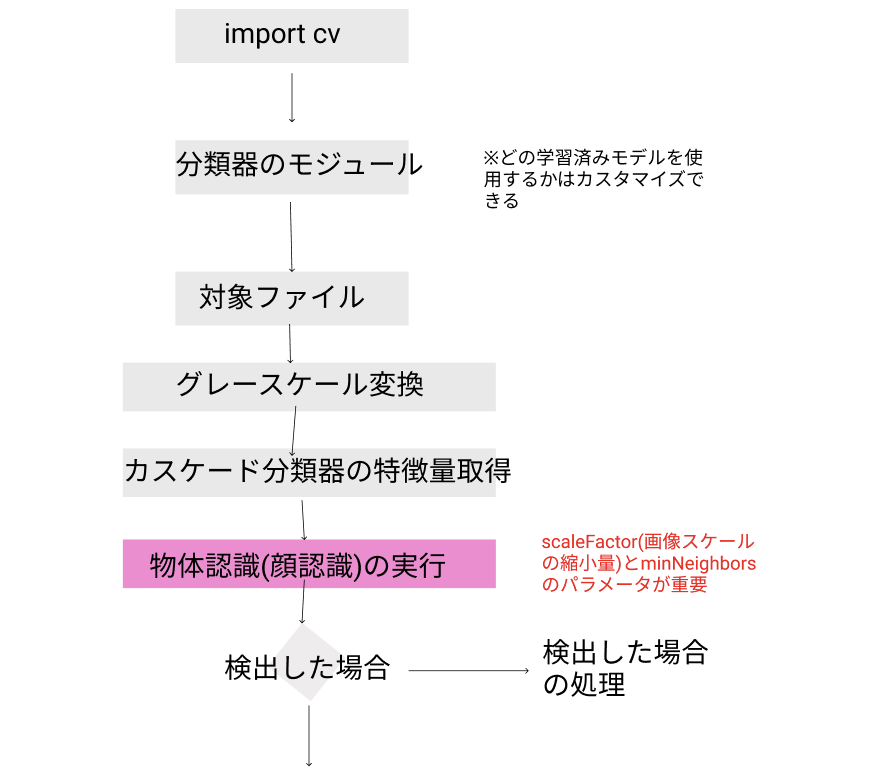
OpenCVを用いた処理ロジックイメージ

対象画像が、傾きがある可能性があれば、傾きを考慮した処理を入れる。
これはいわゆる顔か否かの判定だけだが、個人識別だと、顔のDBと照らし合わせて一致するかどうかを判定するのだろう。
イメージはできますね。
OpenCVの公式サポートは、Python, C++, Java

Docker Imageをpush

### 1. Dockerにログイン
$ sudo docker login
Login with your Docker ID to push and pull images from Docker Hub. If you don’t have a Docker ID, head over to https://hub.docker.com to create one.
Username: ${dockarId}
Password: ${password}
※ログインすると、imageをpushできるようになる

### 2. Docker Push
$ sudo docker push ${userName}/httpd
latest: digest: sha256:102635a0a51899913a5f9e0b8aeb60a2e525e016261106d928910c7***** size: 948

${userName}はDockerIdでないとrequest is deniedとなるので、注意が必要

後は、コンテナとローカルとのファイルのマウント方法ですね。

Dockerfileの操作

### Dockerfileの作成
$ vi Dockerfile

Dockerfile

FROM centos
MAINTAINER hpscript <master@hpscript.com>
# RUN: buildするときに実行
RUN echo "now building..."
# CMD: runするときに実行
CMD ["echo", "running..."]

Dockerfileの実行
$ sudo docker build -t ${UserName}/${name} .
// sudo docker build -t hpscript/echo .

$ sudo docker images
$ sudo docker run hpscript/echo
running…

### Webサーバを立ち上げて、ブラウザで中身を確認する方法
$ sudo vi Dockerfile

FROM centos
MAINTAINER hpscript <master@hpscript.com>
# RUN: buildするときに実行
# RUN echo "now building..."
# CMD: runするときに実行
# CMD ["echo", "running..."]
RUN yum install -y httpd
ADD ./index.html /var/www/html/
EXPOSE 80
CMD ["/usr/sbin/httpd", "-D", "FOREGROUND"]

$ sudo vi index.html

<html>
hello from Docker!
</html>

$ ls
Dockerfile index.html
// build
$ sudo docker build -t hpscript/httpd .
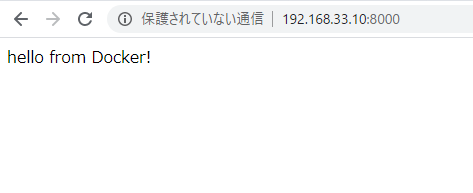
$ sudo docker run -p 8000:80 -d hpscript/httpd
393fc9fd240e2650789466b23076165cf49b62ebdbe9f1b6****

コンテナに変更を加え、imageを作成

## 実行中のコンテナ操作
### コンテナを実行
$ sudo docker run -d ${docker id} free -s 3
59b83e48eec642ec6d2d1443a62fff6b96b7facac648eb06f4******
※「-d」でバックグラウンドで動かす
※「-s 3」で3秒おきに実行

### ログ
$ sudo docker logs ${id}
実行中のコマンドライン
$ sudo docker attach –sig-proxy=false ${id}
※「ctl」+「c」で抜ける

### 実行中のdockerを停止
$ sudo docker stop ${id}

$ sudo docker ps
$ sudo docker attach –sig-proxy=false ${id}
You cannot attach to a stopped container, start it first

### 停止中のdockerを再開
$ sudo docker start ${id}
$ sudo docker ps

## ターミナルで入ってコンテナに変更を加える
### コンテナの中に入って操作
$ sudo docker run -i -t ${ImageID} /bin/bash
※「-i」はインタラクティブモード、「-t」はターミナルを立ち上げる

実行例

vagrant@vagrant-ubuntu-trusty-64:~$ sudo docker run -i -t 470671670cac /bin/bash[root@03471f0b8a7d /]# touch hello.txt
[root@03471f0b8a7d /]# ls
bin  etc        home  lib64       media  opt   root  sbin  sys  usr
dev  hello.txt  lib   lost+found  mnt    proc  run   srv   tmp  var
[root@03471f0b8a7d /]# exit
exit

$ sudo docker ps -a

### docker imageの作成
$ sudo docker commit ${containerId} ${userName}/${name}

実際の例

$ sudo docker commit 034 hpscript/hello
sha256:da9def7208eabab27c9ffd3b05f0e5fc3c8551585396bb06ecb*********
$ sudo docker images
$ sudo docker run -i -t hpscript/hello /bin/bash
[root@f1953ff957d6 /]# ls
bin  etc        home  lib64       media  opt   root  sbin  sys  usr
dev  hello.txt  lib   lost+found  mnt    proc  run   srv   tmp  var

Ubuntuでdocker pullからdocker runまで

### Dockerの概要
– 軽量な仮想化環境作成のツール
– コンテナを用いてアプリケーションをすばやく構築、テスト、デプロイできるソフトウェアプラットフォーム
– ubuntu上で開発されている
https://www.docker.com/

### Ubuntu/trusty64の用意
$ vagrant init ubuntu/trusty64

config.vm.network "private_network", ip: "192.168.33.10"

$ vagrant up
$ vagrant status
$ vagrant ssh

### Dockerインストール
公式ドキュメント: linux ubuntu install
1. Update the apt package index:
$ sudo apt-get update

2. Install packages to allow apt to use a repository over HTTPS:
$ sudo apt-get install \
apt-transport-https \
ca-certificates \
curl \
gnupg-agent \
software-properties-common

3. Add Docker’s official GPG key:
$ curl -fsSL https://download.docker.com/linux/ubuntu/gpg | sudo apt-key add –

4. Use the following command to set up the stable repository. To add the nightly or test repository, add the word nightly or test (or both) after the word stable in the commands below.
$ sudo add-apt-repository \
“deb [arch=amd64] https://download.docker.com/linux/ubuntu \
$(lsb_release -cs) \
stable”

INSTALL DOCKER ENGINE – COMMUNITY
1. Update the apt package index.
$ sudo apt-get update

2. Install the latest version of Docker Engine – Community and containerd, or go to the next step to install a specific version:
$ sudo apt-get install docker-ce docker-ce-cli containerd.io

3. List the versions available in your repo:
$ apt-cache madison docker-ce

4. Install a specific version using the version string from the second column
$ sudo apt-get install docker-ce=18.06.3~ce~3-0~ubuntu

### 確認
$ sudo docker –version
Docker version 18.06.3-ce, build d7080c1

docker pullしてdocker runするとimageが実行される

### dockerの操作
// imageの取得
$ sudo docker pull centos
// image一覧表示
$ sudo docker images
// imageの詳細表示
$ sudo docker inspect 470671

// dockerの実行
$ sudo docker run 47067 echo “hello world”
docker: Error response from daemon: OCI runtime create failed: container_linux.go:348: starting container process caused “process_linux.go:297: copying bootstrap data to pipe caused \”write init-p: broken pipe\””: unknown.

kernelが古い
https://github.com/docker/for-linux/issues/591
kernel >= 3.17

// kernelを4.4にバージョンアップする
$ sudo apt-get install –install-recommends linux-generic-lts-xenial
// reboot
$ sudo reboot

再度dockerを実行
vagrant@vagrant-ubuntu-trusty-64:~$ sudo docker run 47067 echo “hello world”
hello world

$ sudo docker ps -a -n=5

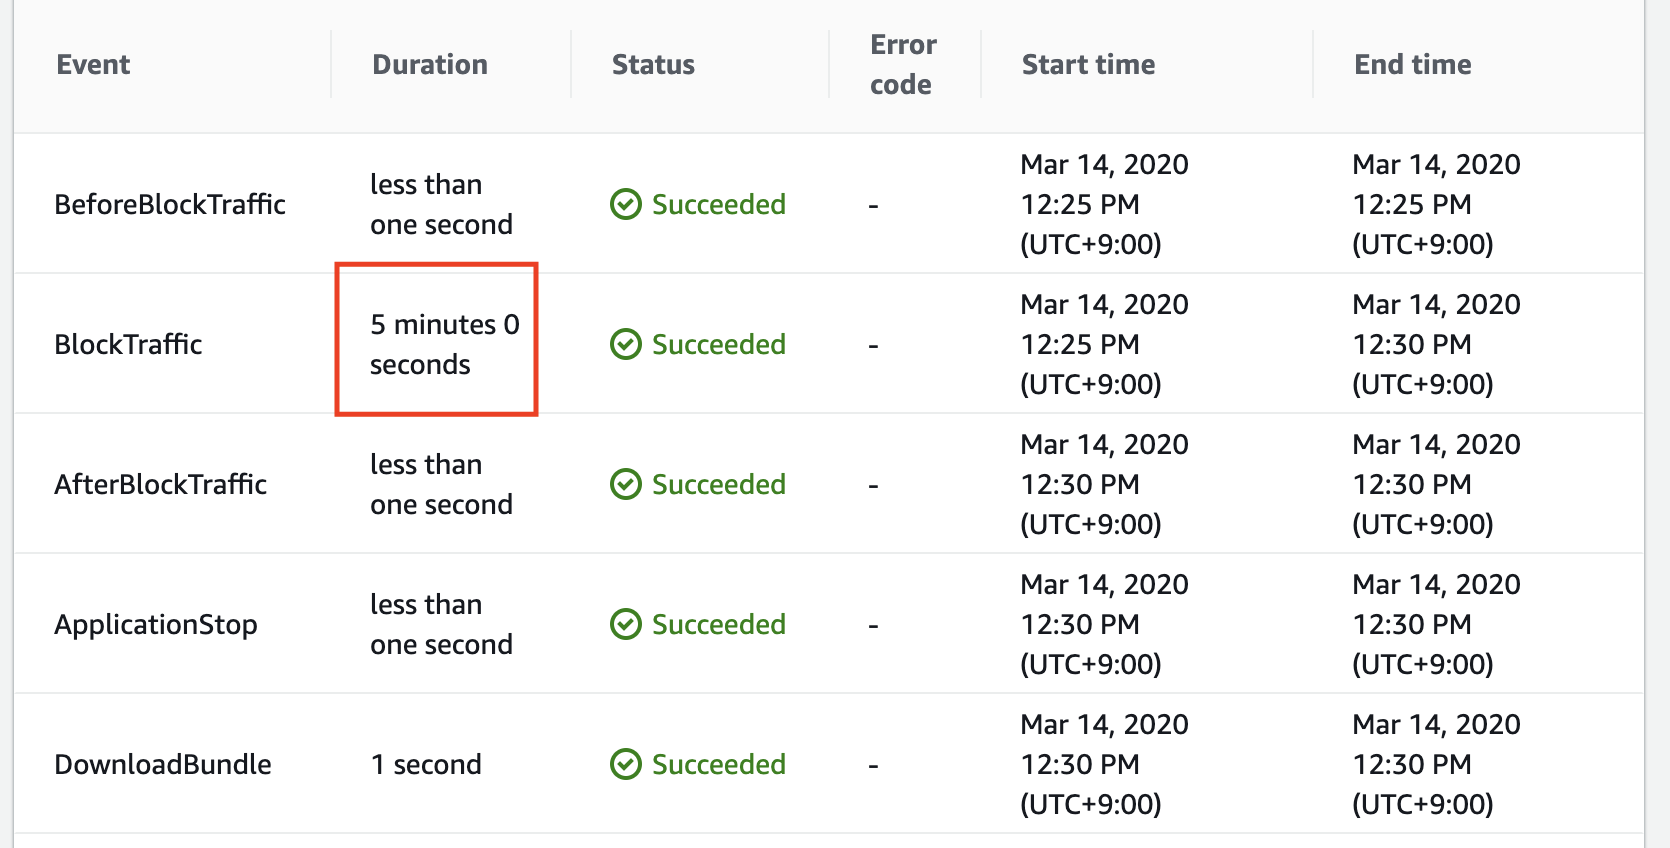
CodeDeployでBlockTrafficとAllowTrafficに5分以上かかる時

CodeDeployでBlockTrafficとAllowTrafficに5分以上かかる時

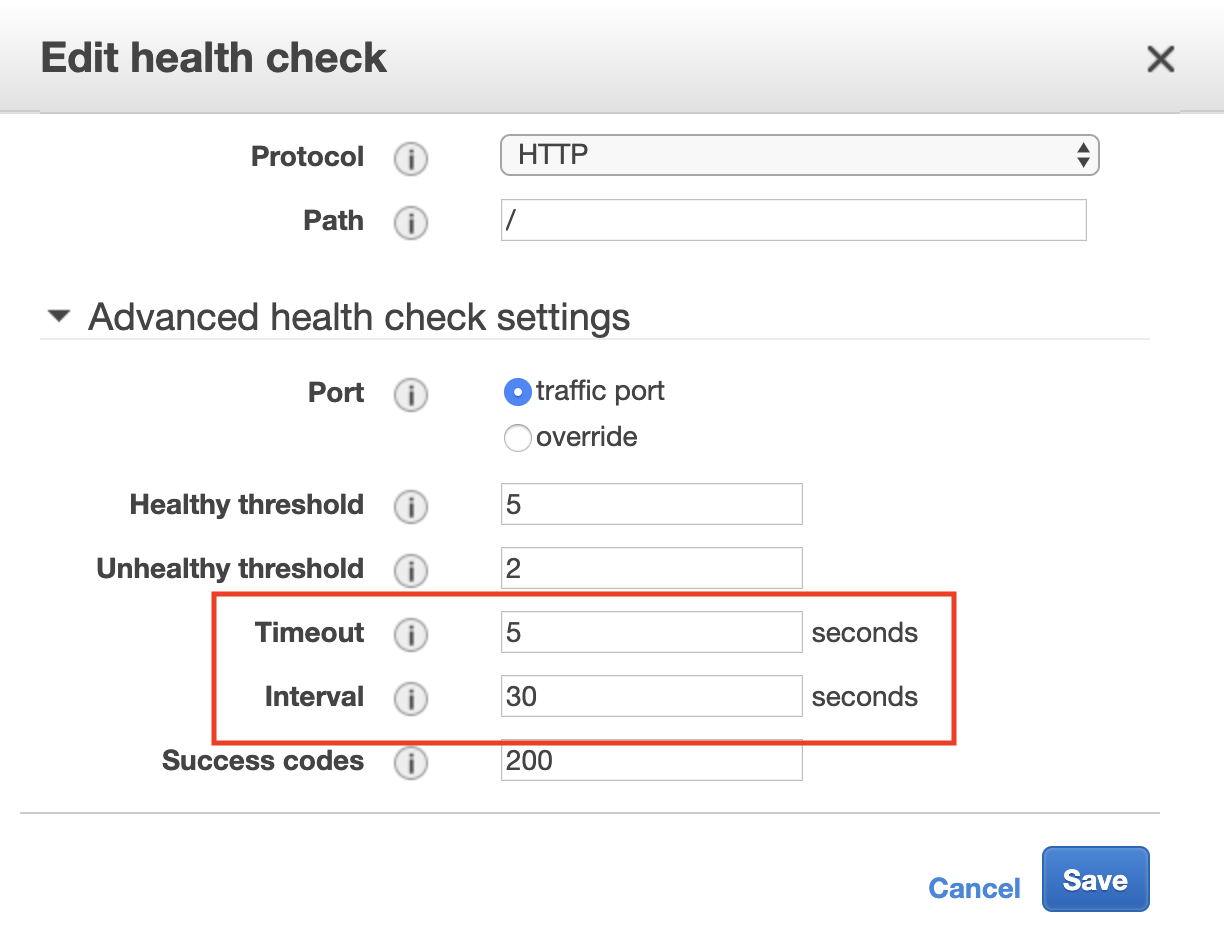
ALBのHealth checkが原因とのこと
defaultでTimeout 5 seconds, Interval 30 secondsとなっているので、ELB Targets Groupsから、Health Checkの設定をそれぞれ、2秒、5秒に変更する

AWSのフォーラムでも回答されています。
Developer Forum

Yes CodeDeploy depends on the ELB Health Check settings that you have configured your ELB with. After an instance is bound to the ELB, CodeDeploy wait for the status if the instance to be healthy ("inService") behind the load balancer. This health check is done by ELB and depends on the health check configuration you have set.

AWS ALB常時SSL(HTTPS)のLaravel 6.x Middleware書き方

つらつらと書いていますが、仕様としては、middlewareを作成後、「### 5.Middleware(ForceHttpProtocol.php)にformatSchemeをoverrideする」に飛んで頂いて構いません。

# 背景
ACMで証明書を取得後、ALBでattachし、挙動テストすると、「完全には保護されていません」と表示される
->PRDのソースを確認すると、プロトコルがhttpで出力されている

<link rel="stylesheet" href="http://${domain}/css/main.css">

ソースコードではasset()で記載

<link rel="stylesheet" href="{{ asset('css/main.css') }}">

原因は、assetが、httpsではなく、httpを読みにいっているから。

# 要件
- 商用環境でhttp通信のリクエストの場合は、https通信にリダイレクト
- ただし、ローカル環境はhttp通信
- 商用環境リンクをフォームを含めて全てhttpsに変更

## 前準備
middlewareの追加
$ php artisan make:middleware ForceHttpProtocol

app/Http/kernel.php

protected $middleware = [
        //省略
        \App\Http\Middleware\ForceHttpProtocol::class,
    ];

### 1. secure()に書き換えるやり方
app/Http/Middleware/ForceHttpProtocol.php

public function handle($request, Closure $next)
    {
        if(!$request->secure() && env('APP_ENV') === 'production'){
            return redirect()->secure($request->getRequestUri());
        }
        return $next($request);
    }

上記では永久リダイレクトとなり、タイムアウトになる。

### 2. ‘https://’.$_SERVER[‘HTTP_HOST’].$_SERVER[‘REQUEST_URI’]にリダイレクト

public function handle($request, Closure $next)
    {
        if(!$this->is_ssl() && config('app.env') === 'production'){
            return redirect('https://'.$_SERVER['HTTP_HOST'].$_SERVER['REQUEST_URI']);
        }
        return $next($request);
    }

    public function is_ssl()
    {
        if ( isset($_SERVER['HTTPS']) === true )
        {
            return ( $_SERVER['HTTPS'] === 'on' or $_SERVER['HTTPS'] === '1' );
        }
        elseif ( isset($_SERVER['SSL']) === true )
        {
            return ( $_SERVER['SSL'] === 'on' );
        }
        elseif ( isset($_SERVER['HTTP_X_FORWARDED_PROTO']) === true )
        {
            return ( strtolower($_SERVER['HTTP_X_FORWARDED_PROTO']) === 'https' );
        }
        elseif ( isset($_SERVER['HTTP_X_FORWARDED_PORT']) === true )
        {
            return ( $_SERVER['HTTP_X_FORWARDED_PORT'] === '443' );
        }
        elseif ( isset($_SERVER['SERVER_PORT']) === true )
        {
            return ( $_SERVER['SERVER_PORT'] === '443' );
        }

        return false;
    }

これでhttpリクエストの場合も、httpsにリダイレクトされるようになる。
ただし、asset、routeなどのリンクが、httpsではなく、httpを読みにいく事象は解消されないまま

->urlのhelperを確認
Illuminate/Foundation/helper.php

function url($path = null, $parameters = [], $secure = null)

URLやViewのasset, redirectを全て書き換える?
嘘だろ?

### 3. パスをassetからurlに書き換える
AppServiceProvicerで商用ならtrue, 商用以外ならfalseのメソッドを作成

app/Providers/AppServiceProvider.php

use View;
public function boot()
    {
       $is_production = env('APP_ENV') === 'production' ? true: false;
       View::share('is_production', $is_production);
    }

続いて、viewで、assetをurlに変更して、上記の変数を第3パラメータに追加
resources/view/auth/login.blad.php

<form method="POST" action="{{ url('login', null, $is_production) }}">

一箇所修正して挙動確認。
URLがhttpsに変わっていることを確認
3~4ページぐらい修正を繰り返していると、早くも絶望的な気分になってくる

### 4. Laravelコレクティブ&Controllerでのhttpsパラメータの渡し方を確認
laravel collective

{!! Form::open(['method'=>'POST', 'action'=>['HogeController@confirm',null,$is_production] ]) !!}

controller

protected $is_production;

    public function __construct(){
        $this->is_production = env('APP_ENV') === 'production' ? true: false;
    }

// 戻るボタン処理
        if($action == '戻る'){
            return redirect()->action('HogeController@create', 302, null, $this->is_production)->withInput($inputs);
        }

うまくいかない。

縷々調査すると、ssetやrouteのプロトコルはformatSchemeで生成しているとのこと。
Illuminate/Routing/UrlGenerator.php

public function formatScheme($secure = null)
    {
        if (! is_null($secure)) {
            return $secure ? 'https://' : 'http://';
        }

        if (is_null($this->cachedScheme)) {
            $this->cachedScheme = $this->forceScheme ?: $this->request->getScheme().'://';
        }

        return $this->cachedScheme;
    }

### 5.Middleware(ForceHttpProtocol.php)にformatSchemeをoverrideする

use URL;
public function handle($request, Closure $next)
    {
        if(!$this->is_ssl() && config('app.env') === 'production'){
            return redirect('https://'.$_SERVER['HTTP_HOST'].$_SERVER['REQUEST_URI']);
        }
        if (env('APP_ENV') === 'production')
        {
            URL::forceScheme('https');
        }

        return $next($request);
    }

    public function is_ssl()
    {
        if ( isset($_SERVER['HTTPS']) === true )
        {
            return ( $_SERVER['HTTPS'] === 'on' or $_SERVER['HTTPS'] === '1' );
        }
        elseif ( isset($_SERVER['SSL']) === true )
        {
            return ( $_SERVER['SSL'] === 'on' );
        }
        elseif ( isset($_SERVER['HTTP_X_FORWARDED_PROTO']) === true )
        {
            return ( strtolower($_SERVER['HTTP_X_FORWARDED_PROTO']) === 'https' );
        }
        elseif ( isset($_SERVER['HTTP_X_FORWARDED_PORT']) === true )
        {
            return ( $_SERVER['HTTP_X_FORWARDED_PORT'] === '443' );
        }
        elseif ( isset($_SERVER['SERVER_PORT']) === true )
        {
            return ( $_SERVER['SERVER_PORT'] === '443' );
        }

        return false;
    }

このように書くことで、要件を満たすことができる
- 商用環境でhttp通信のリクエストの場合は、https通信にリダイレクト
- ただし、ローカル環境はhttp通信
- 商用環境リンクをフォームを含めて全てhttpsに変更

EBSのIOPS

### GP2(General Purpose)
– HDD: SSD
– 容量: 1GiB~16TiB
– ISOP: 1TiB以下の場合、3000IOPSまでバースト

### PIOPS(プロビジョンドIOSP)
– HDD: SSD
– 容量: 10GiB~16TiB
– ISOP: 最大20,000IOPS

### Magnetic
– HDD: 磁気ディスク
– 容量: 1GiB~1TiB
– ISOP: 最大数百IOPS

秒間アクセスがどれくらい集中するかを考慮して、検討する必要がある。

laravel6.xでSESの設定

### SES
Service -> Customer Engagement -> Simple Email Service
Asia Pacific (Mumbai)
左メニューのEmailAddresses -> Verify a New Email Address -> 認証
以下のような文言が表示される

Amazon SES の新規ユーザーの場合–上限緩和をまだ申請していない場合は、引き続きサンドボックス環境を使用しています。そのため、メールは確認済みのアドレスにのみ送信できます。新しいメールアドレスまたはドメインを確認するには、Amazon SES コンソールの [Identity Management] のセクションを参照してください。

Amazon Pinpoint の新規ユーザーの場合–上限緩和をまだ申請していない場合は、引き続きサンドボックス環境を使用しています。そのため、メールは確認済みのアドレスにのみ送信できます。新しいメールアドレスまたはドメインを確認するには、Amazon Pinpoint コンソールの [Settings] > [Channels] ページを参照してください。

なお、送信制限解除申請は、AWS Support -> Create Case -> Service limit increaseから送信する

### AmazonSESFullAccessのユーザ追加
IAMからAdd user
User name:${appName}-ses
Select AWS access type: Programmatic access
Permissions: AmazonSESFullAccess

### .env

MAIL_DRIVER=ses
MAIL_FROM_ADDRESS=${ses認証のメールアドレス}

SES_KEY=
SES_SECRET=
SES_REGION=ap-south-1 ※munbai

### テスト実行
Error executing “SendRawEmail” on “https://email.ap-northeast-1.amazonaws.com”; AWS HTTP error: cURL error 6: Could not resolve host: email.ap-northeast-1.amazonaws.com (see https://curl.haxx.se/libcurl/c/libcurl-errors.html)

あれ?
$ curl https://email.ap-northeast-1.amazonaws.com
curl: (6) Could not resolve host: email.ap-northeast-1.amazonaws.com

SES_REGIONをap-south-1に設定しているのに、ap-northeast-1にリクエストを送ってます。
configでsesの設定を確認してみます。

config/services.php

'ses' => [
        'key' => env('AWS_ACCESS_KEY_ID'),
        'secret' => env('AWS_SECRET_ACCESS_KEY'),
        'region' => env('AWS_DEFAULT_REGION', 'us-east-1'),
    ],

regionがAWS_DEFAULT_REGIONとなっており、さらに、keyとsecretも共通のkey, secret担っているので、AWS_DEFAULT_REFIONをmunbaiに変更します。

'ses' => [
        'key' => env('SES_KEY'),
        'secret' => env('SES_SECRET'),
        'region' => env('ap-south-1', 'us-east-1'),
    ],

$ php artisan config:clear

同時に、mailのfromを.envから取得するように変更します。

->from(env('MAIL_FROM_ADDRESS'))

SESで送信できていることが確認できます。