Laravel : gitリポジトリからローカル環境でのプロジェクト複製の流れ

———————
$ git clone https://github.com/***/***.git
$ cd ***
$ git branch ${issue}
$ git checkout ${issue}
// vendorの作成
$ php composer.phar install
// .envファイルの作成 ※.env.exampleの複製ではなく、必要に応じてMAIL_DRIVER、AWS_ACCESS_KEY、PUSHER_APP_IDなどを記述する
.env
$ php artisan key:generate
// mysql
mysql> create database ***_dev
mysql> use ***_dev

$ php artisan migrate
// テーブルの初期値入力

$ php composer.phar dump-autoload
$ php artisan storage:link
———————

– .env作成のところは、DATABASEだけでなく、MAIL_DRIVER、AWS_ACCESS_KEY、PUSHER_APP_IDを自分用のアカウントで作らないといけないので、丁寧にドキュメントを作成する必要がありそう。
– シンボリックリンクは、git push, git cloneでは設定が反映されないので、改めて設定する必要がある。

extendsの条件分岐

非同期などの機能を実装する際に、同じルーティングで、blade内のインクルードファイルを切り分けたい時
-> if elseだと両方のextendsが読み込まれる為、 三項演算子(?:;)で切り分ける

## 前

@if($id == 1)
	@extends('layouts.hoge')
@else
	@extends('layouts.foo')
@endif

## 後

@extends(($id == 1) ? 'layouts.hoge':'layouts.foo')

ルーティングは要検討か。

laravel 6.x Mailgunからメール送信する書き方

公式ドキュメント: https://readouble.com/laravel/6.x/ja/mail.html

# 前準備
### mailgun
mailgun登録
https://app.mailgun.com/

### guzzleインストール
$ php composer.phar require guzzlehttp/guzzle

※guzzleとは?
https://github.com/guzzle/guzzle
-> Guzzle is a PHP HTTP client that makes it easy to send HTTP requests and trivial to integrate with web services.

### .env

MAIL_DRIVER=mailgun
MAILGUN_DOMAIN=**********.mailgun.org
MAILGUN_SECRET=**********

### config/mail.php
driverをsmtpからmailgunに変更

'driver' => env('MAIL_DRIVER', 'mailgun'),

### config/services.php
特に変更なし

 'mailgun' => [
        'domain' => env('MAILGUN_DOMAIN'),
        'secret' => env('MAILGUN_SECRET'),
        'endpoint' => env('MAILGUN_ENDPOINT', 'api.mailgun.net'),
    ],

// route, controller, bladeは省略

以上

smtpとは異なり、.envにMAILGUN_DOMAINとMAILGUN_SECRETを設定する必要がある。
services.phpのendpointはデフォルトのまま

smtpを独自に作るとなると大変だが、APIだとサクッと書ける

Laravelでgmailから送信する設定

# gmailから送信する設定
### メール送信するgoogle account
– セキュリティ->2段階認証プロセス on
– アプリパスワード->(メール, mac(or windows))を選択

### .env

MAIL_DRIVER=smtp
MAIL_HOST=smtp.gmail.com
MAIL_PORT=587
MAIL_USERNAME=${domain}@gmail.com
MAIL_PASSWORD=${生成されたアプリ パスワード}
MAIL_ENCRYPTION=tls
MAIL_FROM_ADDRESS=${domain}@gmail.com
MAIL_FROM_NAME=sample

$ php artisan config:cache

// route, controller, bladeは省略

587ポートとは?
->メール送信時に使われてきたTCP25番ポート以外で、メール送信の為の専用ポート
->25番ポートブロックでも送信可能になる

outlookでもsmtpホストがありますが、殆ど使われていないのでしょうか。

メール送信時のcontroller・mailableクラスの変数の書き方

– to, cc, bccなど宛先はcontrollerで書く
– mailableクラスのコンストラクターに引数を渡す
– constructorに初期値を設定し、callback関数でルートからプレビューを行うこともできる
– メール本文は、text, htmlどちらも可能。改行はbrタグ

### controller

use Illuminate\Support\Facades\Mail;
use App\Mail\TestMail;
public function index()
    {
        //
        $name = '山本太郎';
        $date = '2020/02/11';
        $status = '完了';
        $to = 'test@gmail.com';
        $cc = 'cc@gmail.com';
        
        Mail::to($to)
            ->cc($cc)
            ->send(new TestMail($name, $date, $status));
        return "its works";
    }

### app/Mail/TestMail.php
$ php artisan make:mail TestMail

public function __construct($name='山田太郎', $date='2020/01/01', $status='テスト')
    {
        //
        $this->title = $date . 'テスト送信';
        $this->date = $date;
        $this->name = $name;
        $this->status = $status;
    }

    /**
     * Build the message.
     *
     * @return $this
     */
    public function build()
    {
        return $this
            ->from('from@example.com')
            ->subject($this->title)
            ->view('email.test')->with([
                'name' => $this->name,
                'date' => $this->date,
                'status' => $this->status,
            ]);
    }

### view

{{ $date }}<br>
メール本文<br>
{{ $name }}さんのステータスは{{ $status}}です

### routeプレビュー時

Route::get('/send', 'MailController@index');
Route::get('/send/preview', function(){
	return new App\Mail\TestMail();
});

メールの送信方法と、メール内容の設定はMVCで切り離されているので、非常に管理しやすいように思います。

mailtrapによるテスト送信の流れ

Dev、STG環境でのメール送信にmailtrapを使用できる
https://mailtrap.io/

### 特徴
– 開発用
– Inboxに保管できるメール数の上限は50通
– Inboxはひとつだけ

### .env
Integrationsの”Laravel”の内容を記述します

MAIL_DRIVER=smtp
MAIL_HOST=smtp.mailtrap.io
MAIL_PORT=2525
MAIL_USERNAME=null
MAIL_PASSWORD=null
MAIL_ENCRYPTION=null
MAIL_FROM_ADDRESS=null
MAIL_FROM_NAME="${APP_NAME}"

### make:mail
$ php artisan make:mail TestMail

app/Mail/TestMail.php が生成される

public function build()
    {
        return $this
            ->from('from@example.com')
            ->subject('テスト送信')
            ->view('email.test');
    }

### メール本文
resources/views/email/test.blade.php

メール本文

### route

Route::get('/send', 'MailController@index');

### controller
$ php artisan make:controller –resource MailController

public function index()
    {
        //
        Mail::to('test@gmail.com')
            ->send(new TestMail());
        return "its works";
    }

$ php artisan serve –host 192.168.33.10 –port 8000

mailtrapを確認すると、送信済となっています。
controllerから、メールを送る際に変数を扱いたいと思うので、続けてやっていきたいと思います。

Promiseとは?

### 「同期処理」と「非同期処理」
– 同期処理は上から下へ順番に1つずつ処理
– 非同期処理は時間が掛かりそうな処理を実行した後に、結果を待たずにすぐ次の処理を実行

## promise
引数「resolve」に取得したい値を設定することで、非同期処理の結果を格納

var result = new Promise(function(resolve){
		resolve(new Date);
	});

	result.then(function(data){
		console.log(data.getFullYear());
	});

then()の処理を実行することで、階層が複雑化しない

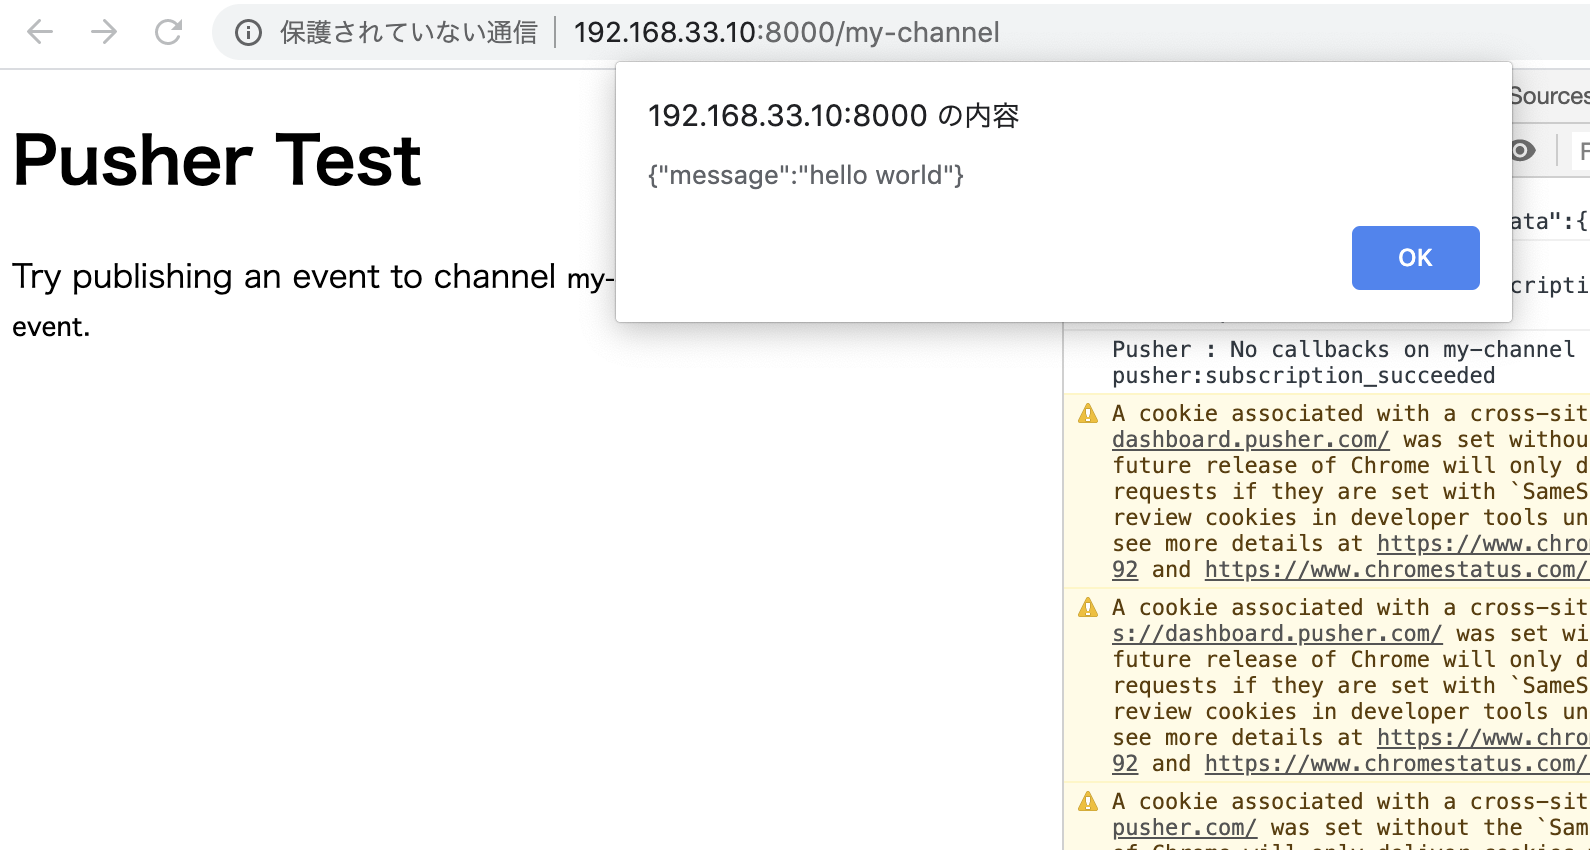
Pusherの挙動

DevToolでコンソールを開きながら、getting startedで挙動を確認します。

### index.html

<h1>Pusher Test</h1>
    <p>
        Try publishing an event to channel <code>my-channel</code>
        with event name <code>my-event</code>.
    </p>
     <script src="https://js.pusher.com/5.0/pusher.min.js"></script>
    <script>
        Pusher.logToConsole = true;

        var pusher = new Pusher('****************',{
            cluster: 'ap3',
            forceTLS: true
        });

        var channel = pusher.subscribe('my-channel');
        channel.bind('my-event', function(data){
            alert(JSON.stringify(data));
        });
    </script>

### server side
$ curl -sS https://getcomposer.org/installer | php
$ php composer.phar require pusher/pusher-php-server

require __DIR__ . '/vendor/autoload.php';

$options = array(
	'cluster' => 'ap3',
	'useTLS' => true
);
$pusher = new Pusher\Pusher(
	'********************',
	'********************',
	'******',
	$options
);

$data['message'] = 'hello world';
$pusher->trigger('my-channel', 'my-event', $data);

server側からclient側でデータが渡っていることを確認できます。

vue.jsのmountedとは?

公式: mounted
https://jp.vuejs.org/v2/api/index.html#mounted
elがマウントされた丁度後に呼ばれる
-> ビュー全体がレンダリングされた後にのみ実行される
-> createdはDOMがまだ作られていない状態、mountedはDOMが生成された直後の状態

<script src="https://cdn.jsdelivr.net/npm/vue@2.5.17/dist/vue.min.js"></script>
	<script>
    	new Vue({
    		el: '#chat',
    		data: {
    			message: '',
    			messages: []
    		},
    		methods: {
    		},
    		mounted(){
    			this.$nextTrick(function(){
    				
    			})
    		} 
    	});
    </script>

### createdとmounted

new Vue({
    		el: '#app',
    		data: {
    		},
    		methods: {
    			showEl : function(){
    				console.log(this.$el)
    			}
    		},
    		created(){
    				console.log('created')
    				console.log(this.$el)
    		},
    		mounted(){
    			    console.log('created')
    				console.log(this.$el)
    		} 
    	});

createdを実装するイメージが湧かないが、mountedの使い方はわかりました。

axiosとは?

– axiosは、HTTP通信を簡単に行うことができるJavascriptライブラリ
https://github.com/axios/axios
– 主にJsonの取得に利用される

### Features
– Make XMLHttpRequests from the browser
– Make http requests from node.js
– Supports the Promise API
– Intercept request and response
– Transform request and response data
– Cancel requests
– Automatic transforms for JSON data
– Client side support for protecting against XSRF

## サンプル
### npm install
$ npm install axios –save

### index.js
– axios.get(‘${url}’), axios.post(‘${url}’)と実装する
– get, post以外にも、request, delete, head, options, put, patch, getUriなどがある

var express = require('express');
var router = express.Router();

// axiosのインスタンス生成
const axiosBase = require('axios');
const axios = axiosBase.create({
	baseURL = '192.168.33.10:8000',
	headers: {
		'Content-Type' : 'application/json',
		'X-Requested-With': 'XMLHttpRequest'
	},
	responseType: 'json'
});

router.get('/', function(req, res, next){
	axios.get('/title')
	.then(function(response){
		res.render('index', response.data);
	})

	.catch(function(error){
		console.log('Error!! occurred in Backend.')
	});
});

module.exports = router;

### res, err, finally

<script>
		axios.get(${url})
		.then(res => console.log(res.data))
		.catch(err => console.error(err))
		.finally(res => console.log('finally'))
	</script>

XMLHttpRequestを生成せずに処理できるので、確かに使い勝手良さそうです。