Express.ioを使ってみる

express.io = express + socket.io

express.ioをインストールして、サーバーを立てるまで

### express.io install
package.json

{
	"name": "test-webrtc",
	"version": "0.0.1",
	"private": true,
	"dependencies": {
		"express": "4.x",
		"ejs": "3.0.1",
		"express.io": "1.x",
		"coffee-script": "~1.6.3",
		"connect": "*"
	}
}

$ npm update

### server.js

var express = require('express.io');
var app = express();
var PORT = 3000;

var fs = require("fs");
var https = require("https");
var options = {
	key: fs.readFileSync('key.pem'),
	cert: fs.readFileSync('server.crt')
}
app.https(options).io();

console.log('server started' + PORT);

app.use(express.static(__dirname + '/public'));
app.get('/', function(req, res){
	res.render('index.ejs');
});

app.io.route('ready', function(req){
	req.io.join(req.data)
	app.io.room(req.data).broadcast('announce', {
		message: 'New client in the ' + req.data + ' room.'
	})
})

app.listen(PORT);

### index.ejs

<!DOCTYPE html>
<html lang="en">
<head>
	<meta charset="UTF-8">
	<title>WebRTC</title>
	<link rel="stylesheet" type="text/css" href="public/styles.css">
	<script src="/socket.io/socket.io.js"></script>
</head>
<body>
	<p><button id="takeProfilePicture" type="button" autofocus="true">Create Profile Picture</button></p>
	<video id="videoTag" autoplay></video>
	<div>
		<label>Your Name</label><input id="myName" type="text">
		<label>Your Name</label><input id="myMessage" type="text">
		<input id="sendMessage" type="submit">
		<div id="chatArea">Message: output:<br></div>
	</div>

	<script>
		navigator.getUserMedia = navigator.getUserMedia || navigator.webkitGetUserMedia || window.navigator.mozGetUserMedia;
		var constraints = {audio: false, video: {
				mandatory: {
					maxWidth: 240,
					maxHeight: 240
				}
			}
		};
		var videoArea = document.querySelector("video");
		var myName = document.querySelector("#myName");
		var myMessage = document.querySelector("#myMessage");
		var sendMessage = document.querySelector("#sendMessage");
		var chatArea = document.querySelector("#chatArea");
		var ROOM = "chat";

		io = io.connect();
		io.emit('ready', ROOM);

		io.on('announce', function(data){
			displayMessage(data.message);
		});

		function displayMessage(message){
			chatArea.innerHTML = chatArea.innerHTML + "<br>" + message;
		}

		navigator.getUserMedia(constraints, onSuccess, onError);

		function onSuccess(stream){
			console.log("Success! we have a stream!");
			// videoArea.src = window.URL.createObjectURL(stream);
			// videoArea.className = "grayscale_filter";
			videoArea.srcObject = stream;
		}

		function onError(error){
			console.log("Error with getUserMedia: ", error);
		}
	</script>
</body>
</html>

$npm server.js

socket ioとは、web soketにより、双方向通信を簡単に記述できる
複数ブラウザでテストし、io.emit(‘ready’, ROOM);となった際に、chatArea.innerHTML = chatArea.innerHTML + “
” + message;で、’New client in the ‘ + req.data + ‘ room.’が追加される

Vagrant環境(amazon linux2)で、Expressを使ってhttpsサーバーを立てる

まず、sslモジュールをinstall
$ sudo yum install mod_ssl

続いてkeyとcertを作成して読み込む
# 手順
## certificate file作成
openssl req -newkey rsa:2048 -new -nodes -keyout key.pem -out csr.pem
openssl x509 -req -days 365 -in csr.pem -signkey key.pem -out server.crt

## package.json

{
	"name": "test-webrtc",
	"version": "0.0.1",
	"private": true,
	"dependencies": {
		"express": "4.x",
		"ejs": "3.0.1"
	}
}

$ npm install

## server.js

var express = require('express');
var app = express();

var fs = require("fs");
var https = require("https");
var options = {
	key: fs.readFileSync('key.pem'),
	cert: fs.readFileSync('server.crt')
}
var server = https.createServer(options, app);

console.log('server started');

app.get('/', function(req, res){
	res.render('index.ejs');
});

server.listen(3000);

$ node server.js

# 駄目な方法
## certificate file作成
$ openssl genrsa > server.key
$ openssl req -new -key server.key > server.csr
$ openssl x509 -req -signkey server.key < server.csr > server.crt

var express = require('express');
var app = express();

var fs = require("fs");
var https = require("https");
var options = {
	key: fs.readFileSync('server.key'),
	cert: fs.readFileSync('server.crt')
}
var server = https.createServer(options, app);

console.log('server started');

app.get('/', function(req, res){
	res.writeHead(200);
	res.render('index.ejs');
});

server.listen(3000);

## server.js
keyがpemファイルでないので、エラーが出ます
$ node server.js
_tls_common.js:88
c.context.setCert(options.cert);
^

Error: error:0906D06C:PEM routines:PEM_read_bio:no start line
at Object.createSecureContext (_tls_common.js:88:17)
at Server (_tls_wrap.js:819:25)
at new Server (https.js:60:14)
at Object.createServer (https.js:82:10)
at Object. (/home/vagrant/webrtc/server.js:10:20)
at Module._compile (module.js:653:30)
at Object.Module._extensions..js (module.js:664:10)
at Module.load (module.js:566:32)
at tryModuleLoad (module.js:506:12)
at Function.Module._load (module.js:498:3)

vagrantでhttpsの環境を作ろうとした時、opensslとphpのビルトインサーバーでhttps環境を作っていましたが、フロントエンドだけならexpressで十分だということがわかりました。
expressはhttpのみかと勘違いしていたが、よくよく考えたら、できないわけない😂😂😂

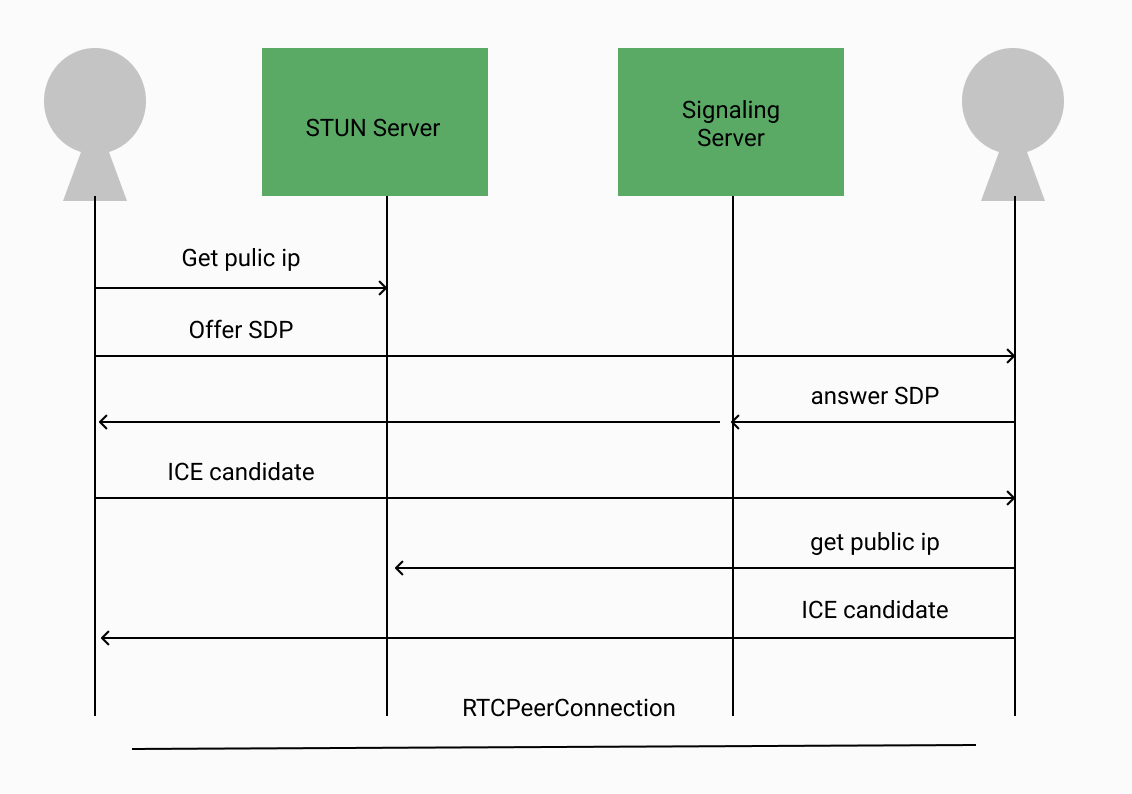
Signalingの仕組み

## basic signaling structure

“Offer” & “Answer” : Session Description Protocol(SDP), video codecs resolution format

How to connect : Websockets, socket.io, Publish/Subscribe, commercial providers

To communicate within Firewall of Private Networks
1. Connection over Plubic IP’s
2. STUN server ※NATを通過するためのポートマッピング
3. TURN server ※Firewallを越えるための、TURNによるリレーサーバーを介した中継通信

STUN, TURNでSDPを交換してから、ICE(Internet Connectivity Establishment) Candidateで接続する

PCカメラでの自撮画像 作成方法

– そろそろプロフィール写真を変えたいが、スマホで撮って一々転送するのはめんどくさいので、自分のPCで自撮画像を撮りたいと思ってる方に朗報
– 以下のコードでPCから自撮して画像化できます
– canvasでvideoタグをdrawImageして、 toDataURL(‘image/png’) で画像化してダウンロードできるようにしています

<!DOCTYPE html>
<html lang="en">
<head>
	<meta charset="UTF-8">
	<title>WebRTC</title>
	<link rel="stylesheet" type="text/css" href="public/styles.css">
</head>
<body>
	<p><button id="takeProfilePicture" type="button" autofocus="true">Create Profile Picture</button></p>
	<video id="videoTag" autoplay></video>
	<canvas id="profilePicCanvas" style="display: none;"></canvas>
	<div>
		<img id="profilePictureOutput">
	</div>
	<div class="download" style="display: none;">
		<a id="download" href="#" download="canvas.jpg">download</a>
	</div>
	<script>
		navigator.getUserMedia = navigator.getUserMedia || navigator.webkitGetUserMedia || window.navigator.mozGetUserMedia;
		var constraints = {audio: false, video: {
				mandatory: {
					maxWidth: 240,
					maxHeight: 240
				}
			}
		};
		var videoArea = document.querySelector("video");
		var profilePicCanvas = document.querySelector("#profilePicCanvas");
		var profilePictureOutput = document.querySelector("#profilePictureOutput");
		var takePicButton = document.querySelector("#takeProfilePicture");
		var videoTag = document.querySelector("#videoTag");
		var width = 240;
		var height = 0;
		var streaming = false;

		takePicButton.addEventListener('click', function(ev){
			takeProfilePic();
			ev.preventDefault();
		}, false);

		videoTag.addEventListener('canplay', function(ev){
			if(!streaming){
				height = videoTag.videoHeight / (videoTag.videoWidth/width);
				if (isNaN(height)){
					height = width / (4/3);
				}
				videoTag.setAttribute('width', width);
				videoTag.setAttribute('height', height);
				profilePicCanvas.setAttribute('width', width);
				profilePicCanvas.setAttribute('height', height);
				streaming = true;
			}
		}, false);

		function takeProfilePic(){
			var context = profilePicCanvas.getContext('2d');
			if (width && height){
				profilePicCanvas.width = width;
				profilePicCanvas.height = height;
				context.drawImage(videoTag, 0, 0, width, height);

				var data = profilePicCanvas.toDataURL('image/png');
				profilePictureOutput.setAttribute('src', data);
				document.querySelector(".download").style.display = "block";
				document.getElementById("download").href = data;
			}
		}

		navigator.getUserMedia(constraints, onSuccess, onError);

		function onSuccess(stream){
			console.log("Success! we have a stream!");
			// videoArea.src = window.URL.createObjectURL(stream);
			// videoArea.className = "grayscale_filter";
			videoArea.srcObject = stream;
		}

		function onError(error){
			console.log("Error with getUserMedia: ", error);
		}
	</script>
</body>
</html>

今からハッカソンエントリーしてくる

webrtc 縦横比とCSSグレースケール

アプリケーションによって制約があるかと思うが、基本はwidth, heightはvideo constraintsに沿って4:3にする
cssのfilter: saturate(0.0x); でvideoをグレースケール化できる

WebRTC Video Resolutions 2 – the Constraints Fight Back


https://webrtchacks.com/

<script>
		navigator.getUserMedia = navigator.getUserMedia || navigator.webkitGetUserMedia || window.navigator.mozGetUserMedia;
		var constraints = {audio: false, video: {
				mandatory: {
					maxWidth: 640,
					maxHeight: 480
				}
			}
		};
		var videoArea = document.querySelector("video");
		navigator.getUserMedia(constraints, onSuccess, onError);

		function onSuccess(stream){
			console.log("Success! we have a stream!");
			// videoArea.src = window.URL.createObjectURL(stream);
                        videoArea.className = "grayscale_filter";
			videoArea.srcObject = stream;
		}

		function onError(error){
			console.log("Error with getUserMedia: ", error);
		}
	</script>
.grayscale_filter{
	-webkit-filter: saturate(0.02);
	filter: saturate(0.02);
}

$ vendor/bin/hyper-run -s 192.168.33.10:8000
whala

あれ、ちょっと待てよ、webrtcそのまま画像認識に使える👺 あれ?

ローカルamazon linux 2でのLaravel環境構築

– ローカルでのAmazon Linux 2環境構築

### vagrant init & ssh接続
// 割愛
$ cat /proc/version
Linux version 4.14.154-128.181.amzn2.x86_64 (mockbuild@ip-10-0-1-129) (gcc version 7.3.1 20180712 (Red Hat 7.3.1-6) (GCC)) #1 SMP Sat Nov 16 21:49:00 UTC 2019

### git install
// 割愛
$ git –version
git version 2.19.2

### node.js install
// 割愛
$ node –version
v8.17.0
$ npm –version
6.13.4

### apache install
$ sudo yum install httpd
$ sudo systemctl start httpd
$ sudo systemctl status httpd
$ sudo systemctl enable httpd
$ sudo systemctl is-enabled httpd

### PHP >= 7.2.0 install
https://readouble.com/laravel/6.x/ja/installation.html
$ sudo yum list | grep php
$ amazon-linux-extras
$ amazon-linux-extras info php7.3
$ sudo amazon-linux-extras install php7.3
$ yum list php* | grep amzn2extra-php7.3
$ sudo yum install php-cli php-pdo php-fpm php-json php-mysqlnd php-mbstring
$ php -v

### MySQL8.0
$ sudo yum install https://dev.mysql.com/get/mysql80-community-release-el7-1.noarch.rpm
$ sudo yum install –enablerepo=mysql80-community mysql-community-server
$ mysqld –version
$ sudo systemctl start mysqld
$ sudo cat /var/log/mysqld.log | grep “temporary password”
$ mysql -u root -p
> ALTER USER ‘root’@’localhost’ IDENTIFIED BY ‘${temporary password}’;
> SET GLOBAL validate_password.length=6;
> SET GLOBAL validate_password.policy=LOW;
> ALTER USER ‘root’@’localhost’ IDENTIFIED WITH mysql_native_password BY ‘${new password}’;
$ sudo systemctl enable mysqld

### ansible
$ sudo amazon-linux-extras install ansible2
$ ansible –version

Laravel本丸はhomesteadベースで動いているので、Homesteadとamazon-linux-extrasの動向には注意しておいた方が良いだろう。
RHEL系なので、ローカルはCentOSでも良いという意見もあるが、商用&STG環境とDEV環境が微妙に異なると、デプロイ時にちょっとしたミスが起こることがあるので、特別な理由がない限り商用とDEVの環境はできるだけ併せた方が良い。

wip TDD、tailwindcss, @errorの書き方

wip: work in progress

refactoring

public function test_an_author_can_be_created(){

        $this->post('/authors', $this->data());
        $author = Author::all();

        $this->assertCount(1, $author);
        $this->assertInstanceOf(Carbon::class, $author->first()->dob);
        $this->assertEquals('1988/14/05', $author->first()->dob->format('Y/d/m'));
    }

    private function data(){
        return [
            'name' => 'Author Name',
            'dob' => '05/14/1988'
        ];
    }

$ phpunit –filter test_an_author_can_be_created

public function test_a_name_is_required(){
        $response = $this->post('/authors', array_merge($this->data(), ['name' => '']));

        $response->assertSessionHasErrors('name');

    }

    public function test_a_dob_is_required(){
        $response = $this->post('/authors', array_merge($this->data(), ['dob' => '']));
        $response->assertSessionHasErrors('dob');

    }

controller

public function store(){
    	$data = $this->validateData();

    	Author::create($data);
    }

    protected function validateData(){
    	return request()->vadidate([
    		'name' => 'required',
    		'dob'=> '',
    	]);
    }

### tailwindcss
$ php artisan help preset
$ php artisan preset none
$ php artisan preset vue

$ npm install

https://tailwindcss.com/
$ npm install tailwindcss –save-dev

app.scss

@tailwind base;

@tailwind components;

@tailwind utilities;

$ npx tailwind init

webpack.mix.js

const tailwindcss = require('tailwindcss');
mix.js('resources/js/app.js', 'public/js')
   .sass('resources/sass/app.scss', 'public/css')
   .options({
    processCssUrls: false,
    postCss: [ tailwindcss('./.config.js') ],
  });

$ npm install webpack

$ npm run dev

authors/create.blade.php

@extends('layouts.app')

@section('content')
	<dvi class="bg-gray-300 h-screen">
		asdfg
	</dvi>
@endsection

web.php

Route::get('/authors/create', 'AuthorsController@create');

create.blade.php
test

@extends('layouts.app')

@section('content')
	<div class="w-2/3 bg-gray-200 mx-auto">
		asdfg
	</div>
@stop

### @errorの
styling

<div class="w-2/3 bg-gray-200 mx-auto p-6 shadow">
		<form action="/authors" method="post" class="flex flex-col items-center">
			@csrf
		<h1>Add New Author</h1>
		<div class="pt-4">
			<input type="text" name="name" placeholder="Full Name" class="rounded px-4 py-2 w-64">
			@if{{$errors->has('dob')}}
				<p class="text-red-600">{{$errors->first('name')}}</p>
			@endif
		</div>
		<div class="pt-4">
			<input type="text" name="dob" placeholder="Date of Birth" class="rounded px-4 py-2 w-64">
			@if{{$errors->has('dob')}}
				<p class="text-red-600">{{$errors->first('dob')}}</p>
			@endif
		</div>
		<div class="pt-4">
			<button class="bg-blue-400 text-white rounded py-2 px-4">Add New Author</button>
		</div>
		</form>
	</div>
@error('name') <p class="text-red-600">{{$message}}</p> @enderror

tailwindはモダンな感じがする
しかし、6系になってフロント周りを中心に随分仕様が変わってます。

laravel feature test 404と6系のmake:auth

– laravel 6系ではmake:authが無くなりました
$ php artisan –version
Laravel Framework 6.9.0
– unit test -> feature testの順番

$ php artisan make:test BookCheckoutTest

use RefreshDatabase;
    public function test_a_book_can_be_check_out(){

        $this->withoutExceptionHandling();

        $book = factory(Book::class)->create();
        $this->actingAs($user = Factory(User::class)->create())
            ->post('/checkout/' . $book->id);

        $this->assertCount(1, Reservation::all());
        $this->assertEquals($user->id, Reservation::first()->user_id);
        $this->assertEquals($book->id, Reservation::first()->book_id);
        $this->assertEquals(now(), Reservation::first()->checked_out_at);
    }

route

Route::post('/checkout/{book}', 'CheckoutBookController@store');

$ php artisan make:controller CheckoutBookController

public function __construct(){
		$this->middleware('auth');
	}
public function store(Book $book){
    	$book->checkout(auth()->user());
    }

$ phpunit –filter test_a_book_can_be_check_out
OK (1 test, 4 assertions)

$ php artisan make:auth
Command “make:auth” is not defined.

### make:auth
$ composer require laravel/ui –dev
$ php artisan ui vue –auth
$ php artisan migrate:refresh
$ npm install

$ phpunit –filter test_only_signed_in_users_can_be_checkout_book
OK (1 test, 3 assertions)

$ php artisan make:controller CheckinBookController

public function __construct(){
		$this->middleware('auth');
	}
    public function store(Book $book){
    	$book->checkin(auth()->user());
    }
public function test_404_is_thrown_if_a_book_is_not_checked_out(){

        $book = factory(Book::class)->create();
        $user = factory(User::class)->create();

        $this->actingAs($user)
            ->post('/checkin/' . $book->id)
            ->assertStatus(404);

        $this->assertCount(0, Reservation::all());
    }
public function __construct(){
		$this->middleware('auth');
	}
    public function store(Book $book){

    	try {
    		$book->checkin(auth()->user());
    	} catch(\Exception $e){
    		return response([], 404);
    	}
    	
    }

make:authがvueのコンポーネントになったということは、LaravelはReactよりvueを支持しているってこと?フロントエンドは確実にvue.jsが必須になってきました。

それと、テストエンジニアってなんか敬遠されがちだが、そもそもtestはフレームワークの仕組みを深く理解してないとできないから、テストエンジニアを下に見るのは偏見がかなり入っている

Laravel hasManyのUnitTest

– 想定する条件において、親子の各テーブルをassertCount, assertEquals、assertNotNullでcheckする
– feature testとunit testの違い
 -> userの挙動のテストがfeature test, unit testはuser操作が関係ない
– unit testのデータ生成にはfactoryを活用

$ php artisan make:test BookReservationsTest

namespace Tests\Unit;

use Illuminate\Foundation\Testing\RefreshDatabase;
use Illuminate\Foundation\Testing\WithFaker;
use Tests\TestCase;
use App\Book;
use App\User;

class BookReservationsTest extends TestCase
{
    
    use RefreshDatabase;

    public function test_a_book_can_be_checked_out(){

        $book = factory(Book::class)->create();
        $user = factory(User::class)->create();

        $book->checkout($user);

        $this->assertCount(1, Reservation::all());
        $this->assertEquals($user->id, Reservation::first()->user_id);
        $this->assertEquals($book->id, Reservation::first()->book_id);
        $this->assertEquals(now(), Reservation::first()->checked_out_at);
    }
}

$ phpunit –filter test_a_book_can_be_checked_out
Tests\Unit\BookReservationsTest::test_a_book_can_be_checked_out

$ php artisan make:factory BookFactory -m Book
BookFactory.php

use App\Book;
use App\Author;
use Faker\Generator as Faker;

$factory->define(Book::class, function (Faker $faker) {
    return [
        'title' => $faker->sentence,
        'author_id' => factory(Author::class),
    ];
});

$ phpunit –filter test_a_book_can_be_checked_out

$ php artisan make:factory AuthorFactory -m Author

use App\Author;
use Faker\Generator as Faker;

$factory->define(Author::class, function (Faker $faker) {
    return [
        'name' => $faker->name,
        'dob' => now()->subYears(10),
    ];
});

Book.php

public function checkout(){
    	
    }

$ php artisan make:model Reservation -m

Book.php

public function checkout(User $user){
    	$this->reservations()->create([
    		'user_id' => $user->id,
    		'checked_out_at' => now(),
    	]);
    }

    public function reservations(){
    	return $this->hasMany(Reservation::class);	
    }

Reservation.php

protected $fillable = [
        'user_id',
        'book_id',
        'checked_out_at'
    ];

migration file

Schema::create('reservations', function (Blueprint $table) {
            $table->bigIncrements('id');
            $table->unsignedBigInteger('user_id');
            $table->unsignedBigInteger('book_id');
            $table->timestamp('checked_out_at');
            $table->timestamp('checked_in_at');
            $table->timestamps();
        });

$ phpunit –filter test_a_book_can_be_checked_out

public function test_a_book_can_be_returned(){
        $book = factory(Book::class)->create();
        $user = factory(User::class)->create();

        $book->checkin();

        $this->assertCount(1, Reservation::all());
        $this->assertEquals($user->id, Reservation::first()->user_id);
        $this->assertEquals($book->id, Reservation::first()->book_id);
        $this->assertEquals(now(), Reservation::first()->checked_in_at);

    }

Book.php

public function checkin($user){
    	$reservation = $this->reservations()->where('user_id', $user->id)->whereNotNull('checked_out_at')->whereNull('checked_in_at')->first();

    	$reservation->update([
    		'checked_in_at' => now(),
    	]);
    }
public function test_a_book_can_be_returned(){
        $book = factory(Book::class)->create();
        $user = factory(User::class)->create();

        $book->checkout($user);
        $book->checkin($user);

        $this->assertCount(1, Reservation::all());
        $this->assertEquals($user->id, Reservation::first()->user_id);
        $this->assertEquals($book->id, Reservation::first()->book_id);
        $this->assertEquals(now(), Reservation::first()->checked_in_at);

    }

    public function test_a_user_can_checkout_a_book_twice(){

        $book = factory(Book::class)->create();
        $user = factory(User::class)->create();
        $book->checkout($user);
        $book->checkin($user);

        $book->checkout($user);

        $this->assertCount(2, Reservation::all());
        $this->assertEquals($user->id, Reservation::find(2)->user_id);
        $this->assertEquals($book->id, Reservation::find(2)->book_id);
        $this->assertNull(Reservation::find(2)->checked_in_at);
        $this->assertEquals(now(), Reservation::find(2)->checked_out_at);

        $book->checkin($user);

        $this->assertCount(2, Reservation::all());
        $this->assertEquals($user->id, Reservation::find(2)->user_id);
        $this->assertEquals($book->id, Reservation::find(2)->book_id);
        $this->assertNotNull(Reservation::find(2)->checked_in_at);
        $this->assertEquals(now(), Reservation::find(2)->checked_in_at);

    }

UnitTestを細かくやる人はこだわりがあり、レベルが高い印象があります。

Laravel OneToOneのテストメソッドの書き方

– 親テーブルの方にテストケースを書く
– modelのmass asignmentは忘れがちなので注意

BookManagementTest.php

public function test_a_new_author_is_automatically_added(){
        $this->post('/books', [
            'title' => 'Cool Title',
            'author' => 'Victor'
        ]);

        $book = Book::first();
        $author = Author::first();

        $this->assertCount(1, Author::all());
        $this->assertEquals($author->id, $book->book_id);
    }

Author.php

public function setAuthorAttribute($author){
    	$this->attributes['author_id'] = Author::firstOrCreate([
    			'name' => $author,
    	]);
    }

$ phpunit –filter test_a_new_author_is_automatically_added

tests/Unit/AuthorTest.php

namespace Tests\Unit;

// use PHPUnit\Framework\TestCase;
use Tests\TestCase;
use Illuminate\Foundation\Testing\RefreshDatabase;
use App\Author;

class ExampleTest extends TestCase
{
	use RefreshDatabase;
    public function test_a_dob_is_nullable(){
    	Author::firstOrCreate([
    			'name' => 'John Doe'
    	]);

    	$this->assertCount(1, Author::all());
    }
}

author migration file

Schema::create('authors', function (Blueprint $table) {
            $table->bigIncrements('id');
            $table->string('name');
            $table->timestamp('dob')->nullable();
            $table->timestamps();
        });
public function test_a_new_author_is_automatically_added(){
        $this->withoutExceptionHandling();
        $this->post('/books', [
            'title' => 'Cool Title',
            'author' => 'Victor'
        ]);

        $book = Book::first();
        $author = Author::first();
        
        $this->assertEquals($author->id, $book->author_id);
        $this->assertCount(1, Author::all());
    }

$ php artisan make:test BookTest –unit

>>> \Schema::getColumnListing(‘books’);
=> [
“id”,
“title”,
“author”,
“author_id”,
“created_at”,
“updated_at”,
]

Book.php

protected $fillable = ['title', 'author','author_id'];

    public function path(){
    	return '/books/' . $this->id;
    }
public function test_an_author_id_is_recorded()
    {
    	Book::create([
    		'title' => 'Coolest title',
    		'author' => '',
    		'author_id' => 1,
    	]);

    	$this->assertCount(1, Book::all());
    }

$ phpunit –filter test_an_author_id_is_recorded
OK (1 test, 1 assertion)

BooksController.php

rotected function validateRequest(){
    	return request()->validate([
    		'title' => 'required',
    		'author_id' => 'required',
    	]);
    }

Book.php

public function setAuthorIdAttribute($author){
    	$this->attributes['author_id'] = (Author::firstOrCreate([
    			'name' => $author,
    	]))->id;
    }

$ phpunit –filter test_a_new_author_is_automatically_added
OK (1 test, 2 assertions)

ぐううう

### 全てのmethodをテストするとき
just run phpunit
$ phpunit

### private function

$response = $this->post('/books', [
            'title' => 'Cool Title',
            'author_id' => 1
        ]);
$response = $this->post('/books',$this->data());
private function data() : array{
        return [
            'title' => 'Cool Title',
            'author_id' => 1
        ];
    }

### array_merge

public function test_a_author_is_require(){

        $response = $this->post('/books', array_merge($this->data(), ['author_id'=> '']));

        $response->assertSessionHasErrors('author_id');

    }

OneToOneのテストメソッドでも基本は同じ