Reflection after changing crontab file

How to reflect changes after editing the contents of crontab file directly. There is no need to restart cron after changing crontab.

On Linux, it checks the modification time of cron every minute and reloads if there is a change, so change of the file of cront if you do, your changes will take effect immediately without having restart cron.

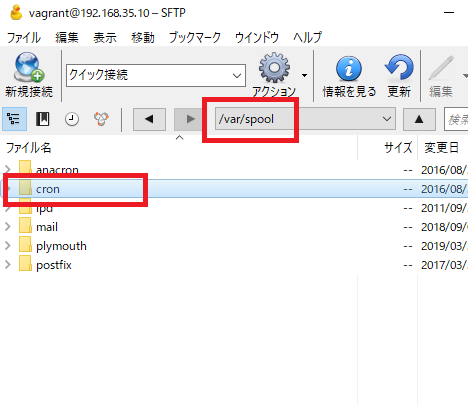
/var/spool/cron

[vagrant@localhost ~]$ /etc/rc.d/init.d/crond status
crond (pid 2614) を実行中…

ps -aef

ps: Check the processes currently running on Linux

a: display the process of terminal operation
f(option -h, option-forest): display processes in a hierarchy
e: display the command name and environment, variables being executed.

[vagrant@localhost ~]$ ps -aef
UID PID PPID C STIME TTY TIME CMD
root 1 0 0 Mar24 ? 00:00:00 /sbin/init
root 2 0 0 Mar24 ? 00:00:00 [kthreadd]
root 3 2 0 Mar24 ? 00:00:00 [migration/0]
root 4 2 0 Mar24 ? 00:00:00 [ksoftirqd/0]
root 5 2 0 Mar24 ? 00:00:00 [stopper/0]
root 6 2 0 Mar24 ? 00:00:00 [watchdog/0]
root 7 2 0 Mar24 ? 00:01:54 [events/0]
root 8 2 0 Mar24 ? 00:00:00 [events/0]
root 9 2 0 Mar24 ? 00:00:00 [events_long/0]
root 10 2 0 Mar24 ? 00:00:00 [events_power_ef]
root 11 2 0 Mar24 ? 00:00:00 [cgroup]
root 12 2 0 Mar24 ? 00:00:00 [khelper]
root 13 2 0 Mar24 ? 00:00:00 [netns]
root 14 2 0 Mar24 ? 00:00:00 [async/mgr]
root 15 2 0 Mar24 ? 00:00:00 [pm]
root 16 2 0 Mar24 ? 00:00:00 [sync_supers]
root 17 2 0 Mar24 ? 00:00:00 [bdi-default]
root 18 2 0 Mar24 ? 00:00:00 [kintegrityd/0]
root 19 2 0 Mar24 ? 00:00:03 [kblockd/0]
root 20 2 0 Mar24 ? 00:00:00 [kacpid]
root 21 2 0 Mar24 ? 00:00:00 [kacpi_notify]
root 22 2 0 Mar24 ? 00:00:00 [kacpi_hotplug]
root 23 2 0 Mar24 ? 00:00:00 [ata_aux]
root 24 2 0 Mar24 ? 00:00:00 [ata_sff/0]
root 25 2 0 Mar24 ? 00:00:00 [ksuspend_usbd]
root 26 2 0 Mar24 ? 00:00:00 [khubd]
root 27 2 0 Mar24 ? 00:00:00 [kseriod]
root 28 2 0 Mar24 ? 00:00:00 [md/0]
root 29 2 0 Mar24 ? 00:00:00 [md_misc/0]
root 30 2 0 Mar24 ? 00:00:00 [linkwatch]
root 33 2 0 Mar24 ? 00:00:00 [khungtaskd]
root 34 2 0 Mar24 ? 00:00:00 [lru-add-drain/0]
root 35 2 0 Mar24 ? 00:00:01 [kswapd0]
root 36 2 0 Mar24 ? 00:00:00 [ksmd]
root 37 2 0 Mar24 ? 00:00:00 [aio/0]
root 38 2 0 Mar24 ? 00:00:00 [crypto/0]
root 45 2 0 Mar24 ? 00:00:00 [kthrotld/0]
root 47 2 0 Mar24 ? 00:00:00 [kpsmoused]
root 48 2 0 Mar24 ? 00:00:00 [usbhid_resumer]
root 49 2 0 Mar24 ? 00:00:00 [deferwq]
root 81 2 0 Mar24 ? 00:00:00 [kdmremove]
root 82 2 0 Mar24 ? 00:00:00 [kstriped]
root 186 2 0 Mar24 ? 00:00:00 [scsi_eh_0]
root 188 2 0 Mar24 ? 00:00:00 [scsi_eh_1]
root 214 2 0 Mar24 ? 00:00:00 [scsi_eh_2]
root 262 2 0 Mar24 ? 00:00:00 [kdmflush]
root 264 2 0 Mar24 ? 00:00:00 [kdmflush]
root 332 2 0 Mar24 ? 00:00:02 [jbd2/dm-0-8]
root 333 2 0 Mar24 ? 00:00:00 [ext4-dio-unwrit]
root 338 2 0 Mar24 ? 00:00:01 [flush-253:0]
root 409 1 0 Mar24 ? 00:00:00 /sbin/udevd -d
root 513 2 0 Mar24 ? 00:00:00 [iprt-VBoxWQueue]
root 708 2 0 Mar24 ? 00:00:00 [jbd2/sda1-8]
root 709 2 0 Mar24 ? 00:00:00 [ext4-dio-unwrit]
root 771 2 0 Mar24 ? 00:00:00 [kauditd]
root 963 1 0 Mar24 ? 00:00:00 /sbin/dhclient -1 -q -cf /etc/dh
root 1148 1 0 Mar24 ? 00:00:00 auditd
root 1170 1 0 Mar24 ? 00:00:00 /sbin/rsyslogd -i /var/run/syslo
rpc 1192 1 0 Mar24 ? 00:00:00 rpcbind
rpcuser 1214 1 0 Mar24 ? 00:00:00 rpc.statd
root 1318 1 0 Mar24 ? 00:00:46 /usr/sbin/VBoxService –pidfile
root 1357 1 0 Mar24 ? 00:00:00 /usr/sbin/sshd
root 1392 1 0 Mar24 ? 00:00:00 /bin/sh /usr/bin/mysqld_safe –d
mysql 1632 1392 0 Mar24 ? 00:01:03 /usr/sbin/mysqld –basedir=/usr
root 2246 1 0 Mar24 ? 00:00:00 /usr/libexec/postfix/master
postfix 2250 2246 0 Mar24 ? 00:00:00 qmgr -l -t fifo -u
root 2370 1 0 Mar24 ? 00:00:06 /usr/sbin/httpd
root 2614 1 0 Mar24 ? 00:00:00 crond
jenkins 3741 1 0 Mar24 ? 00:05:14 /etc/alternatives/java -Dcom.sun
root 4085 1 0 Mar24 tty1 00:00:00 /sbin/mingetty /dev/tty1
root 4087 1 0 Mar24 tty2 00:00:00 /sbin/mingetty /dev/tty2
root 4091 1 0 Mar24 tty3 00:00:00 /sbin/mingetty /dev/tty3
root 4096 1 0 Mar24 tty4 00:00:00 /sbin/mingetty /dev/tty4
root 4098 1 0 Mar24 tty5 00:00:00 /sbin/mingetty /dev/tty5
root 4100 1 0 Mar24 tty6 00:00:00 /sbin/mingetty /dev/tty6
root 4132 409 0 Mar24 ? 00:00:00 /sbin/udevd -d
root 4133 409 0 Mar24 ? 00:00:00 /sbin/udevd -d
root 10290 1357 0 18:51 ? 00:00:00 sshd: vagrant [priv]
vagrant 10292 10290 0 18:51 ? 00:00:00 sshd: vagrant@notty
vagrant 10293 10292 0 18:51 ? 00:00:00 /usr/libexec/openssh/sftp-server
root 10300 1357 0 18:53 ? 00:00:00 sshd: vagrant [priv]
vagrant 10302 10300 0 18:53 ? 00:00:00 sshd: vagrant@notty
vagrant 10303 10302 0 18:53 ? 00:00:00 /usr/libexec/openssh/sftp-server
root 10320 1357 0 19:04 ? 00:00:00 sshd: vagrant [priv]
vagrant 10322 10320 0 19:04 ? 00:00:00 sshd: vagrant@pts/0
vagrant 10323 10322 0 19:04 pts/0 00:00:00 -bash
postfix 10798 2246 0 19:47 ? 00:00:00 pickup -l -t fifo -u
apache 10930 2370 0 19:54 ? 00:00:00 /usr/sbin/httpd
apache 10931 2370 0 19:54 ? 00:00:00 /usr/sbin/httpd
apache 10932 2370 0 19:54 ? 00:00:00 /usr/sbin/httpd
apache 10933 2370 0 19:54 ? 00:00:00 /usr/sbin/httpd
apache 10934 2370 0 19:54 ? 00:00:00 /usr/sbin/httpd
apache 10935 2370 0 19:54 ? 00:00:00 /usr/sbin/httpd
apache 10936 2370 0 19:54 ? 00:00:00 /usr/sbin/httpd
apache 10937 2370 0 19:54 ? 00:00:00 /usr/sbin/httpd
root 11000 1357 0 20:21 ? 00:00:00 sshd: vagrant [priv]
vagrant 11002 11000 0 20:21 ? 00:00:00 sshd: vagrant@pts/1
vagrant 11003 11002 0 20:21 pts/1 00:00:00 -bash
vagrant 11425 11003 0 20:26 pts/1 00:00:00 ps -aef

なにこれ?こんなに走ってるの? httpdぐらいかと思ったらww

さー今日は225が-700くらい付けてますが、今日も頑張りますかー
Linux “hostname”

“Hostname” is a command to display the host name of the system. If you are the root user(superuser), you can also change the host name.

[vagrant@localhost ~]$ hostname
localhost.localdomain

[vagrant@localhost ~]$ sudo -S “hostname”
localhost.localdomain

yum -y install perl-CGI

sudo yum -y install perl-CGIで、perl-CGIをinstall

[vagrant@localhost ~]$ sudo yum -y install perl-CGI
– 中略 -
トランザクションを実行しています
インストールしています : perl-CGI-3.51-144.el6.x86_64 1/1
Verifying : perl-CGI-3.51-144.el6.x86_64 1/1

インストール:
perl-CGI.x86_64 0:3.51-144.el6

インストール後、やり直します。

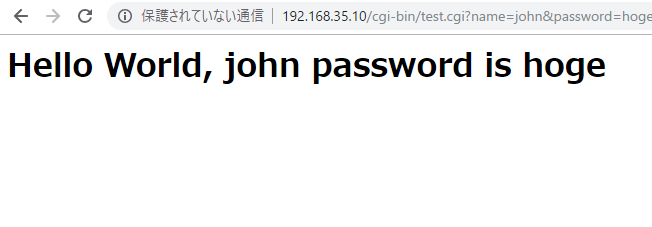
データがcgiに届きました。

#!/usr/bin/perl --
use strict;
use utf8;
use warnings;
use CGI;

my $q = new CGI;
my $param1 = $q->param('name');
my $param2 = $q->param('password');

print "Content-type:text/html\n\n";
print "<html>\n";
print "<head></head>\n";
print "<h1>Hello World, $param1 password is $param2</h1>";
print "</html>";

うーん、パラメータが付くのが気になるな。。hiddenだと、type=”password”にできないし、困ったな。。

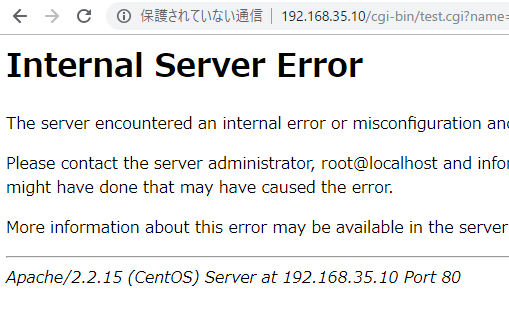
use CGIでinternal server error

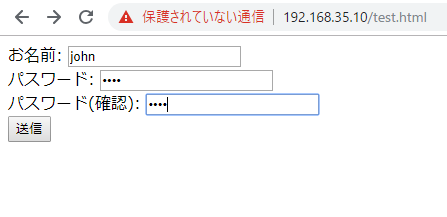
form

<!DOCTYPE html>
<meta charset="utf-8">
<style>
#errorMessage {
	color: red;
}
</style>
<form action="/cgi-bin/test.cgi">
<div id="errorMessage"></div>

<label for="name">お名前:</label>
<input name="name" id="name" required><br>
<label for="password">パスワード:</label>
<input type="password" name="password" id="password" required><br>
<label for="passwordConfirm">パスワード(確認):</label>
<input type="password" name="confirm" id="confirm" oninput="CheckPassword(this)"><br>
<input type="submit" value="送信">
</form>
<script>
		function CheckPassword(confirm){
			var input1 = password.value;
			var input2 = confirm.value;

			if (input1 != input2){
				confirm.setCustomValidity("入力値が一致しません");
			} else{
				confirm.setCustomValidity('');
			}
		}
</script>

データ受け取りのcgi

#!/usr/bin/perl --
use strict;
use utf8;
use warnings;
use CGI;

my $q = new CGI;
my $param1 = $q->param('name');
my $param2 = $q->param('password');

print "Content-type:text/html\n\n";
print "<html>\n";
print "<head></head>\n";
print "<h1>Hello World</h1>";
print "</html>";

view

なんでやねん、て、use CGIをコメントアウトするとinternal server errorが消えているので、おそらくcuse CGIがinstallされていないだけかと。。

[vagrant@localhost ~]$ find `perl -e ‘print “@INC”‘` -name ‘*.pm’ -print | grep CGI

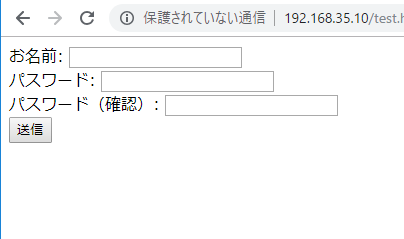
パスワード 入力値の確認 その2

<!DOCTYPE html>
<meta charset="utf-8">
<style>
#errorMessage {
	color: red;
}
</style>
<form>
<div id="errorMessage"></div>

<label for="name">お名前:</label>
<input name="name" id="name" required><br>
<label for="password">パスワード:</label>
<input type="password" name="password" id="password" required><br>
<label for="passwordConfirm">パスワード(確認):</label>
<input type="password" name="confirm" id="confirm" oninput="CheckPassword(this)"><br>
<input type="submit" value="送信">
</form>
<script>
		function CheckPassword(confirm){
			var input1 = password.value;
			var input2 = confirm.value;

			if (input1 != input2){
				confirm.setCustomValidity("入力値が一致しません");
			} else{
				confirm.setCustomValidity('');
			}
		}
</script>

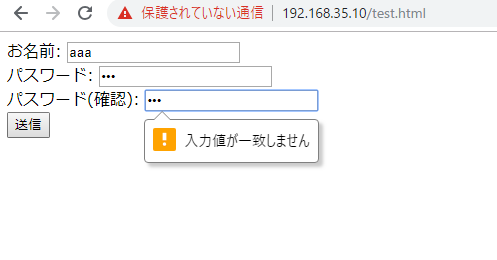
うまくいきました。

oninput=””か、なるほど。

パスワード 入力値の確認

<!DOCTYPE html>
<meta charset="utf-8">
<style>
#errorMessage {
	color: red;
}
</style>
<form>
<div id="errorMessage"></div>

<label for="name">お名前:</label>
<input name="name" id="name" required><br>
<label for="password">パスワード:</label>
<input type="password" name="password" id="password" required><br>
<label for="passwordConfirm">パスワード(確認):</label>
<input type="password" name="passwordConfirm" id="passwordConfirm" required><br>
<input type="submit" value="送信">
</form>
<script>
var form = document.forms[0];
form.onsubmit = function(){
	form.password.setCustomValidity("");

	if(form.password.value != form.passwordConfirm.value){
		form.password.setCustomValidity("パスワードと確認用パスワードが一致しません")
	}
}
form.addEventListener("invalid", function(){
	document.getElementById("errorMessage").innerHTML = "入力値にエラーがあります";
}, false);
</script>

あれ? あれ?
うまくいきませんね。。

「確認」「クリア」「戻る」ボタン

I want to display the “confirmation”, “clear” and “return” buttons within HTML form.
Here is User Interface.

confirm: type=”submit”
clear: type=”reset”
return: type=”button” onclick=”history.back()”

<center>
		<button type="submit">確認</button> <button type="reset">クリア</button> <button type="button" onclick="history.back()">戻る</button>
	</center>

It’s easy than expected.

.travis.yml2

language: ruby
rvm: 1.9.3

env:
  global:
    - RAILS_ENV=document
    - secure: "hogehoge"

branches:
  except: /^(feature|try).*$/

branches:
  only:
    - master
    - develop

before_install:
  - eval `ssh-agent -s`
  - chmod 600 ~/.ssh/config
  - openssl aes-256-cbc -K $encrypted_XXX_key -iv $encrypted_xxx_iv -in .travis/travis_key.enc -out travis_key -d
  - cp travis_key ~/.ssh/
  - chmod 600 ~/.ssh/travis_key
  - ssh-add ~/.ssh/travis_key

after_success: .travis/after_success.sh
after_failure: .travis/after_failure.sh 

なるほどー

.travis.yml

TravisCI flow
1. git clone the repository(where .travis.yml is located) from Github
the option –depth=50 is attached to git clone
2. Move to the cloned repository
3. Get committed code by git checkout
Environment variables written in .travis.yml apply here
4. If you use cache, get cache
5. Specify the version of Ruby to use
6. The one defined in before_install is executed
if you use a cache, it will be added here
7. The one defined in install is executed
8. The one defined in before_script is executed
9. What is defined in script is executed
If the exit code is 0 it is judged as success, otherwise it is judged as failure
10. The one defined in after_success or after_failure is executed.
11. The one defined in after_script is executed

ふむ、工程ごとに分かれたスクリプトを実行するのね。