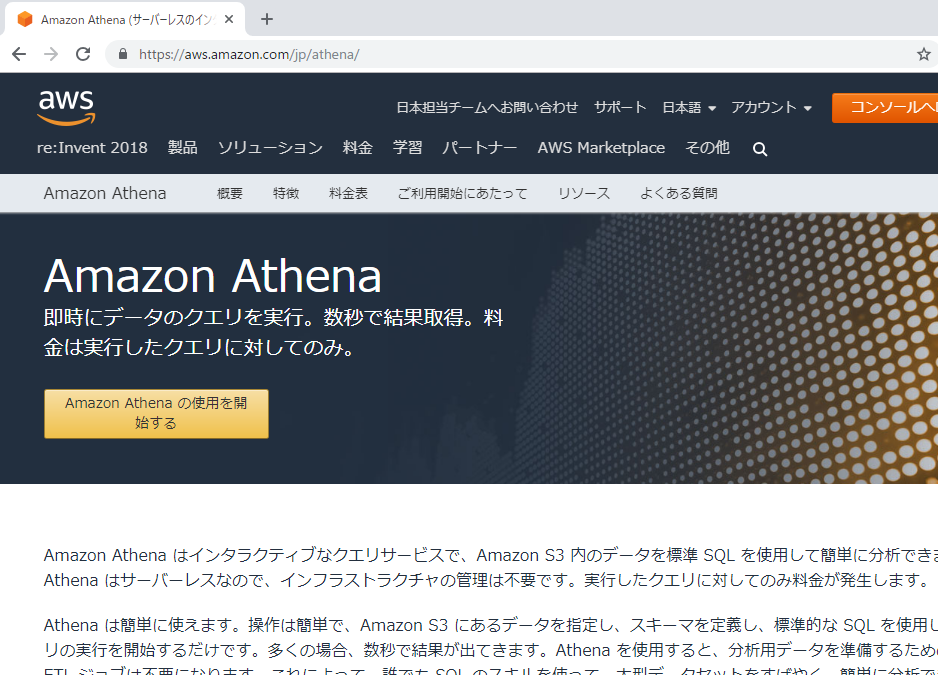
Amazon Athena(アテナ)

即時にデータのクエリを実行。数秒で結果取得、料金は実行したクエリに対してのみ。
https://aws.amazon.com/jp/athena/

まず読み方がわからない
Athenaでアテナと読む。アセナと間違える。。

aws athenaのチュートリアル
step1 データベースを作成
step2 テーブルを作成
step3 データをクエリする
athenaでcloudfront_logsテーブルを作成したら、このテーブルに対してクエリを実行して、athenaで結果を確認できる

ん? step3が重要か? データベース作成、テーブル作成は普通のRDB操作と何もかわらんぞ。
では、実際にクエリを書いていきましょう。

Git ソースツリー(source tree)とは

Git操作はコマンドラインではなかなか作業が見にくいのですが、Git ソースツリーでは、今誰が、どのファイルを、どのように編集しているかを視覚化して見えやすいようにすることができます。

細かい操作はコマンドの方が早い などのデメリットもあるようです。

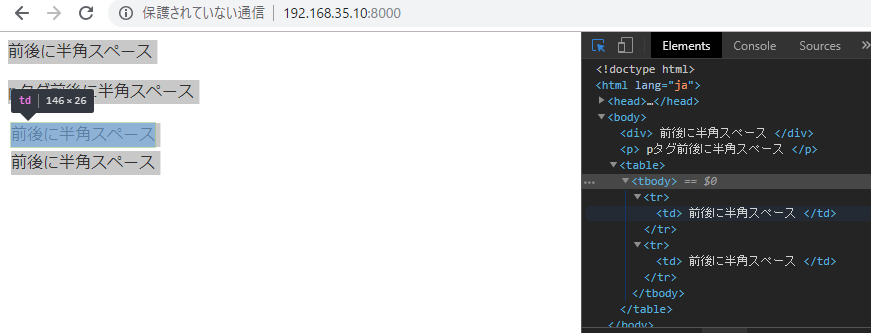
半角スペースの自動削除

<!DOCTYPE html>
<html lang="ja">
<head>
	 <meta charset="UTF-8">
	 <title>space</title>
</head>
<body>
	<div> 前後に半角スペース </div>
	<p> pタグ前後に半角スペース </p>
	<table>
		<tr>
			<td> 前後に半角スペース </td>
		</tr>
		<tr>
			<td> 前後に半角スペース </td>
		</tr>
	</table>
</body>
</html>

ん? 文頭の半角スペースは消えるが文末の半角スペースは残ってる?
なに? 期待値とちょっと違うな。。

Google FormのURLを他のユーザーに送る

割と簡単にできます。
(1)Google Formをつくる
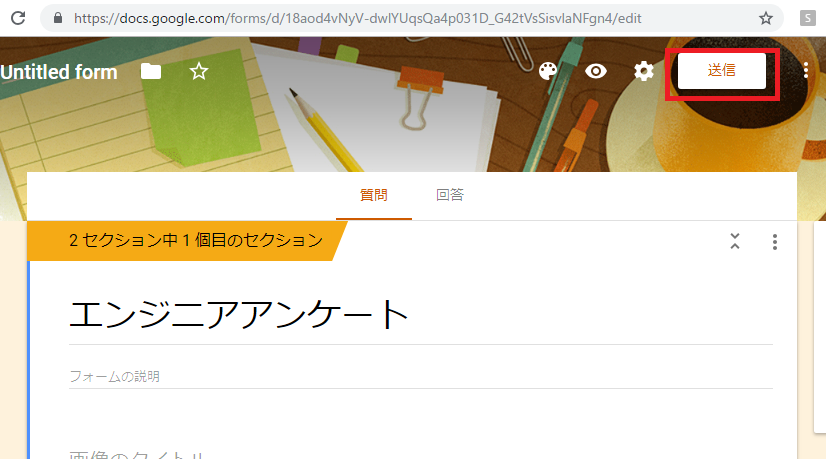
(2)画面右上の「送信」ボタンをクリックします。

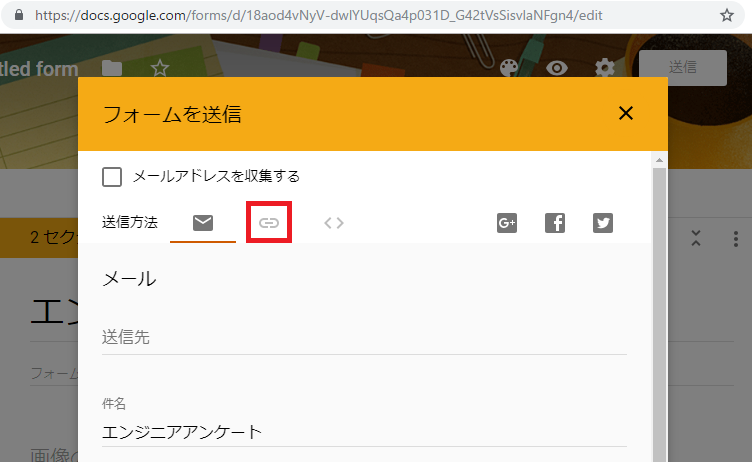
(3)ポップアップが表示されたら、メールアイコンの横のリンクアイコンをクリックします

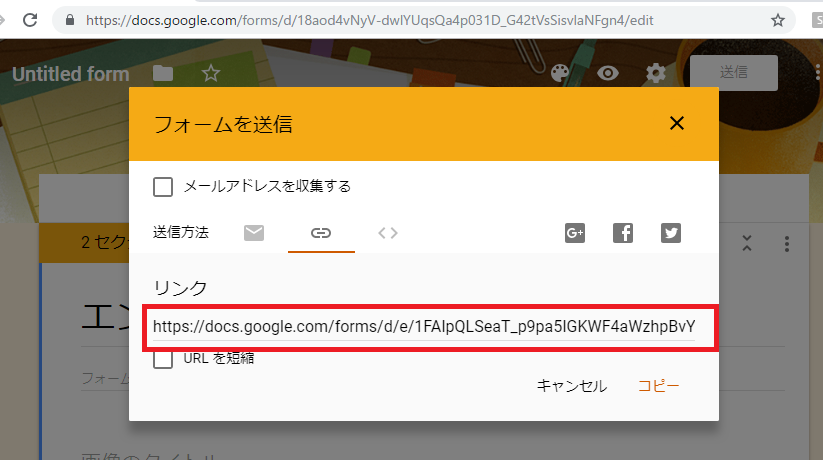
(4)リンクURLが表示されます

ElasticIPとPublicIP

プライベートIPv4は、インターネットから到達できないIP
プライベートIPv4は、同じネットワーク内のインスタンス間の通信に使用

RFC1918

パブリックIPアドレス インターネットから到達可能なIPv4アドレス
インスタンスとインターネット間で通信するにはパブリックアドレスを使用

Elastic IPアドレス(IPv4) : アカウントに割り当てることができるパブリックIPv4アドレス
IPv6アドレス:IPv6 CIDRブロックをVPCと関連付けることができる

プライベートIPは、要するに1つのインスタンスから別のインスタンスに接続する際に使用するIPアドレス

プライベートIPとパブリックIPはサーバを再起動すると変わるが、ElasticIPは固定できる。

RSA秘密鍵、CSR、CRTの配置

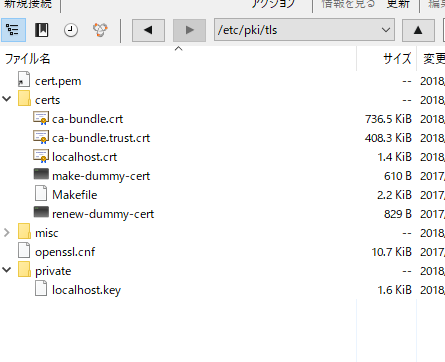
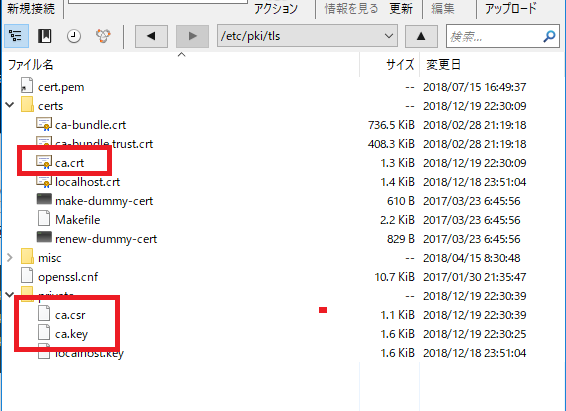
/etc/pki/tls 配下にca.crt, ca.key, ca.csrを配置していく

[vagrant@localhost ssl]$ sudo cp ca.crt /etc/pki/tls/certs/
[vagrant@localhost ssl]$ sudo cp ca.key /etc/pki/tls/private/
[vagrant@localhost ssl]$ sudo cp ca.csr /etc/pki/tls/private/

restorecon (RERSTORE files default selinux security CONtext)
正しいセキュリティコンテキストを付与する

[vagrant@localhost ssl]$ restorecon -RvF /etc/pki/
restorecon reset /etc/pki/dovecot/certs/dovecot.pem context unconfined_u:object_r:dovecot_cert_t:s0->system_u:object_r:dovecot_cert_t:s0
restorecon set context /etc/pki/dovecot/certs/dovecot.pem->system_u:object_r:dovecot_cert_t:s0 failed:’Operation not permitted’
restorecon reset /etc/pki/dovecot/private/dovecot.pem context unconfined_u:object_r:dovecot_cert_t:s0->system_u:object_r:dovecot_cert_t:s0
restorecon set context /etc/pki/dovecot/private/dovecot.pem->system_u:object_r:dovecot_cert_t:s0 failed:’Operation not permitted’
restorecon: unable to read directory /etc/pki/rsyslog
restorecon reset /etc/pki/ca-trust/extracted/openssl/ca-bundle.trust.crt context unconfined_u:object_r:cert_t:s0->system_u:object_r:cert_t:s0
restorecon set context /etc/pki/ca-trust/extracted/openssl/ca-bundle.trust.crt->system_u:object_r:cert_t:s0 failed:’Operation not permitted’
restorecon reset /etc/pki/ca-trust/extracted/pem/tls-ca-bundle.pem context unconfined_u:object_r:cert_t:s0->system_u:object_r:cert_t:s0
restorecon set context /etc/pki/ca-trust/extracted/pem/tls-ca-bundle.pem->system_u:object_r:cert_t:s0 failed:’Operation not permitted’
restorecon reset /etc/pki/ca-trust/extracted/pem/objsign-ca-bundle.pem context unconfined_u:object_r:cert_t:s0->system_u:object_r:cert_t:s0
restorecon set context /etc/pki/ca-trust/extracted/pem/objsign-ca-bundle.pem->system_u:object_r:cert_t:s0 failed:’Operation not permitted’
restorecon reset /etc/pki/ca-trust/extracted/pem/email-ca-bundle.pem context unconfined_u:object_r:cert_t:s0->system_u:object_r:cert_t:s0
restorecon set context /etc/pki/ca-trust/extracted/pem/email-ca-bundle.pem->system_u:object_r:cert_t:s0 failed:’Operation not permitted’
restorecon reset /etc/pki/ca-trust/extracted/java/cacerts context unconfined_u:object_r:cert_t:s0->system_u:object_r:cert_t:s0
restorecon set context /etc/pki/ca-trust/extracted/java/cacerts->system_u:object_r:cert_t:s0 failed:’Operation not permitted’
restorecon reset /etc/pki/ca-trust/source/ca-bundle.legacy.crt context unconfined_u:object_r:cert_t:s0->system_u:object_r:cert_t:s0
restorecon set context /etc/pki/ca-trust/source/ca-bundle.legacy.crt->system_u:object_r:cert_t:s0 failed:’Operation not permitted’
restorecon: unable to read directory /etc/pki/CA/private
restorecon reset /etc/pki/tls/certs/ca.crt context unconfined_u:object_r:cert_t:s0->system_u:object_r:cert_t:s0
restorecon set context /etc/pki/tls/certs/ca.crt->system_u:object_r:cert_t:s0 failed:’Operation not permitted’
restorecon reset /etc/pki/tls/certs/localhost.crt context unconfined_u:object_r:cert_t:s0->system_u:object_r:cert_t:s0
restorecon set context /etc/pki/tls/certs/localhost.crt->system_u:object_r:cert_t:s0 failed:’Operation not permitted’
restorecon reset /etc/pki/tls/private/localhost.key context unconfined_u:object_r:cert_t:s0->system_u:object_r:cert_t:s0
restorecon set context /etc/pki/tls/private/localhost.key->system_u:object_r:cert_t:s0 failed:’Operation not permitted’
restorecon reset /etc/pki/tls/private/ca.key context unconfined_u:object_r:cert_t:s0->system_u:object_r:cert_t:s0
restorecon set context /etc/pki/tls/private/ca.key->system_u:object_r:cert_t:s0 failed:’Operation not permitted’
restorecon reset /etc/pki/tls/private/ca.csr context unconfined_u:object_r:cert_t:s0->system_u:object_r:cert_t:s0
restorecon set context /etc/pki/tls/private/ca.csr->system_u:object_r:cert_t:s0 failed:’Operation not permitted’

なんだこれは?

openssl x509でRSA秘密鍵、CSRから証明書(CRT)を作成する

まつ、csrと秘密鍵がある状態です。
[vagrant@localhost ssl]$ ls
ca.csr ca.key

CRTファイルとは??
CRTファイルは、SSL証明書会社が、CSRファイルに情報を付加して秘密鍵で暗号化したもの。サーバー証明書などと言われる。
証明書会社の秘密鍵に対応する公開鍵は各ブラウザに内蔵されているため、CSRファイルの内容を安全に送信できる。

openssl x509: 秘密鍵で自己署名した証明書を作成する

[vagrant@localhost ssl]$ openssl x509 -req -days 365 -in ca.csr -signkey ca.key -out ca.crt
Signature ok
subject=/C=ja/ST=tokyo/L=shibuya/O=hpscript/OU=developement/CN=hpscript/emailAddress=info@hpscript.com
Getting Private key

まじか!!!!!!!!!!!!!!!

作成したRSA秘密鍵からCSRをつくる

CSRとは「Ceertificate Signing Request」の略でSSLサーバ証明書発行に必要なテキストデータ
公開鍵やコモンネーム(FQDN)、組織名、部署名等が含まれている。
認証局は、CSRと申し込み情報を元に内容を精査してSSLサーバ証明書を発行する

→つまり、認証局がSSL証明書発行に必要なファイルという意味ですね。

openssl req は証明要求(csr)の作成
-new 新規作成
-out 出力する要求ファイル名
-key filename 入力する秘密鍵のファイル名

作成したRSA秘密鍵からCSRをつくります
openssl req -new -key ca.key -out ca.csr
色々聞かれます。
Country Name
state or province name
locality name
organization name
organizational unit name
common name
email address

[vagrant@localhost ssl]$ openssl req -new -key ca.key -out ca.csr
You are about to be asked to enter information that will be incorporated
into your certificate request.
What you are about to enter is what is called a Distinguished Name or a DN.
There are quite a few fields but you can leave some blank
For some fields there will be a default value,
If you enter '.', the field will be left blank.
-----
Country Name (2 letter code) [AU]:ja
State or Province Name (full name) [Some-State]:tokyo
Locality Name (eg, city) []:shibuya
Organization Name (eg, company) [Internet Widgits Pty Ltd]:hpscript
Organizational Unit Name (eg, section) []:developement
Common Name (e.g. server FQDN or YOUR name) []:hpscript
Email Address []:info@hpscript.com

Please enter the following 'extra' attributes
to be sent with your certificate request
A challenge password []:hpscript
An optional company name []:hpscript

RSA秘密鍵を元に、CSRが作られます。

[vagrant@localhost ssl]$ ls
ca.csr  ca.key

作成されたCSR

-----BEGIN CERTIFICATE REQUEST-----
MIIDBjCCAe4CAQAwgY4xCzAJBgNVBAYTAmphMQ4wDAYDVQQIDAV0b2t5bzEQMA4G
A1UEBwwHc2hpYnV5YTERMA8GA1UECgwIaHBzY3JpcHQxFTATBgNVBAsMDGRldmVs
b3BlbWVudDERMA8GA1UEAwwIaHBzY3JpcHQxIDAeBgkqhkiG9w0BCQEWEWluZm9A
aHBzY3JpcHQuY29tMIIBIjANBgkqhkiG9w0BAQEFAAOCAQ8AMIIBCgKCAQEAmJ4B
3ZcX+fD+dDWaE+76QxYd8Z9ooLwGWneFfpZyOYBDP291rMMzVrSA/tAH0HfXFBKu
P8rmtEB23YEzcy4OKOrTXIZqoKfGO6tTgDQYFSTvGJoNWSpf3CZqqVy6nTyeOOUf
MiN6SdWgZV6ZNYx3OPpCacPCVpaYgmLAVL7MmQr+nTGsfFzB8G3acReKaEa1LFDU
bMf1TYj+pK6cNy5KDU3jKLbfWHf6o+n7rFi4ZhLw6DCDHEJpy2CLxO/RdjpC7Vil
hogehoge
-----END CERTIFICATE REQUEST-----

ほう、csrもハッシュ化されるのか^^
opensslでRSA秘密鍵の作成方法

openssl genrsa -out ca.key 2048で作成する
genrsaのオプションを確認しておこう。-out fileでファイルを作成する。2048は2048bitという意味。

usage: genrsa [args] [numbits]
-des encrypt the generated key with DES in cbc mode
-des3 encrypt the generated key with DES in ede cbc mode (168 bit key)
-idea encrypt the generated key with IDEA in cbc mode
-seed
encrypt PEM output with cbc seed
-aes128, -aes192, -aes256
encrypt PEM output with cbc aes
-camellia128, -camellia192, -camellia256
encrypt PEM output with cbc camellia
-out file output the key to ‘file
-passout arg output file pass phrase source
-f4 use F4 (0x10001) for the E value
-3 use 3 for the E value
-engine e use engine e, possibly a hardware device.
-rand file:file:…
load the file (or the files in the directory) into
the random number generator

openssl genrsa -out ca.key 2048と打ち込みます。

[vagrant@localhost ssl]$ openssl genrsa -out ca.key 2048
Generating RSA private key, 2048 bit long modulus
..............+++
.....+++
e is 65537 (0x10001)

ca.keyができるのがわかります。

[vagrant@localhost ssl]$ ls
ca.key

ca.keyの中身を見てみます。

-----BEGIN RSA PRIVATE KEY-----
MIIEogIBAAKCAQEAmJ4B3ZcX+fD+dDWaE+76QxYd8Z9ooLwGWneFfpZyOYBDP291
rMMzVrSA/tAH0HfXFBKuP8rmtEB23YEzcy4OKOrTXIZqoKfGO6tTgDQYFSTvGJoN
WSpf3CZqqVy6nTyeOOUfMiN6SdWgZV6ZNYx3OPpCacPCVpaYgmLAVL7MmQr+nTGs
fFzB8G3acReKaEa1LFDUbMf1TYj+pK6cNy5KDU3jKLbfWHf6o+n7rFi4ZhLw6DCD
HEJpy2CLxO/RdjpC7Vil+eJl99AdIbGOOdRwAnJZ5TfNzINXKg91jWYByaIc0kqS
Vj4snaHADrJkEiKF//B17qsbPXFwG2WbcA+A2wIDAQABAoIBAChWixOwneu4IOlC
Sak/HvKgY+W7RoJFcEB1GtmsliBQoHWh1i6FoYonR3kSLx6Qrk5l6Zx+2p+F8mT1
g03MPH3gI2FvPbuc3K5kyDs4iaz9CB0uipyosJGVrdd55PEuVnufQ7GS4v2k8zIX
4NLgf5qVuvwNe847G7BKvZ8olxdUAh5HEbi8OigI3jHJk/uEXrp48aLF9uU/u6l9
AOwOo44bh0adt1Iu+7HAxS/huFXxwlLqxkCW3iYrAG6A9EgScGdljg7L812meRNJ
Am6/1euX8Zq/rWPkiXds2yTiY5RmI/1TeaHhhLqOMqkGbpxYPCial6uFYfiCgF/Q
uH2tfvECgYEAxzD7M/JMNDQC2Ak9jEMKABFlC60p4BhdFi0KRMZbBfNrBnR/f4zg
+t5dtVzFJX0k5fPD5Dx5KV1LGsmbQNzvfBtvNcraXjICGWEUwaTVV16WkHJt30c8
FeN27pTFXS30qAgPDPn818nQvdesVjEghL1Z/B6jmodtKsGcUkDYPC8CgYEAxCSi
hoehoge
-----END RSA PRIVATE KEY-----

できてます。

オレオレ証明書の作成

認証機関ではない身元が不確かな機関が発行した証明書
オレオレ証明書というのだから、自分で発行した証明書ということだろう

mod_ssl
Apache Module mod_ssl
This module provides SSL v3 and TLS v1.x support for the Apache HTTP Server.
TLSの最新はv1.3だから対応してそう

[vagrant@localhost ~]$ httpd -v
Server version: Apache/2.2.15 (Unix)
Server built: Jun 19 2018 15:45:13
[vagrant@localhost ~]$ rpm -aq | grep mod_ssl

sudo yum isntall mod_ssl openssl
mod_sslとopensslをインストールする

[vagrant@localhost /]$ sudo yum install mod_ssl openssl
[vagrant@localhost /]$ openssl version
OpenSSL 1.0.2n  7 Dec 2017

入りました^^

list-standard-commands
[vagrant@localhost /]$ openssl list-standard-commands
asn1parse
ca
ciphers
cms
crl
crl2pkcs7
dgst
dh
dhparam
dsa
dsaparam
ec
ecparam
enc
engine
errstr
gendh
gendsa
genpkey
genrsa
nseq
ocsp
passwd
pkcs12
pkcs7
pkcs8
pkey
pkeyparam
pkeyutl
prime
rand
req
rsa
rsautl
s_client
s_server
s_time
sess_id
smime
speed
spkac
srp
ts
verify
version
x509

genrsaがありますね。
CAとはCertificate Authority(認証局)
open genrsa -out ca.key 2048
-> 2048bitのに認証局キーを生成する