config/deploy/stage.rb

server 'localhost', user: 'vagrant', roles: %w{web}
set :repo_url, 'git@github.com:mumoshu/finagle_sample_app'

fetch :repo_url
#=> "git@github.com:mumoshu/finagle_sample_app"

task :uptime do
	run_locally do
		output = capture "uptime"
	end
	on roles(:web) do
		output = caputer "uptime"
	end
end

# ソースコードの取得
set :application, 'finalge_sample_app'
set :repo_url, 'git@github.com:mumoshu/finagle_sample.git'

task :update do
	run_locall do
		application = fetch :application
		if test "[ -d #{application} ]"
			execute "cd #{application}; git pull"
		end
	else
		execute "git clone #{fetch :repo_url} #{application}"
	end
  end
end

task :archive => :update do
	run_locally do
		sbt_output = capture "cd #{fetch :application}; sbt pack-archive"

		sbt_output_without_escape_sequences = sbt_output.lines.map {|line| line.gsub(/\e\[\d{1,2}m/,''])}.join

		archive_relative_path = sbt_output_without_escape_sequences.match(/\[info\] Generating (?<archive_path>.+\.tar\.gz)\s*$[:archive_path]
		archive_name =archive_relative_path.match(/(?<archive_name>[^\/]+\.tar\.gz)$/)[:archive_name]
		archive_absolute_path = File.join(capter("cd #{fetch(:application)}; pwd").chomp, archive_relative_path)

		info archive_absolute_path
		info archive_name

		set :archive_absolute_path, archive_absolute_path
		set :archive_name, archive_name
	end
end 

task :deploy => :archive do
	archive_path = fetch :archive_absolute_path
	archive_name = fetch :archive_name
	release_path = File.join(fetch(:deploy_to), fetch(:application))

	on roles(:web) do
		unless test "[ -d #{release_path} ]"
			execute "mkdir -p #{release_path}"
		end

		upload! archive_path, release_path

		execute "cd #{relase_path}; tar -zxvf #{archive_name}"

	end
end

capistrano

Capistranoタスク自体は「コマンドを順番に実行する」だけなので、デプロイのためにシェルスクリプトでやっていたようなことはひと通りできる。
nohupでバックグラウンドプロセス化・upstart/monit/daemontools/godなどでデーモン化・プロセス監視・プロセスIDの管理などシェルスクリプトやRubyコードで表現できることであればできる。

Capistrano
Capistranoはおおまかに以下の3要素から構成
-capコマンド
-Capistranoのライブラリ
-デフォルトのデプロイタスク

Capistranoワークフロー
-Capistranoのインストール
-設定ファイルのひな形をつくる
-設定ファイルのカスタマイズ
-capコマンドを実行する

では、早速Capistranoをインストールしましょう。
[vagrant@localhost ruby]$ ruby -v
ruby 2.3.1p112 (2016-04-26 revision 54768) [x86_64-linux]
[vagrant@localhost ruby]$ gem install capistrano
Fetching: sshkit-1.17.0.gem (100%)
Successfully installed sshkit-1.17.0
Fetching: airbrussh-1.3.0.gem (100%)
Successfully installed airbrussh-1.3.0
Fetching: capistrano-3.11.0.gem (100%)
Successfully installed capistrano-3.11.0
Parsing documentation for sshkit-1.17.0
Installing ri documentation for sshkit-1.17.0
Parsing documentation for airbrussh-1.3.0
Installing ri documentation for airbrussh-1.3.0
Parsing documentation for capistrano-3.11.0
Installing ri documentation for capistrano-3.11.0
Done installing documentation for sshkit, airbrussh, capistrano after 5 seconds
3 gems installed

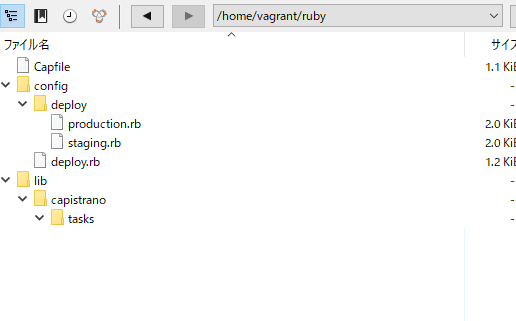
続いて設定ファイルのひな形をつくります。

[vagrant@localhost ruby]$ cap install
mkdir -p config/deploy
create config/deploy.rb
create config/deploy/staging.rb
create config/deploy/production.rb
mkdir -p lib/capistrano/tasks
create Capfile
Capified

以下のようなファイル構成になる。

# config valid for current version and patch releases of Capistrano
lock "~> 3.11.0"

set :application, "my_app_name"
set :repo_url, "git@example.com:me/my_repo.git"

# Default branch is :master
# ask :branch, `git rev-parse --abbrev-ref HEAD`.chomp

# Default deploy_to directory is /var/www/my_app_name
# set :deploy_to, "/var/www/my_app_name"

# Default value for :format is :airbrussh.
# set :format, :airbrussh

# You can configure the Airbrussh format using :format_options.
# These are the defaults.
# set :format_options, command_output: true, log_file: "log/capistrano.log", color: :auto, truncate: :auto

# Default value for :pty is false
# set :pty, true

# Default value for :linked_files is []
# append :linked_files, "config/database.yml"

# Default value for linked_dirs is []
# append :linked_dirs, "log", "tmp/pids", "tmp/cache", "tmp/sockets", "public/system"

# Default value for default_env is {}
# set :default_env, { path: "/opt/ruby/bin:$PATH" }

# Default value for local_user is ENV['USER']
# set :local_user, -> { `git config user.name`.chomp }

# Default value for keep_releases is 5
# set :keep_releases, 5

# Uncomment the following to require manually verifying the host key before first deploy.
# set :ssh_options, verify_host_key: :secure

githubおさらい

共有リポジトリ

> GitHub が、プロジェクトに関連するファイルをまとめて保管する単位
> これをチーム内で共有して、作業目的ごとにブランチ (Branch) と呼ばれるコピーを作り、適当なタイミングでブランチに対して行われた更新をオリジナル (Master Branch) に反映するというのが、GitHub を使った共同開発の 1 つのパターン

リポジトリのフォーク
> 共有されていないリポジトリに対して書き込むことはできないが、フォークしたリポジトリは自分の所有物なので、自由に更新ができる。

フォークは GitHub サーバー上でリポジトリの複製を作成する行為
クローンは、サーバー上のリポジトリを、クライアント環境に複製する行為

forkをすると、リポジトリを持ってこれるってわけですね。

クローンしたリポジトリ内で開発作業を行う
クローンで行った更新を、フォークしたリポジトリにコミット
フォークしたリポジトリからオリジナルのリポジトリにプルリクエスト (Pull Request) を送信

Trvis CI

どうやら失敗したようです。

0.55s$ git clone --depth=50 --branch=chat https://github.com/githubix/bengoshi_chat.git githubix/bengoshi_chat
Cloning into 'githubix/bengoshi_chat'...
remote: Counting objects: 50, done.
remote: Compressing objects: 100% (2/2), done.
remote: Total 50 (delta 0), reused 2 (delta 0), pack-reused 47
Unpacking objects: 100% (50/50), done.
$ cd githubix/bengoshi_chat
$ git checkout -qf db05fb4b37219f42856c6148d96e13a6fbde87a5
Disabling Gradle daemon
$ mkdir -p ~/.gradle && echo "org.gradle.daemon=false" >> ~/.gradle/gradle.properties
rvm
4.10s$ rvm use default
Using /home/travis/.rvm/gems/ruby-2.4.1
** Updating RubyGems to the latest version for security reasons. **
** If you need an older version, you can downgrade with 'gem update --system OLD_VERSION'. **
ruby.versions
$ ruby --version
ruby 2.4.1p111 (2017-03-22 revision 58053) [x86_64-linux]
$ rvm --version
rvm 1.29.3 (latest) by Michal Papis, Piotr Kuczynski, Wayne E. Seguin [https://rvm.io]
$ bundle --version
Bundler version 1.16.2
$ gem --version
2.7.7
No Gemfile found, skipping bundle install
0.15s$ rake
rake aborted!
No Rakefile found (looking for: rakefile, Rakefile, rakefile.rb, Rakefile.rb)
/home/travis/.rvm/gems/ruby-2.4.1@global/gems/rake-12.3.0/exe/rake:27:in `'
(See full trace by running task with --trace)
The command "rake" exited with 1.
Done. Your build exited with 1.

.travis.ymlがnullだったからでしょうか。

yamlを書きます。

language: php

php:
  - 5.6
  - 5.7
  - hhvm

before_script:
  - curl -s http://getcomposer.org/installer | php
  - php composer.phar install --dev --prefer-source

script:
  - mkdir -p build/logs
  - phpunit --coverage-clover build/logs/clover.xml --configuration tests/phpunit.xml tests

after_script:
  - php vendor/bin/coveralls -v

notifications:
  slack:
    rooms:
      secure: your_token_key

TravisCI 画面

なるほど、こういうことか。テスト内容をyamlに書いて、rubyが実行するのね。それをslackなどに送付することも可能。

CloudFormation

what?

AWS CloudFormation gives developers and systems administrators an easy way to create and manage a collection of related AWS resources, provisioning and updating them in an orderly and predictable fashion.

You can use AWS CloudFormation’s sample templates or create your own templates to describe the AWS resources, and any associated dependencies or runtime parameters, required to run your application. You don’t need to figure out the order for provisioning AWS services or the subtleties of making those dependencies work. CloudFormation takes care of this for you. After the AWS resources are deployed, you can modify and update them in a controlled and predictable way, in effect applying version control to your AWS infrastructure the same way you do with your software.

VPSにMackerelをいれる

Mackerelのyumリポジトリを登録
[root@hoge ~]# curl -fsSL https://mackerel.io/file/script/setup-yum.sh | sh
This script requires superuser authority to configure Mackerel yum repository:
+ command -v curl
/usr/bin/curl
+ http_get=’curl -LfsS’
+ ‘[‘ ‘curl -LfsS’ = ” ‘]’
++ mktemp
+ gpgkey_path=/tmp/tmp.KrBsOelQWe
+ curl -LfsS https://mackerel.io/file/cert/GPG-KEY-mackerel
+ rpm –import /tmp/tmp.KrBsOelQWe
+ rm /tmp/tmp.KrBsOelQWe
+ cat
done
To install mackerel-agent type: sudo yum install mackerel-agent

その後、yumコマンドを用いてインストール
# sudo yum install -y mackerel-agent
Loaded plugins: fastestmirror, security
Setting up Install Process
Determining fastest mirrors
epel/metalink | 8.7 kB 00:00
* base: ftp.iij.ad.jp
* epel: mirror.dmmlabs.jp
* extras: ftp.iij.ad.jp
* remi-safe: ftp.riken.jp
* updates: ftp.iij.ad.jp
base | 3.7 kB 00:00
base/primary_db | 4.7 MB 00:00
epel | 3.2 kB 00:00
epel/primary | 3.2 MB 00:00
epel 12521/12521
extras | 3.4 kB 00:00
extras/primary_db | 25 kB 00:00
groonga | 2.9 kB 00:00
groonga/primary_db | 604 kB 00:00
mackerel | 2.5 kB 00:00
mackerel/primary_db | 5.8 kB 00:00
mongodb-org-3.4 | 2.5 kB 00:00
mongodb-org-3.4/primary_db | 73 kB 00:00
remi-safe | 2.9 kB 00:00
remi-safe/primary_db | 1.0 MB 00:00
updates | 3.4 kB 00:00
updates/primary_db | 1.2 MB 00:00
Resolving Dependencies
There are unfinished transactions remaining. You might consider running yum-complete-transaction first to finish them.
–> Running transaction check
—> Package mackerel-agent.noarch 0:0.56.1-1 will be installed
–> Finished Dependency Resolution

Dependencies Resolved

================================================================================
Package Arch Version Repository Size
================================================================================
Installing:
mackerel-agent noarch 0.56.1-1 mackerel 1.9 M

Transaction Summary
================================================================================
Install 1 Package(s)

Total download size: 1.9 M
Installed size: 4.6 M
Downloading Packages:
mackerel-agent-0.56.1-1.noarch.rpm | 1.9 MB 00:00
Running rpm_check_debug
Running Transaction Test
Transaction Test Succeeded
Running Transaction
Installing : mackerel-agent-0.56.1-1.noarch 1/1
Verifying : mackerel-agent-0.56.1-1.noarch 1/1

Installed:
mackerel-agent.noarch 0:0.56.1-1

Complete!

[root@hoge ~]# sudo mackerel-agent init -apikey=””
You have mail in /var/spool/mail/root
[root@hoge ~]# sudo /etc/init.d/mackerel-agent start
Starting mackerel-agent: [ OK ]

すげ、きた

これすげ

Mackerel(マカレル)

はてなが開発した新世代のサーバ管理・監視サービス。
仮想サーバなどクラウドサービスをMackerelで統合管理および監視ができる。

-> box listを表示
MyCentOS>vagrant box list
bento/centos-6.7 (virtualbox, 2.2.7)
bento/centos-6.8 (virtualbox, 2.3.0)
trusty64 (virtualbox, 0)
ubuntu/trusty64 (virtualbox, 20161207.0.0)

Mackerelは入っていない。当然か。

これ打っていいのか。

vagrant box repackage mackerel/centos66 virtualbox 0.0.2

ちゃうちゃう、hatenaのサイトから無料トライアル

apacheとnginxの比較

まず、nginx
[vagrant@localhost local]$ nginx -v
nginx version: nginx/1.14.0

あれ、入ってますね。
起動してみます。
[vagrant@localhost local]$ sudo service nginx start
nginx を起動中: nginx: [emerg] bind() to 0.0.0.0:80 failed (98: Address already in use)
nginx: [emerg] bind() to 0.0.0.0:80 failed (98: Address already in use)
nginx: [emerg] still could not bind()
[失敗]
あ、ポート80はapacheが使ってるからか。

比較
Apacheは、プロセス駆動アーキテクチャでマルチプロセス。これは、各リクエストをプロセスに割り当てて処理を行う。リクエストが大量に来た際、プロセスが同時に起動するのでオーバーヘッドが非常に大きくなるというデメリットがある。

nginxは、イベント駆動アーキテクチャ、シングルスレッドモデル。 シングルスレッドでループ処理をまわし、キューに溜まったイベントを処理していく処理方式(イベントループ方式)(node.jsなどでも採用)。プロセス数はCPUコア数と基本的には同じに設定。

=>リクエストが多い場合は、単純にマルチプロセルの方が速そうだが。
>nginxの方が、処理が軽く、大量のリクエストを処理するのに向いている。
なに?なぜだ?

>nginxは、CPUリソースがたくさん必要な処理には向いていない。処理時間が長くなる処理を実行した際、そこでプロセスがブロックされてしまい処理能力が落ちてしまう。
これはシングルだから、納得できますね。

>NGINXは大量処理、スピード重視を徹底的に追求
同時アクセスはnginxの方が良いと書かれている。
う~ん、イマイチ納得いかない。

コマンドを変えてみるが、
[vagrant@localhost local]$ sudo nginx
nginx: [emerg] bind() to 0.0.0.0:80 failed (98: Address already in use)
nginx: [emerg] still could not bind()

あかん