
module.exports = function(grunt){
 // config
grunt.initConfig({

    pkg: grunt.file.readJSON('package.json'),

    less: {
      build1:{
        src: ['src/styles1.less','src/styles2.less'],
        dest: 'build/styles.css'
      }
    },

    csslint: {
      check: {
        src: '<%= less.build.dest %>'
      }
    }

    cssmin: {
      minmize: {
        options: {
          banner: '/*! <%= pkg.name %> <%= grunt.template.today("yyyy-mm-dd") %> */'
        },
        files: {
          'build/styles.min.css' : '<%= less.build.dest %>'
        }
      }
    }

});

 // plugin
 grunt.loadNpmTasks('grunt-contrib-less');
 grunt.loadNpmTasks('grunt-contrib-csslint');
 grunt.loadNpmTasks('grunt-contrib-cssmin');

 // tasks
 grunt.registerTask('default', ['less', 'cssmin','csslint']);
}
Month: November 2016
LESS ミックスイン
LESSでは様々な使い方があります。
階層的な表現
header {
  font-size: 18px;
  a{
    color: red;
    &:hover {
      color: green;
    }
  }
}

.button {
  &-ok {
    color: green;
  }
  &-ng {
    color: red;
  }
}
ミックスイン。値を入れたいときは、引数を入力しましょう。
.my-mixin(@width:5px; @padding:7px){
  border: @width solid red;
  padding: @padding;
  margin: 7px;
}

h1 {
  font-size: 24px;
  .my-mixin;
}

h2 {
  font-size: 20px;
  .my-mixin(10px; 20px);
}
extend
.button {
  font-size: 14px;
  border: 1px solid black;
}
.button-ok {
  &:extend(.button);
  color: green;
}
.button-ng {
  &:extend(.button);
  color: red;
}
LESS CSS
LESSを使うと、CSSをプログラムのように変数や関数などを使ってCSSをシンプルに書くことができます。
LESS
node.jsで動かしますので、サーバーサイドの環境を整えましょう。
[vagrant@localhost ~]$ mkdir less_lessons
[vagrant@localhost ~]$ cd less_lessons
[vagrant@localhost less_lessons]$ node -v
v0.10.46
[vagrant@localhost less_lessons]$ npm -v
2.15.1
[vagrant@localhost less_lessons]$ sudo npm install -g less
lessからCSSを作るには、コマンド”lessc”となります。
[vagrant@localhost less_lessons]$ lessc -v
lessc 2.7.1 (Less Compiler)
[vagrant@localhost less_lessons]$ lessc styles.less styles.css
それでは、いくつか、記法をみてみましょう。
/*
*/

@h1-color: red;
@h2-color: darken(@h1-color, 10%);
@h1-size: 24px;
@h2-size: @h1-size - 4px;

@header: h;
@color: color;
@dir: "/img";

@{header}1 {
  font-size: @h1-size;
  @{color}: @h1-color;
}

@{header}2 {
  font-size: @h2-size;
  @{color}: @h2-color;
  background: url("@{dir}/bg.png")
}
CSSの値を変数として扱っています。
Google web fontで遊ぼう
Webページ閲覧時、通常ではパソコンにインストールされているフォントしかブラウザで表示することが出来ませんが、「Webフォント」を使用すると任意のフォントを表示することが出来ます。
Google web fontの公式サイト
Google Web font
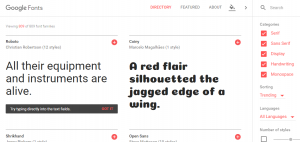
右のメニューバーで、Serif, Sans Serif, Display, Handwriting, Monospaceや、sortなどで、好みを選べます。
また、詳細にのページに行くと、誰が開発したかや、利用状況などを閲覧できます。
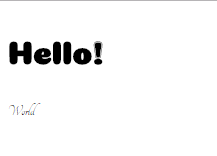
Google fontはheadタグとCSSに記入するだけで、簡単に利用できます。
例えば、以下のように記述します。
<!DOCTYPE html>
<html lang="ja" ng-app>
<head>
    <meta charset="UTF-8">
    <title>web fontの練習</title>
    <link rel="stylesheet" type="text/css"
      href="https://fonts.googleapis.com/css?family=Coiny|Tangerine">
      <style>
      h1 {
        font-family: 'Coiny', serif;
      }
      p {
        font-family: 'Tangerine', serif;
      }
      </style>
</head>
<body>
    <h1>Hello!</h1>
    <p>World</p>
</body>
</html>
Chrom developer toolのnetworkパネル
ページのロードに時間がかかってイライラすることありますよね。
そんなときは、chrom developer toolでどのコードがどれくらい時間がかかっているか調べることができます。
Networkで見ると、Analyticsの処理に時間がかかっていることがわかります。
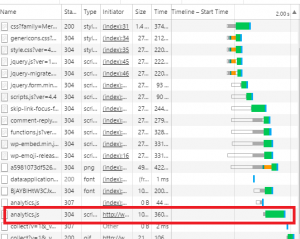
チャートの青い線はDomが構成された時間の事です。オレンジの線は、画像の読み込みやiframeなどです。
更に詳しく見ていくには、timelineで見ていきます。
ちなみに、DOMとは、Document Object Modelのことで、Chrom developer toolでDOMを操作しても、ファイルは変更されません。
ubuntu14.04(trusty)にDockerをインストール
vagrantのubuntu14.04(trusty)にDockerをインストールします。
まず、パッケージマネージャーをアップデートしておきます。
sudo apt-get update
そして、Dockerの最新を取得します。
wget -qO- https://get.docker.com/ | sh
文末にアラートが表示されるので、ユーザーをDockerグループに追加します。
If you would like to use Docker as a non-root user, you should now consider
adding your user to the "docker" group with something like:

  sudo usermod -aG docker vagrant

Remember that you will have to log out and back in for this to take effect!
vagrant@vagrant-ubuntu-trusty-64:~$ sudo usermod -aG docker vagrant
では、Dockerが入っているか確認してみましょう。大丈夫そうですね。
vagrant@vagrant-ubuntu-trusty-64:~$ sudo docker run hello-world
Unable to find image 'hello-world:latest' locally
latest: Pulling from library/hello-world
c04b14da8d14: Pull complete
Digest: sha256:0256e8a36e2070f7bf2d0b0763dbabdd67798512411de4cdcf9431a1feb60fd9
Status: Downloaded newer image for hello-world:latest

Hello from Docker!
This message shows that your installation appears to be working correctly.

To generate this message, Docker took the following steps:
 1. The Docker client contacted the Docker daemon.
 2. The Docker daemon pulled the "hello-world" image from the Docker Hub.
 3. The Docker daemon created a new container from that image which runs the
    executable that produces the output you are currently reading.
 4. The Docker daemon streamed that output to the Docker client, which sent it
    to your terminal.

To try something more ambitious, you can run an Ubuntu container with:
 $ docker run -it ubuntu bash

Share images, automate workflows, and more with a free Docker Hub account:
 https://hub.docker.com

For more examples and ideas, visit:
 https://docs.docker.com/engine/userguide/

vagrant@vagrant-ubuntu-trusty-64:~$ sudo docker --version
Docker version 1.12.3, build 6b644ec
Dockerを動かすためにvagrantにUbuntuをインストール
Dockerは軽量な仮想環境で、OSやアプリケーションを別の場所に簡単にもっていくことができます。Build once, run anywhere と呼ばれたりします。
Dockerはubuntu上で開発されているので、環境は、ubuntuをvagrantでインストールして、そこで作業していきましょう。ということで、vagrantのフォルダに移動し、コマンドラインからubuntuを入れます。
まず、vagrantから、boxesからtrustyをコピーします。
http://www.vagrantbox.es/
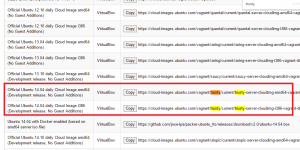
そして、vagrantのフォルダからコマンドラインで以下のように打ち込みます。
C:\Users\username\MyVagrant>vagrant box add trusty64 https://cloud-images.ubuntu.com/vagrant/trusty/current/trusty-server-cloudimg-amd64-vagrant-disk1.box
インストールが終わったら、Dockerのファイルを作り、vagrant initをしましょう。
C:\Users\username\MyVagrant>mkdir Docker
C:\Users\username\MyVagrant>cd Docker
C:\Users\username\MyVagrant\Docker>vagrant init trusty64
そすると、vagrant fileが作られるので、vagrant fileの中で、以下のようにipのコメントを外して、任意のipアドレスを設定しましょう。ここでは、192.168.55.44としてます。
  # Create a private network, which allows host-only access to the machine
  # using a specific IP.
  config.vm.network "private_network", ip: "192.168.55.44"

  # Create a public network, which generally matched to bridged network.
  # Bridged networks make the machine appear as another physical device on
  # your network.
  # config.vm.network "public_network"
その後、vagrant upとし、Ubuntu sshで接続完了です。
login as: vagrant
vagrant@192.168.55.44's password:
Welcome to Ubuntu 14.04.5 LTS (GNU/Linux 3.13.0-100-generic x86_64)* Documentation: https://help.ubuntu.com/
System information disabled due to load higher than 1.0
Get cloud support with Ubuntu Advantage Cloud Guest:
http://www.ubuntu.com/business/services/cloud0 packages can be updated.
0 updates are security updates.
CoffeeScriptのクラスの継承
Coffeeでもクラスの継承、オーバーライドなどできます。
class User
 constructor: (@name) ->
 hello: -> alert "hello, #{@name}"

class AdminUser extends User
 hello: ->
  alert "admin says..."
  super()

tom = new User "Tom"
alert tom.name
tom.hello()

bob  new AdminUser "Bob"
# alert bob.name
bob.hello()
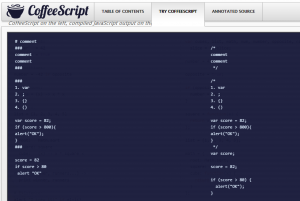
JavaScriptとCoffeeScript
RubyやPhythonのように軽量のCoffeeScriptですが、コード量を減らすなどメリットがあります。
CoffeeScriptからJavaScriptの変換はCoffeeScriptのTry Scriptで確認できます。
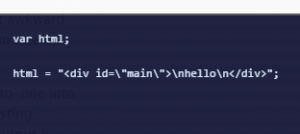
coffee scriptのヒアドキュメント
html = """
       <div id="main">
       hello
       </div>
       """
Ada genericによるswap
with Ada.Text_IO;
use Ada.Text_IO;
with Ada.Integer_Text_IO;
use Ada.Integer_Text_IO;

procedure MyApp is
   generic
     type element is private;
   procedure Swap(a, b: in out element);

   procedure Swap(a, b: in out element) is
     tmp: element;
   begin
     tmp := a;
     a := b;
     b := tmp;
   end Swap;

   procedure SwapInt is new Swap(Integer);
   procedure SwapChar is new Swap(Character);

   i1: Integer := 3;
   i2: Integer := 5;
   c1: Character := 'a';
   c2: Character := 'd';
begin
  put(i1);
  new_line;
  put(i2);
  new_line;
  put(c1);
  new_line;
  put(c2);
  new_line;
  SwapInt(i1, i2);
  SwapChar(c1, c2);
  put(i1);
  new_line;
  put(i2);
  new_line;
  put(c1);
  new_line;
  put(c2);
  new_line;
end MyApp;
[vagrant@localhost ada_lessons]$ gnatmake myapp.adb
gcc -c myapp.adb
gnatbind -x myapp.ali
gnatlink myapp.ali
[vagrant@localhost ada_lessons]$ ./myapp
          3
          5
a
d
          5
          3
d
a