vagrant ssh-config

VagrantfileがあるディレクトリでOpenSSHの設定を行う。

>vagrant ssh-config
Host default
  HostName 127.0.0.1
  User vagrant
  Port 2222
  UserKnownHostsFile /dev/null
  StrictHostKeyChecking no
  PasswordAuthentication no
  IdentityFile C:/Users/hoge/MyVagrant/Cent/.vagrant/machines/default/virtualbox/private_key
  IdentitiesOnly yes
  LogLevel FATAL

ん?なんじゃこりゃ。

取得できるファイルをssh.configに書き込み。
>vagrant ssh-config > ssh.config

>scp -F ssh.config vagrant@default:package-lock.json ./
package-lock.json 100% 11KB 11.5KB/s 00:00

まじこれ?
要するにvagrantにscp接続できたってこと?

うおおおおおおおおおおおお、全然追いつける気がしない。

OpenSSH

OpenSSH(Open Secure Shell) is software for using the SSH protocol, including an SSH server and an SSH client. OpenSSH is developed by the OpenBSD project and released under the BSD license. There are several other implementations of SSH, including the original SSH implementation SSH Tectia, but as of 2008, OpenSSH is the most used SSH implementation in the world.

Windows 10に OpenSSHが正式に組み込まれて使用できるとのこと。
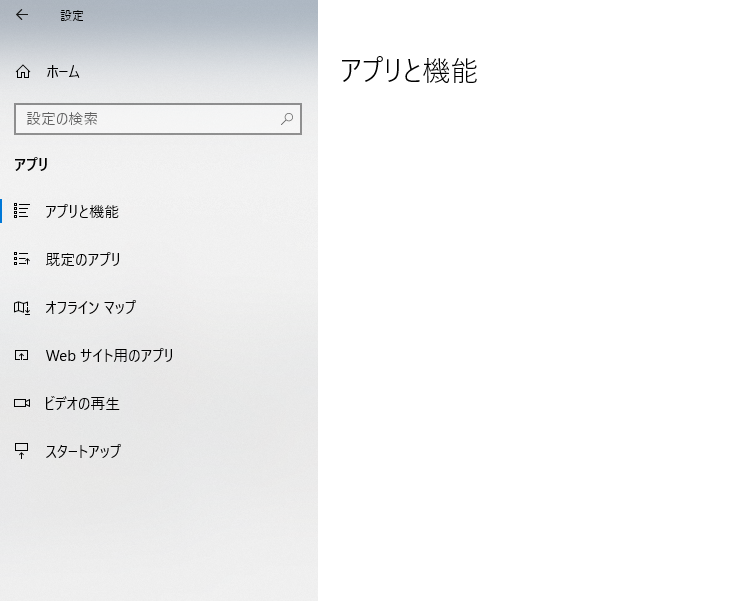
アプリと機能を開きます。

オプション機能の管理→OpenSSHクライアント
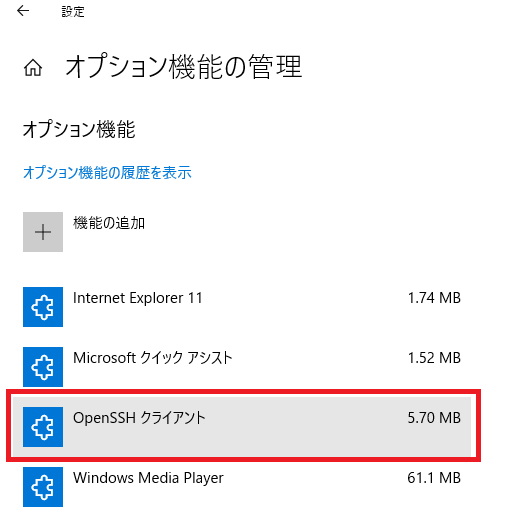
あ、既にインストールされていますね。

続いて、Windows PowerShellを開きます。
> ssh localhost
ssh: connect to host localhost port 22: Connection refused

> New-NetFirewallRule -Protocol TCP -LocalPort 22 -Direction Inbound -Action Allow – DisplayName SS
H
New-NetFirewallRule : 引数 ‘-‘ を受け入れる位置指定パラメーターが見つかりません。
発生場所 行:1 文字:1
+ New-NetFirewallRule -Protocol TCP -LocalPort 22 -Direction Inbound -A …
+ ~~~~~~~~~~~~~~~~~~~~~~~~~~~~~~~~~~~~~~~~~~~~~~~~~~~~~~~~~~~~~~~~~~~~~
+ CategoryInfo : InvalidArgument: (:) [New-NetFirewallRule]、ParameterBindingException
+ FullyQualifiedErrorId : PositionalParameterNotFound,New-NetFirewallRule

> New-NetFirewallRule -Protocol TCP -LocalPort 22 -Direction Inbound -Action Allow -DisplayName SSH

New-NetFirewallRule : アクセスが拒否されました。
発生場所 行:1 文字:1
+ New-NetFirewallRule -Protocol TCP -LocalPort 22 -Direction Inbound -A …
+ ~~~~~~~~~~~~~~~~~~~~~~~~~~~~~~~~~~~~~~~~~~~~~~~~~~~~~~~~~~~~~~~~~~~~~
+ CategoryInfo : PermissionDenied: (MSFT_NetFirewallRule:root/standardcimv2/MSFT_NetFirewallRule) [New-Ne
tFirewallRule], CimException
+ FullyQualifiedErrorId : Windows System Error 5,New-NetFirewallRule

アクセスが拒否されました。
なんでやー

ssh -i /path/to/key

It uses ssh(secure shell) protocol(encrypt communication between client and remote machine), so you can safely execute command. In addition, since the ssh command can use key authentication using secret key / public key, you can further improve security by using them.

ssh -i /path/to/key

Specify the private key file(identity file). In the initial setting, SSH version 1 is /.ssh/identity, ssh version 2 is /.ssh/id_rsa and /.ssh/id_dsa

ssh接続コマンドのオプション -L, -N

コマンドラインにて以下のように打った時

ssh -N -L hogehoge foofoo

-p ポート番号
接続に使用するポート番号を指定

-l ユーザー名
接続に使用するユーザ名を指定

-L リモート側ソケットに与えられたローカル(クライアント)ホスト上の指定のTCPポートまたはUnixソケットが、与えられたリモートホスト上のポートに転送されるよう指定する。ローカル側で、TCPポートにlisten用のソケットを割り当てることにより行われる。

-N リモートコマンドを実行しない。

オプションはほかにも、 -1, -2, -4, -6 など色々ある模様。
うーん、ややこしーーーー

RSA秘密鍵、CSR、CRTの配置

/etc/pki/tls 配下にca.crt, ca.key, ca.csrを配置していく

[vagrant@localhost ssl]$ sudo cp ca.crt /etc/pki/tls/certs/
[vagrant@localhost ssl]$ sudo cp ca.key /etc/pki/tls/private/
[vagrant@localhost ssl]$ sudo cp ca.csr /etc/pki/tls/private/

restorecon (RERSTORE files default selinux security CONtext)
正しいセキュリティコンテキストを付与する

[vagrant@localhost ssl]$ restorecon -RvF /etc/pki/
restorecon reset /etc/pki/dovecot/certs/dovecot.pem context unconfined_u:object_r:dovecot_cert_t:s0->system_u:object_r:dovecot_cert_t:s0
restorecon set context /etc/pki/dovecot/certs/dovecot.pem->system_u:object_r:dovecot_cert_t:s0 failed:’Operation not permitted’
restorecon reset /etc/pki/dovecot/private/dovecot.pem context unconfined_u:object_r:dovecot_cert_t:s0->system_u:object_r:dovecot_cert_t:s0
restorecon set context /etc/pki/dovecot/private/dovecot.pem->system_u:object_r:dovecot_cert_t:s0 failed:’Operation not permitted’
restorecon: unable to read directory /etc/pki/rsyslog
restorecon reset /etc/pki/ca-trust/extracted/openssl/ca-bundle.trust.crt context unconfined_u:object_r:cert_t:s0->system_u:object_r:cert_t:s0
restorecon set context /etc/pki/ca-trust/extracted/openssl/ca-bundle.trust.crt->system_u:object_r:cert_t:s0 failed:’Operation not permitted’
restorecon reset /etc/pki/ca-trust/extracted/pem/tls-ca-bundle.pem context unconfined_u:object_r:cert_t:s0->system_u:object_r:cert_t:s0
restorecon set context /etc/pki/ca-trust/extracted/pem/tls-ca-bundle.pem->system_u:object_r:cert_t:s0 failed:’Operation not permitted’
restorecon reset /etc/pki/ca-trust/extracted/pem/objsign-ca-bundle.pem context unconfined_u:object_r:cert_t:s0->system_u:object_r:cert_t:s0
restorecon set context /etc/pki/ca-trust/extracted/pem/objsign-ca-bundle.pem->system_u:object_r:cert_t:s0 failed:’Operation not permitted’
restorecon reset /etc/pki/ca-trust/extracted/pem/email-ca-bundle.pem context unconfined_u:object_r:cert_t:s0->system_u:object_r:cert_t:s0
restorecon set context /etc/pki/ca-trust/extracted/pem/email-ca-bundle.pem->system_u:object_r:cert_t:s0 failed:’Operation not permitted’
restorecon reset /etc/pki/ca-trust/extracted/java/cacerts context unconfined_u:object_r:cert_t:s0->system_u:object_r:cert_t:s0
restorecon set context /etc/pki/ca-trust/extracted/java/cacerts->system_u:object_r:cert_t:s0 failed:’Operation not permitted’
restorecon reset /etc/pki/ca-trust/source/ca-bundle.legacy.crt context unconfined_u:object_r:cert_t:s0->system_u:object_r:cert_t:s0
restorecon set context /etc/pki/ca-trust/source/ca-bundle.legacy.crt->system_u:object_r:cert_t:s0 failed:’Operation not permitted’
restorecon: unable to read directory /etc/pki/CA/private
restorecon reset /etc/pki/tls/certs/ca.crt context unconfined_u:object_r:cert_t:s0->system_u:object_r:cert_t:s0
restorecon set context /etc/pki/tls/certs/ca.crt->system_u:object_r:cert_t:s0 failed:’Operation not permitted’
restorecon reset /etc/pki/tls/certs/localhost.crt context unconfined_u:object_r:cert_t:s0->system_u:object_r:cert_t:s0
restorecon set context /etc/pki/tls/certs/localhost.crt->system_u:object_r:cert_t:s0 failed:’Operation not permitted’
restorecon reset /etc/pki/tls/private/localhost.key context unconfined_u:object_r:cert_t:s0->system_u:object_r:cert_t:s0
restorecon set context /etc/pki/tls/private/localhost.key->system_u:object_r:cert_t:s0 failed:’Operation not permitted’
restorecon reset /etc/pki/tls/private/ca.key context unconfined_u:object_r:cert_t:s0->system_u:object_r:cert_t:s0
restorecon set context /etc/pki/tls/private/ca.key->system_u:object_r:cert_t:s0 failed:’Operation not permitted’
restorecon reset /etc/pki/tls/private/ca.csr context unconfined_u:object_r:cert_t:s0->system_u:object_r:cert_t:s0
restorecon set context /etc/pki/tls/private/ca.csr->system_u:object_r:cert_t:s0 failed:’Operation not permitted’

なんだこれは?

作成したRSA秘密鍵からCSRをつくる

CSRとは「Ceertificate Signing Request」の略でSSLサーバ証明書発行に必要なテキストデータ
公開鍵やコモンネーム(FQDN)、組織名、部署名等が含まれている。
認証局は、CSRと申し込み情報を元に内容を精査してSSLサーバ証明書を発行する

→つまり、認証局がSSL証明書発行に必要なファイルという意味ですね。

openssl req は証明要求(csr)の作成
-new 新規作成
-out 出力する要求ファイル名
-key filename 入力する秘密鍵のファイル名

作成したRSA秘密鍵からCSRをつくります
openssl req -new -key ca.key -out ca.csr
色々聞かれます。
Country Name
state or province name
locality name
organization name
organizational unit name
common name
email address

[vagrant@localhost ssl]$ openssl req -new -key ca.key -out ca.csr
You are about to be asked to enter information that will be incorporated
into your certificate request.
What you are about to enter is what is called a Distinguished Name or a DN.
There are quite a few fields but you can leave some blank
For some fields there will be a default value,
If you enter '.', the field will be left blank.
-----
Country Name (2 letter code) [AU]:ja
State or Province Name (full name) [Some-State]:tokyo
Locality Name (eg, city) []:shibuya
Organization Name (eg, company) [Internet Widgits Pty Ltd]:hpscript
Organizational Unit Name (eg, section) []:developement
Common Name (e.g. server FQDN or YOUR name) []:hpscript
Email Address []:info@hpscript.com

Please enter the following 'extra' attributes
to be sent with your certificate request
A challenge password []:hpscript
An optional company name []:hpscript

RSA秘密鍵を元に、CSRが作られます。

[vagrant@localhost ssl]$ ls
ca.csr  ca.key

作成されたCSR

-----BEGIN CERTIFICATE REQUEST-----
MIIDBjCCAe4CAQAwgY4xCzAJBgNVBAYTAmphMQ4wDAYDVQQIDAV0b2t5bzEQMA4G
A1UEBwwHc2hpYnV5YTERMA8GA1UECgwIaHBzY3JpcHQxFTATBgNVBAsMDGRldmVs
b3BlbWVudDERMA8GA1UEAwwIaHBzY3JpcHQxIDAeBgkqhkiG9w0BCQEWEWluZm9A
aHBzY3JpcHQuY29tMIIBIjANBgkqhkiG9w0BAQEFAAOCAQ8AMIIBCgKCAQEAmJ4B
3ZcX+fD+dDWaE+76QxYd8Z9ooLwGWneFfpZyOYBDP291rMMzVrSA/tAH0HfXFBKu
P8rmtEB23YEzcy4OKOrTXIZqoKfGO6tTgDQYFSTvGJoNWSpf3CZqqVy6nTyeOOUf
MiN6SdWgZV6ZNYx3OPpCacPCVpaYgmLAVL7MmQr+nTGsfFzB8G3acReKaEa1LFDU
bMf1TYj+pK6cNy5KDU3jKLbfWHf6o+n7rFi4ZhLw6DCDHEJpy2CLxO/RdjpC7Vil
hogehoge
-----END CERTIFICATE REQUEST-----

ほう、csrもハッシュ化されるのか^^

githubに公開鍵を登録して確認する方法

まず、ローカルのコマンドラインで、ssh-keygen -t rsaとして、公開鍵(id_rsa.pub)、秘密鍵(id_rsa)を作ります。

Github personal settingsのSSH and GPG keysにアクセスします。
https://github.com/settings/keys

右上のNew SSH Keyを押下。

title:公開鍵(id_rsa.pub)の名前を入れる。拡張子のpubは必要ないので、id_rsaのみ
Key:公開鍵の中身を入れます。

ssh -T git@github.comで接続確認
ローカルから、ssh -T git@github.comと打ち込みます。

>ssh -T git@github.com
Enter passphrase for key 'C:\Users\hoge/.ssh/id_rsa':
Hi githubix! You've successfully authenticated, but GitHub does not provide shell access.

You’ve successfully authenticatedと表示されればOK
簡単でしょ?

Could not open a connection to your authentication agent.

linuxにログインして、ssh-add -lと打つと、「Could not open a connection to your authentication agent.」と返ってくる。

agrant@precise64:~$ ssh-add -l
Could not open a connection to your authentication agent.

どうやらssh-agentが起動していない模様。eval ‘ssh-agent’と打つ。evalはシェルを実行

vagrant@precise64:~$ eval ‘ssh-agent’
SSH_AUTH_SOCK=/tmp/ssh-GxTXywae1697/agent.1697; export SSH_AUTH_SOCK;
SSH_AGENT_PID=1698; export SSH_AGENT_PID;
echo Agent pid 1698;

ssh-agent: 必要な時に秘密鍵を渡してくれる

再度、ssh-add -lと打つ

vagrant@precise64:~$ ssh-add -l
Could not open a connection to your authentication agent.

なにいいいいいいいいいいいいいいいいい

eval `ssh-agent -s`とする

vagrant@precise64:~$ eval `ssh-agent -s`
Agent pid 1708
vagrant@precise64:~$ ssh-add -l
The agent has no identities.

ひゃほおおおおおおおおおお

Linuxのssh-add コマンドとは何か?

ssh-addって何?

ssh-add: 認証エージェントに秘密鍵(id_rsa)を登録すること。
引数なしで実行された場合、~/.ssh/id_rsaが追加される。
秘密鍵(id_rsa)を読み込んだ後、ssh-addはそれに対応する情報を、秘密鍵のファイル名にサフィックス-cert.pubを追加したファイルから読み込もうとする。

秘密鍵の登録状況の確認

ssh-add -l

秘密鍵の確認

ssh-add hoge/fuga