[Laravel8.16.0] bladeでbelongsToの呼び出しを複数繋げる

こういうbelongTo->belongToが出来るのか試したが、結論から言うと出来る。

<p>{{ $orders->product->category->name }}</p>

model: productがcategoryのbelongTo

public function category(){
        return $this->belongsTo('App\Models\Category');
    }

model: orderがproductのbelongTo

public function product(){
        return $this->belongsTo('App\Models\Product', );
    }

良かったー 死ぬかと思った。。

request model, requestsテーブルを作成すると

controller

use Illuminate\Http\Request;
// 省略
use App\Request;

view
-> Symfony\Component\Debug\Exception\FatalErrorException
Cannot use App\Request as Request because the name is already in use

laravelではpost methodなどでrequestクラスを使っているので、requestモデル、requestsテーブルを作って使おうとすると、重複エラーになる。

modelやmigrationファイルの作り直しは、関連のコードだけでなく、設計書の修正まで色々手間がかかるので、make:modelの時にエラーを吐いてほしい。
データベース周りの出戻りは面倒なので、やはりDB設計は優秀な人がやらないと大変になる。

Laravel 6.x 親テーブルに対し、複数のbelongsToで呼び込みたい時

親 :usersテーブル(->hasMany)、 子: pictures のリレーションにおいて、
子 picturesの 「user_id」 「review_user_id」 から、belongsToで親テーブルのユーザーを呼び込みたい時のモデルの書き方

### 子テーブルのmigration file

Schema::create('pictures', function (Blueprint $table) {
            $table->bigIncrements('id');
            $table->integer('user_id')->index()->unsigned();
            // 省略
            $table->integer('review_user_id')->index()->unsigned()->nullable();
            $table->timestamps();
            $table->softDeletes();
        });

### 子テーブルのモデル
Picture.php
belongsToの第二引数に小テーブルのカラム、第三引数に親テーブルのカラムを記述する。

public function user(){
        return $this->belongsTo('App\User');
    }
public function reviewUser(){
        return $this->belongsTo('App\User', 'review_user_id', 'id');
    }

### 挙動テスト

Route::get('/read', function(){
	// $user = Picture::findOrFail(1)->user;
	// dd($user);
	$user = Picture::findOrFail(2)->reviewUser;
	return $user->name;
});

直ぐに解決するかと思いきや、ドキュメントが少なく意外と苦戦しました。こういうケースでは、Laravel側としては、usersテーブルから2回呼び込むのではなく、users, review_usersという風に親テーブルを分けて設計して欲しいのかもしれません。

MassAssignmentException

create methodで書くと、MassAssignmentExceptionとなる

Route::get('/create', function(){

	Post::create(['title'=>'php create method', 'content'=>'Wow I\'m learning a lot']);
	
});

その場合は、modelでfillableに配列としてカラム名を記入する

class Post extends Model
{
    //
    // protected $table = 'posts'; 
	protected $fillable = [
		'title',
		'content'
	]
}

mysql> select * from posts;
+—-+——————-+——————————————————+———————+———————+———-+
| id | title | content | created_at | updated_at | is_admin |
+—-+——————-+——————————————————+———————+———————+———-+
| 1 | Update tile | Laravel is the best thing that happen to PHP | NULL | NULL | 0 |
| 3 | laravel awesome | Laravel is the best thing that happen to PHP, period | NULL | NULL | 0 |
| 4 | new ORM title 2 | wow eloquent is really cool, look at this content | 2019-12-05 18:23:33 | 2019-12-05 18:33:31 | 0 |
| 5 | php create method | Wow I’m learning a lot | 2019-12-05 18:47:53 | 2019-12-05 18:47:53 | 0 |
+—-+——————-+——————————————————+———————+———————+———-+

curious

eloquentって何?

Laravelのドキュメントを読んでいると、eloquentってワードが何度も出てきます。
なんとなく雰囲気でわかったような気でいましたが、eloquentって何でしょうか?
tinker・controllerでやっている以下のようなことでしょうか?

$post = new Post();
$post->title = $request->title;
$post->body = $request->body;
$post->save();

Model:model is a class that deal with database

モデルの作成
$ php artisan make:model Post
Model created successfully.

appフォルダにPost.phpが作られる
eloquentとは下のコードからもわかる様に、Modelのclass

databaseのtable nameがpostsなら、model nameはPost

use Illuminate\Database\Eloquent\Model;

class Post extends Model
{
    //
    posts 
}
use App\Post;
Route::get('/read', function(){

	$posts = Post::all();

	foreach($posts as $post){
		return $post->title;
	}
});

laravelのログイン認証を勉強しよう

# ディレクトリを作成します
[vagrant@localhost app]$ mkdir angel

# 作成したディレクトリに移動
[vagrant@localhost app]$ cd angel
[vagrant@localhost angel]$ ls

# composerをインストール
[vagrant@localhost angel]$ curl -sS https://getcomposer.org/installer | php
[vagrant@localhost angel]$ ls
composer.phar

# composerでlaravelをインストール。ディレクトリ名は適当にangelとしておきます。
php composer.phar create-project –prefer-dist laravel/laravel angel

# mysqlにログイン
[vagrant@localhost ~]$ mysql -u root -p
Enter password:
mysql> show databases;

# mysqlでDBの作成
mysql> create database angel;
Query OK, 1 row affected (0.12 sec)

# .envファイルを編集

DB_CONNECTION=mysql
DB_HOST=127.0.0.1
DB_PORT=3306
DB_DATABASE=angel
DB_USERNAME=root
DB_PASSWORD=secret

# migration 実行
[vagrant@localhost angel]$ cd angel
[vagrant@localhost angel]$ php artisan migrate
Migration table created successfully.
Migrating: 2014_10_12_000000_create_users_table
Migrated: 2014_10_12_000000_create_users_table
Migrating: 2014_10_12_100000_create_password_resets_table
Migrated: 2014_10_12_100000_create_password_resets_table

# 作成されたtable確認
mysql> use angel;
mysql> show tables;
+—————–+
| Tables_in_angel |
+—————–+
| migrations |
| password_resets |
| users |
+—————–+
3 rows in set (0.00 sec)

mysql> describe migrations;
+———–+——————+——+—–+———+—————-+
| Field | Type | Null | Key | Default | Extra |
+———–+——————+——+—–+———+—————-+
| id | int(10) unsigned | NO | PRI | NULL | auto_increment |
| migration | varchar(255) | NO | | NULL | |
| batch | int(11) | NO | | NULL | |
+———–+——————+——+—–+———+—————-+
3 rows in set (0.08 sec)

mysql> describe password_resets;
+————+————–+——+—–+———+——-+
| Field | Type | Null | Key | Default | Extra |
+————+————–+——+—–+———+——-+
| email | varchar(255) | NO | MUL | NULL | |
| token | varchar(255) | NO | | NULL | |
| created_at | timestamp | YES | | NULL | |
+————+————–+——+—–+———+——-+
3 rows in set (0.00 sec)

mysql> describe users;
+——————-+———————+——+—–+———+—————-+
| Field | Type | Null | Key | Default | Extra |
+——————-+———————+——+—–+———+—————-+
| id | bigint(20) unsigned | NO | PRI | NULL | auto_increment |
| name | varchar(255) | NO | | NULL | |
| email | varchar(255) | NO | UNI | NULL | |
| email_verified_at | timestamp | YES | | NULL | |
| password | varchar(255) | NO | | NULL | |
| remember_token | varchar(100) | YES | | NULL | |
| created_at | timestamp | YES | | NULL | |
| updated_at | timestamp | YES | | NULL | |
+——————-+———————+——+—–+———+—————-+
8 rows in set (0.00 sec)

# 認証機能を生成
[vagrant@localhost angel]$ php artisan make:auth
Authentication scaffolding generated successfully.

# routes/web.phpに追加されている

Auth::routes();

Route::get('/home', 'HomeController@index')->name('home');

# php artisan serveでサーバを立てる
[vagrant@localhost angel]$ php artisan serve –host 192.168.35.10 –port 8000
Laravel development server started:

# ${domain}/register にアクセス

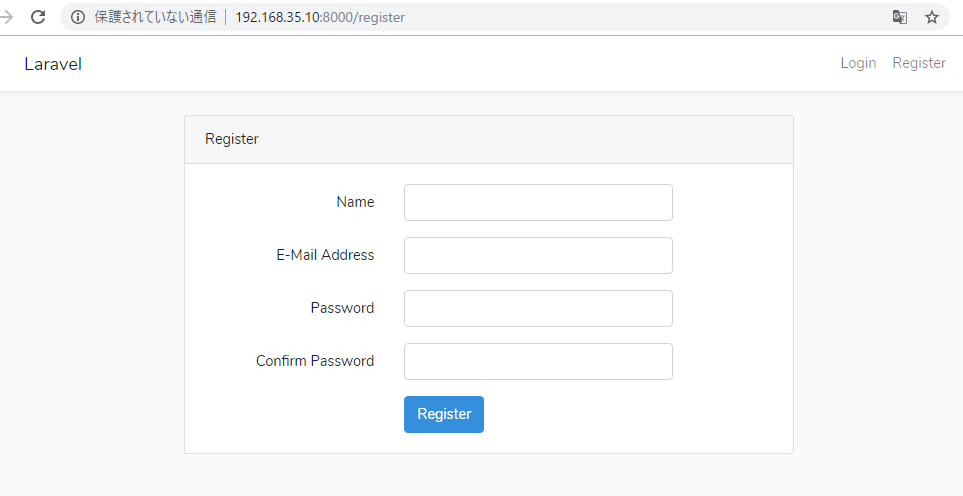
おおおおおおおおおお、これはちょっと勉強が必要だ。

migrationファイルによるカラム修正

<?php

use Illuminate\Support\Facades\Schema\;
use Illuminate\Database\Schema\Blueprint\;
use Innuminate\Database\Migrations\Migration;

class AddColumnSalesHogeTable extends Migration{

	public function up(){
		Schema::table('books', function(Blueprint $table){
			$table->integer('sales')->default(0)->index('index_sales')->after('price')->comment('販売数');
		});
	}

	public function down()
	{
		Schema::table('books', function(Blueprint $table){
			$table->dropColumn('sales');
		});
	}
}

Laravel5.7 バリデーションのエラーメッセージをカスタマイズ

Laravel5.7 バリデーションのエラーメッセージをカスタマイズしたいと思います。
複雑なことやってんのかな? いえ、こんなに奇怪なことはやってません。

まず、app/Http/Requests 配下にフォームリクエストのCompanyRequest.phpがあります。

namespace App\Http\Requests;

use Illuminate\Foundation\Http\FormRequest;

class CompanyRequest extends FormRequest
{
    /**
     * Determine if the user is authorized to make this request.
     *
     * @return bool
     */
    public function authorize()
    {
        return true;
    }

    /**
     * Get the validation rules that apply to the request.
     *
     * @return array
     */
    public function rules()
    {
        return [
            'company_name' => 'required',
            'agent_name' => 'required',
        ];
    }
}

この状態だと、fieldの値がnullだと、「The ${value} field is required.」とアラートメッセージが表示されます。

公式ドキュメントバリデーション(https://readouble.com/laravel/5.7/ja/validation.html)のページ中段にあるエラーメッセージのカスタマイズを実装します。
public function rulesの下、overrideするメッセージを書きます。
適当に日本語で、「会社名を入力してください」「代理店名を入力してください」としておきましょう。

namespace App\Http\Requests;

use Illuminate\Foundation\Http\FormRequest;

class CompanyRequest extends FormRequest
{
    /**
     * Determine if the user is authorized to make this request.
     *
     * @return bool
     */
    public function authorize()
    {
        return true;
    }

    /**
     * Get the validation rules that apply to the request.
     *
     * @return array
     */
    public function rules()
    {
        return [
            'company_name' => 'required',
            'agent_name' => 'required',
        ];
    }
    public function messages()
    {
        return [
            'company_name.required' => '会社名を入力してください',
            'agent_name.required' => '代理店名を入力してください',
        ];
    }
}

日本語で表示されるようになりました。

おお、割と簡単だった。

Laravelアプリケーション開発の進め方

どのような流れで開発していけばいいか。DBのテーブル、モデル、フロントは出来ている前提。

1. make artisanでControllerページ作成
2. Controllerにfunctionを書く
3. Routingを設定
4. Controllerに処理を書く
5. Viewを書く
6. バリデーション

つまり、Controllerをつくって、routingして、Viewを書いて、Controllerの処理を編集していく。

あ、小俣さんの会社も上のようなホワイトボードにcontrollerの流れを書いてた。。

Laravel5.7 ControllerからMySQLへupdate, delete

DB::updateで、update文を書けばOKです。

namespace App\Http\Controllers;

use Illuminate\Http\Request;
use Illuminate\Support\Facades\DB;
use App\Account;

class AccountController extends Controller
{
    //
    public function index()
    {
    	// $account = Account::first();
    	// dd($account->login_id);
    	DB::update('update account set login_id = "adminUser" where id = ?', ['1']); 	
    }
}

deleteの場合

namespace App\Http\Controllers;

use Illuminate\Http\Request;
use Illuminate\Support\Facades\DB;
use App\Account;

class AccountController extends Controller
{
    //
    public function index()
    {
    	// $account = Account::first();
    	// dd($account->login_id);
    	DB::delete('delete from account where id = ?', ['2']); 	
    }
}