引き続き、todoアプリを作ります。
(function(){

var Task = Backbone.Model.extend({
 defaults: {
 	title: 'do something',
 	completed: false
 },
validate: function(attrs){
	if ( _.isEmpty(attrs.title)){
		return 'title must not be empty';
	}
},
initialize: function(){
	this.on('invalid', function(model, error){
		$('#error').html(error);
	})
}
});

var Tasks = Backbone.Collection.extend({ model: Task });

var TaskView = Backbone.View.extend({
	tagName: 'li',
	initialize: function(){
		this.model.on('destroy', this.remove, this);
		this.model.on('change', this.render, this);
	},
	events: {
		'click .delete': 'destroy',
		'click .toggle': 'toggle'
	},
	toggle: function(){
		this.model.set('completed', !this.model.get('completed'));
	},
	destroy: function(){
		if (confirm('are you shure?')){
			this.model.destroy();
		}
	},
	remove: function(){
		this.$el.remove();
	},
	template: _.template($('#task-template').html()),
	render: function(){
		var template = this.template(this.model.toJSON());
		this.$el.html(template);
		return this;
	}
});
var TasksView = Backbone.View.extend({
	tagName: 'ul',
	initialize: function(){
		this.collection.on('add', this.addNew, this);
		this.collection.on('change', this.updateCount, this);
		this.collection.on('destroy', this.updateCount, this);
	},
	addNew: function(task){
		var taskView = new TaskView({model: task});
		this.$el.append(taskView.render().el);
		$('#title').val('').focus();
		this.updateCount();
	},
	updateCount: function(){
		var uncompletedTasks = this.collection.filter(function(task){
			return !task.get('completed');
		});
		$('#count').html(uncompletedTasks.length);
	},
	render: function(){
		this.collection.each(function(task){
			var taskView = new TaskView({model: task});
			this.$el.append(taskView.render().el);
		}, this);
		this.updateCount();
		return this;
	}
});


var AddTaskView = Backbone.View.extend({
	el: '#addTask',
	events: {
		'submit': 'submit'
	},
	submit: function(e){
		e.preventDefault();
		// var task = new Task({title: $('#title').val()});
		var task = new Task();
		if (task.set({title: $('#title').val()}, {validate: true})){
			this.collection.add(task);
			$('#error').empty();
		}
	}
});

var tasks = new Tasks([
{
	title: 'task1',
	completed: true
},
{
	title: 'task2'
},
{
	title: 'task3'
}
]);

var tasksView = new TasksView({collection: tasks});
var addTaskView = new AddTaskView({collection: tasks});
$('#tasks').html(tasksView.render().el);

})();
htmlです。
<!DOCTYPE html>
<html lang="ja">
<head>
	<meta charset="utf-8">
	<title>Backbone.js</title>
	<style>
	.completed{
		text-decoration: line-through;
		color: gray;
	}
	</style>
</head>
<body>

<h1>Tasks</h1>

<form id="addTask">
	<input type="text" id="title">
	<input type="submit" value="add">
	<span id="error"></span>
</form>
<div id="tasks">
</div>
<p>Tasks left: <span id="count"></span></p>


<script type="text/template" id="task-template">
<input type="checkbox" class="toggle" <%= completed ? 'checked': '' %>>
<span class="<%= completed ? 'completed' : '' %>">
<%- title %>
</span>
<span class="delete">[x]</span>
</script>
<script src="js/underscore.js"></script>
<script src="js/jquery.js"></script>
<script src="js/backbone.js"></script>
<script src="js/app.js"></script>
</body>
</html>
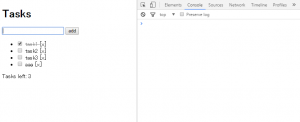
ブラウザでの表示です。