[Django3.0]widget_tweaksでradioボタンの使い方が解らない時

widget_tweaks Django公式サイトを見たが、textformやtextarea、select formなどはわかるが、radioボタンの使い方がイマイチよくわからない。
django-widget-tweaks 1.4.8

やりたい事としては、銀行口座編集画面で、A.銀行口座(value=1)or郵便貯金口座(value=2)、B.普通預金(value=1)or当座預金(value=2)の登録情報を編集できるようにしたい。
なお、フロント側では、Javascriptで銀行口座の場合は銀行口座入力のみ、郵便貯金口座の場合は郵便貯金口座入力のフォームのみ入力できるようにformのdisableで制御している。

結局色々調べたが不明のため、views.py側で口座タイプ(bank_type)の値を取得し、ビュー側でif endifで制御する事にした。
{% if bank_type == 1 %}checked{% endif %}

views.py

def bank_edit(request):
	data = Bank.objects.get(id=1)
	params = {
		'form': BankForm(instance=data),
		'bank_type': data.bank_type,
		'account_type': data.account_type,
	}
	return render(request, 'sales/bank_edit.html', params)

template

<div class="row col-md-12">
	          			<div class="form-check col-md-2">
						  <input class="form-check-input" type="radio" name="bank_type" id="bank" value="1" {% if bank_type == 1 %}checked{% endif %} onClick="flg0(this.checked);">
						  <label class="form-check-label" for="bank">銀行口座</label>
						</div>
						<div class="form-check col-md-2">
						  <input class="form-check-input" type="radio" name="bank_type" id="jpbank" value="2"  {% if bank_type == 2 %}checked{% endif %} onClick="flg1(this.checked);">
						  <label class="form-check-label" for="jpbank">郵便貯金口座</label>
						</div>
					</div>

formの初期値でdisabled=”disabled”を付けるかどうかも同様にif endifで制御した。

{% if bank_type == 1 %}
								{% render_field form.bank_name class="form-control" id="bank_name" placeholder="銀行名を入力してください" %}
							{% else %}
								{% render_field form.bank_name class="form-control" id="bank_name" placeholder="銀行名を入力してください" disabled="disabled" %}
							{% endif %}

想定通りの動きになっているが、何か気持ち悪いので、widget_tweaksでradioの使い方があれば教えて欲しい。

### PDFで表示
上記を請求書に実装する

if bank.bank_type == 1:
			bank_name = bank.bank_name + ' ' + bank.bank_branch
			if bank.account_type == 1:
				account = '普通預金 ' + bank.account_number
			else:
				account = '当座預金 ' + bank.account_number
			holder = '法人口座名義 ' + bank.account_holder
		elif bank.bank_type == 2:
			bank_name = '郵貯銀行'
			account = '記号 ' + bank.jp_number + '  番号' + bank.jp_holder
			holder = '法人口座名義 ' + bank.account_holder
		else:
			bank_name = '別途ご連絡'
			account = ''
			holder = ''

		delivery_date = data.delivery_date.strftime("%Y年%m月%d日") + '納品予定' if data.delivery_date != None else ''

		# 振込先
		pdf_canvas.drawString(60, 155, 'お手数でございますが、お支払いは下記銀行口座へ振込くださいますようお願い申し上げます。')
		pdf_canvas.drawString(60, 135, '振込先: ' + bank_name)
		pdf_canvas.drawString(60, 125, account)
		pdf_canvas.drawString(60, 115, holder)
		pdf_canvas.drawString(60, 105, '恐れ入りますが、振込手数料は貴社にてご負担ください。')
		pdf_canvas.drawString(60, 85, delivery_date)

Let’s Gooooooo

[Django3.0]ForeignKeyを使ったモデルとviews.pyの保存処理の書き方

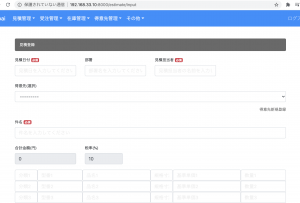
見積登録ページを作成するため、hasManyのモデルをmigrationした後にModelFormを作っていきます。

models.py
-> ForeignKeyでClients ModelのhasManyを設定しています。

class Estimates(models.Model):
	client = models.ForeignKey(Clients, null=True, blank=True, on_delete=models.PROTECT)
	estimate_date = models.DateField()
	position = models.CharField(max_length=50, null=True, blank=True)
	name = models.CharField(max_length=255, null=True, blank=True)
	title = models.CharField(max_length=255)
	classification1 = models.CharField(max_length=255, null=True, blank=True)
	// 省略
	total = models.IntegerField(null=True, blank=True)
	remark = models.TextField(max_length=300, null=True, blank=True)
	created_at = models.DateTimeField(auto_now_add=True)
	updated_at = models.DateTimeField(auto_now=True)

	def __str__(self):
		return self.title

forms.py

class EstimatesForm(forms.ModelForm):
	class Meta:
		model = Estimates
		fields = ['client', 'estimate_date', 'position', 'name', 'title', 'classification1', 'classification2', 'classification3', 'classification4', 'classification5', 'classification6', 'classification7', 'classification8', 'classification9', 'classification10', 'type1', 'type2', 'type3', 'type4', 'type5', 'type6', 'type7', 'type8', 'type9', 'type10', 'name1', 'name2', 'name3', 'name4', 'name5', 'name6', 'name7', 'name8', 'name9', 'name10', 'size1', 'size2', 'size3', 'size4', 'size5', 'size6', 'size7', 'size8', 'size9', 'size10', 'unit1', 'unit2', 'unit3', 'unit4', 'unit5', 'unit6', 'unit7', 'unit8', 'unit9', 'unit10', 'price1', 'price2', 'price3', 'price4', 'price5', 'price6', 'price7', 'price8', 'price9', 'price10', 'total', 'remark']

続いて、views.pyでestimate_input関数を書いていきます。

views.py

from .models import Estimates
from .forms import EstimatesForm

def estimate_input(request):
	params = {
		'form': EstimatesForm()
	}
	return render(request, 'sales/estimate_input.html')
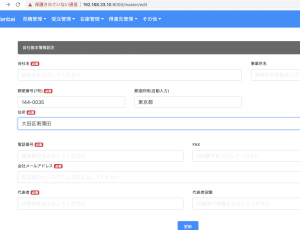
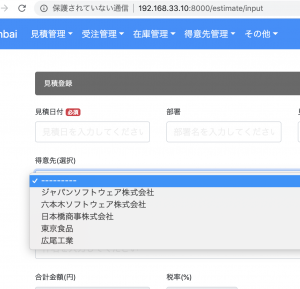
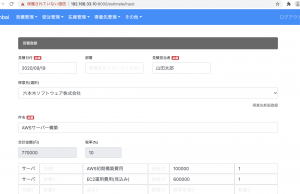
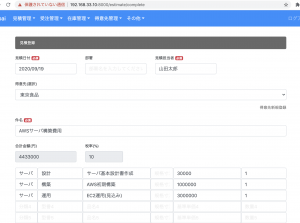
## view
### Select文でリレーションの呼び出し
– viewはwidget_tweaksを使っています。
– form.${親テーブル} とするだけでselect文を作ってくれます。

estimate_input.html

<div class="form-group">
						<label for="client">得意先(選択)</label>
						{% render_field form.client class="form-control" %}
					</div>

– 見積の合計金額は、vue.jsでcomputedします。

var app = new Vue({
			el: '#app',
			data: {
				tax:10,
				price_1:'',
				// 省略
			},
			computed: {
				add1: function(){
					return (this.price_1 * this.unit_1 + this.price_2 * this.unit_2 + this.price_3 * this.unit_3 + this.price_4 * this.unit_4 + this.price_5 * this.unit_5 + this.price_6 * this.unit_6 + this.price_7 * this.unit_7 + this.price_8 * this.unit_8 + this.price_9 * this.unit_9 + this.price_10 * this.unit_10 ) * (100 + this.tax) / 100;

				}
			}

### views.py
formで飛ばして、最後に保存します

def estimate_complete(request):
	if(request.method == 'POST'):
		data = EstimatesForm(request.POST)
		if data.is_valid():
			client = request.POST['client']
			estimate_date = request.POST['estimate_date']
			position = request.POST['position']
			name = request.POST['name']
			title = request.POST['title']
			classification1 = request.POST['classification1']
			// 省略
			total = request.POST['total']
			remark = request.POST['remark']
			estimates = Estimates(client_id=client, estimate_date=estimate_date, position=position, name=name, title=title, classification1=classification1, classification2=classification2, classification3=classification3, classification4=classification4, classification5=classification5, classification6=classification6, classification7=classification7, 
				classification8=classification8, classification9=classification9, classification10=classification10, type1=type1, type2=type2, type3=type3, type4=type4, type5=type5, type6=type6, type7=type7, type8=type8, type9=type9, type10=type10, name1=name1, name2=name2, name3=name3, name4=name4, name5=name5, name6=name6, name7=name7, name8=name8, 
				name9=name9, name10=name10, size1=size1, size2=size2, size3=size3, size4=size4, size5=size5, size6=size6, size7=size7, size8=size8, size9=size9, size10=size10, unit1=unit1, unit2=unit2, unit3=unit3, unit4=unit4, unit5=unit5, unit6=unit6, unit7=unit7, unit8=unit8, unit9=unit9, unit10=unit10, price1=price1, price2=price2, price3=price3,
				price4=price4, price5=price5, price6=price6, price7=price7, price8=price8, price9=price9, price10=price10, total=total, remark=remark)
			estimates.save()
			return render(request, 'sales/estimate_complete.html')
		else:
			params = {
				'form': EstimatesForm(request.POST),
			}
			return render(request, 'sales/estimate_input.html', params)
	return render(request, 'sales/estimate_complete.html')

### 結合テスト
修正しまくって、上手く動くようになるまで数日かかりました。

mysql側も確認し、ちゃんと入っています。
client_idには親テーブルのidが入っています。

mysql> select * from sales_estimates;
+—-+—————+———-+————–+—————–+—————–+—————–+—————–+—————–+—————–+—————–+—————–+—————–+—————–+——————+——–+——–+——-+——-+——-+——-+——-+——-+——-+——–+———————–+—————–+——-+——-+——-+——-+——-+——-+——-+——–+———–+——-+——-+——-+——-+——-+——-+——-+——-+——–+——-+——-+——-+——-+——-+——-+——-+——-+——-+——–+——–+——–+——–+——–+——–+——–+——–+——–+——–+———+——–+——–+—————————-+—————————-+———–+
| id | estimate_date | position | name | title | classification1 | classification2 | classification3 | classification4 | classification5 | classification6 | classification7 | classification8 | classification9 | classification10 | type1 | type2 | type3 | type4 | type5 | type6 | type7 | type8 | type9 | type10 | name1 | name2 | name3 | name4 | name5 | name6 | name7 | name8 | name9 | name10 | size1 | size2 | size3 | size4 | size5 | size6 | size7 | size8 | size9 | size10 | unit1 | unit2 | unit3 | unit4 | unit5 | unit6 | unit7 | unit8 | unit9 | unit10 | price1 | price2 | price3 | price4 | price5 | price6 | price7 | price8 | price9 | price10 | total | remark | created_at | updated_at | client_id |
+—-+—————+———-+————–+—————–+—————–+—————–+—————–+—————–+—————–+—————–+—————–+—————–+—————–+——————+——–+——–+——-+——-+——-+——-+——-+——-+——-+——–+———————–+—————–+——-+——-+——-+——-+——-+——-+——-+——–+———–+——-+——-+——-+——-+——-+——-+——-+——-+——–+——-+——-+——-+——-+——-+——-+——-+——-+——-+——–+——–+——–+——–+——–+——–+——–+——–+——–+——–+———+——–+——–+—————————-+—————————-+———–+
| 2 | 2020-09-19 | | 山田太郎 | AWS構築費用 | サーバ | サーバ | | | | | | | | | 設計 | 構築 | | | | | | | | | 基本設計書作成 | EC2初期構築 | | | | | | | | | 設計書 | | | | | | | | | | 1 | 1 | NULL | NULL | NULL | NULL | NULL | NULL | NULL | NULL | 50000 | 300000 | NULL | NULL | NULL | NULL | NULL | NULL | NULL | NULL | 385000 | | 2020-09-19 13:00:45.342104 | 2020-09-19 13:00:45.342128 | 19 |
+—-+—————+———-+————–+—————–+—————–+—————–+—————–+—————–+—————–+—————–+—————–+—————–+—————–+——————+——–+——–+——-+——-+——-+——-+——-+——-+——-+——–+———————–+—————–+——-+——-+——-+——-+——-+——-+——-+——–+———–+——-+——-+——-+——-+——-+——-+——-+——-+——–+——-+——-+——-+——-+——-+——-+——-+——-+——-+——–+——–+——–+——–+——–+——–+——–+——–+——–+——–+———+——–+——–+—————————-+—————————-+———–+
1 row in set (0.00 sec)

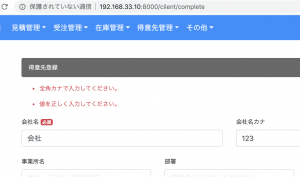
これ実装するのにすごい時間かかったけど、ここまで来たら、大分山を超えた感があります。後は基本的なところはauthとメールなど細かな機能でしょう。デバッグする際に、form.errors.itemsで画面にエラーメッセージを表示させてからスピードが上がりました。

[Django3.0]あいまい検索の検索フォーム実装

顧客一覧ページで、会社名の検索機能を設けたい。

template

<form action="/client/1" method="post">
				{% csrf_token %}
				<div class="form-group row">
					<div class="col-md-10">
						<input type="text" class="form-control" name="name" placeholder="検索する会社名を入力してください">
					</div>
					<div class="col-md-2">
						<button class="btn search-btn" type="submit">検索</button>
					</div>
				</div>
			</form>

<span>{{ query }}</span>

– if(request.method==’POST’)でgetとpostを分岐させる
– 検索は *.objects.filter(column=value)と書く
– あいまい検索には(column__contains=value)と書く
– nullで検索された場合は、メッセージを表示させたくないので、最初の分岐で、and request.POST[‘name’]も追加する

views.py

def client(request, num=1):
	if(request.method=='POST' and request.POST['name']):
		name= request.POST['name']
		data = Clients.objects.filter(name__contains=name)
		page = Paginator(data, 3)
		params = {
			'data' : page.get_page(num),
			'query' : "会社名に「" + name + "」を含む検索結果"
		}
	else:
		data = Clients.objects.all()
		page = Paginator(data, 3)
		params = {
			'data' : page.get_page(num)
		}
	return render(request, 'sales/client.html', params)

うん、GoodJob! 意外と簡単にできました。
得意先一覧ができたので、続いて見積管理を作っていきます。
得意先が複数の見積を持つというhasManyのモデルをどう作るか考えなければなりません。

[Django3.0]widget_tweaksで値を表示したい時

顧客情報編集ページで、formのactionにidを使いたい時

### views.py

def client_edit(request, id):
	data = Clients.objects.get(id=id)
	params = {
		'form': ClientsForm(instance=data),
		'id':id
	}
	return render(request, 'sales/client_edit.html', params)

### template

<form action="/client/{{id}}/complete" method="post">

widget_tweaksで値を表示したい場合は、paramsで値を送る必要がある
action=”/client/{{form.id}}/complete”とすると、何も表示されない

Djangoは日本語のトラブルシューティングのページが殆どないので、laravelなどに比べて調査に時間がかかります。

[Django3.0]エラーメッセージで辞書型のvalueを表示する書き方

forms.pyで、全角カナ以外の入力があった場合にname_kanaにエラーメッセージを割り当てています。

forms.py

	def clean_name_kana(self):
		name_kana = self.cleaned_data['name_kana']
		p = re.compile('[\u30A1-\u30F4]+')
		if not(p.fullmatch(name_kana)):
			raise forms.ValidationError("全角カナで入力してください。")

### keyが表示される駄目な例
view側で、form.errorsは辞書型のデータを取得するので、form.name_kana.errorsとすれば辞書型のvalueが表示されますが、errorだけだと、辞書型のkeyを表示します。
以下のように書くとエラーメッセージはname_kana となります。

client_input.html

{% for error in form.errors %}
{{ error }}
{% endfor %}

### 辞書型のvalueが表示される例
このように書くと、辞書型のkeyとvalueを取得できるので、指定したバリデーションメッセージを表示させる事ができます。

client_input.html

{% for key, value in form.errors.items %}
{{ value }}
{% endfor %}

これ修正するのに凄い時間かかった。もー

[Django3.0]django-widdget-tweaksを使ったスタイリング

Formクラスを使いつつ、テンプレート側でスタイリングする為、django-widdget-tweaksを使用します。

$ pip install django-widget-tweaks

/hanbai/settings.py

INSTALLED_APPS = [
    'django.contrib.admin',
    'django.contrib.auth',
    'django.contrib.contenttypes',
    'django.contrib.sessions',
    'django.contrib.messages',
    'django.contrib.staticfiles',
    'sales',
    'widget_tweaks',
]

/sales/forms.py

from django import forms

class MasterForm(forms.Form):
	name = forms.CharField(label='name')
	office = forms.CharField(label='office')
	zipcode = forms.CharField(label='zipcode')
	prefecture = forms.CharField(label='prefecture')
	address = forms.CharField(label='address')
	tel = forms.CharField(label='tel')
	fax = forms.CharField(label='fax')
	email = forms.EmailField(label='email')
	name_top = forms.CharField(label='name_top')
	position_top = forms.CharField(label='position_top')

/sales/views.py

def master_detail(request):
	data = Master.objects.get(id=1)
	params = {
		'data' : data
	}
	return render(request, 'sales/master_detail.html', params)

/sales/templates/sales/master.html

{% load widget_tweaks %}

// 省略
<form action="{% url 'master_complete' %}" method="post">
					{% csrf_token %}
					<div class="row">
						<div class="col-sm">
							<label for="name">会社名 <span class="badge badge-danger">必須</span></label>
							<!-- <input type="text" class="form-control" id="name" name="name" placeholder="会社名を入力してください" required> -->
							{% render_field form.name class="form-control" placeholder="会社名を入力してください" %}
						</div>
						<div class="col-md-4">
							<label for="office">事業所名</label>
							<!-- <input type="text" class="form-control" id="office" name="office" placeholder="事業所の名称を入力してください" > -->
							{% render_field form.office class="form-control" placeholder="事業所の名称を入力してください" %}
						</div>
					</div>

					<br>

					<div class="row">
						<div class="col-md-4">
							<label for="zipcode">郵便番号(7桁) <span class="badge badge-danger">必須</span></label>
							<!-- <input type="text" class="form-control" id="zip" name="zipcode" size="10" maxlength="8" onKeyUp="AjaxZip3.zip2addr(this,'','prefecture', 'address');" placeholder="7桁の郵便番号を入力してください" > -->
							{% render_field form.zipcode class="form-control" placeholder="都道府県を入力してください" id="zip" name="zipcode" onkeyup="AjaxZip3.zip2addr(this,``,`prefecture`, `address`);" %}
						</div>
						<div class="col-md-4">
							<label for="prefecture">都道府県(自動入力)</label>
							<!-- <input type="text" name="prefecture" class="form-control" id="prefecture" placeholder="都道府県を入力してください" > -->
							{% render_field form.prefecture class="form-control" placeholder="都道府県を入力してください" %}
						</div>
					</div>
					<div class="form-group">
						<label for="address">住所 <span class="badge badge-danger">必須</span></label>
						<!-- <input type="text" name="address" class="form-control" id="address" placeholder="住所を入力してください" > -->
						{% render_field form.address class="form-control" placeholder="住所を入力してください" %}
					</div>

					<br>

					<div class="row">
						<div class="col-sm">
							<label for="tel">電話番号 <span class="badge badge-danger">必須</span></label>
							<!-- <input type="text" class="form-control" id="tel" name="tel" placeholder="電話番号を入力してください" > -->
							{% render_field form.tel class="form-control" placeholder="電話番号を入力してください" %}
						</div>
						<div class="col-sm">
							<label for="fax">FAX</label>
							<!-- <input type="text" class="form-control" id="fax" name="fax" placeholder="FAX番号を入力してください" > -->
							{% render_field form.fax class="form-control" placeholder="FAX番号を入力してください" %}
						</div>
					</div>

					<div class="form-group">
						<label for="email">会社メールアドレス <span class="badge badge-danger">必須</span></label>
						<!-- <input type="email" class="form-control" id="email" name="mail" placeholder="担当者のメールアドレスを入力してください" > -->
						{% render_field form.email class="form-control" placeholder="担当者のメールアドレスを入力してください" %}
					</div>

					<div class="row">
						<div class="col-sm">
							<label for="name_top">代表者 <span class="badge badge-danger">必須</span></label>
							<!-- <input type="text" class="form-control" id="name_top" name="name_top" placeholder="代表者名を入力してください" > -->
							{% render_field form.name_top class="form-control" placeholder="代表者名を入力してください" %}
						</div>
						<div class="col-sm">
							<label for="position_top">代表者役職</label>
							<!-- <input type="text" class="form-control" id="position_top" name="position_top" placeholder="代表者の役職を入力してください" > -->
							{% render_field form.position_top class="form-control" placeholder="代表者の役職を入力してください" %}
						</div>
					</div>

					<br><br>

					<div class="col text-center">
						<button class="btn" type="submit">更新</button>
					</div>
				</form>

ajaxの部分も問題なく動きます。

[Django3.0]Formクラスを試してみる

Djangoの入力フォームをフォームクラスを使って書いていきたい。
HTMLでベタ書きしているものをフォームクラスに移管する。

### Form Class
まずfomrs.pyを作ります。
/sales/forms.py

from django import forms

class MasterForm(forms.Form):
	name = forms.CharField(label='name')
	office = forms.CharField(label='office')
	zipcode = forms.CharField(label='zipcode')
	prefecture = forms.CharField(label='prefecture')
	address = forms.CharField(label='address')
	tel = forms.CharField(label='tel')
	fax = forms.CharField(label='fax')
	email = forms.EmailField(label='email')
	name_top = forms.CharField(label='name_top')
	position_top = forms.CharField(label='position_top')

次にビュー関数を編集する。
/sales/views.py

from .forms import MasterForm

def master(request):
	params = {
		'form': MasterForm()
	}
	return render(request, 'sales/master.html', params)

/sales/templates/sales/master.html

<form action="{% url 'master_complete' %}" method="post">
					{% csrf_token %}
					{{ form }}
					<br><br>
					<div class="col text-center">
						<button class="btn" type="submit">更新</button>
					</div>
				</form>

forms.pyの使い方はわかったが、view側のスタイリングをどうにかしないといけない。

form.as_tableやform.as_pだと、inputのcol-md-*の調整ができないないので、方法を考える必要がある。

[Django3.0]フォーム送信の基本機能を実装する

まず、登録完了ページのurls.py, views.pyを追記し、完了画面のhtml(master_complete.html)をサクッと作ります。

/sales/urls.py

urlpatterns = [
	// 省略
	path('master/complete', views.master_complete, name='master_complete'),
	// 省略
]

/sales/views.py

def master_complete(request):
	return render(request, 'sales/master_complete.html')

### フォーム画面
フォーム送信先を登録完了画面のnameに設定し、csrf_tokenを設定する

/sales/templates/sales/master.html

<form action="{% url 'master_complete' %}" method="post">
    {% csrf_token %}
</form>

### フォーム関数
登録完了画面で、request.POST[‘*’]で送られてきた値を受け取ります。

/sales/views.py

def master_complete(request):
	name = request.POST['name']
	office = request.POST['office']
	zipcode = request.POST['zipcode']
	prefecture = request.POST['prefecture']
	address = request.POST['address']
	tel = request.POST['tel']
	fax = request.POST['fax']
	mail = request.POST['mail']
	name_top = request.POST['name_top']
	position_top = request.POST['position_top']
	return render(request, 'sales/master_complete.html')

挙動確認

OK
次に入力画面でformクラスを使いたいんだけど、form.as_tableやform.as_pなどではデザインを再現できないような気がするんだが、やり方あるんだろうか?

[Django]formモジュール2

### ChoiceField
/hello/forms.py

class HelloForm(forms.Form):
	data = [
		('one', 'item 1'),
		('two', 'item 2'),
		('three', 'item 3')
	]
	choice = forms.ChoiceField(label='Choice', choices=data)

/hello/views.py

	def post(self, request):
		ch = request.POST['choice']
		self.params['result'] = 'you selected: "' + ch + '".'
		self.params['form'] = HelloForm(request.POST)
		return render(request, 'hello/index.html', self.params)

### ラジオボタン
– radioもChoiceFieldを使って作成する
– forms.ChoiceField(choices=value, widget=forms.RadioSelect())
/hello/forms.py

class HelloForm(forms.Form):
	data = [
		('one', 'item 1'),
		('two', 'item 2'),
		('three', 'item 3')
	]
	choice = forms.ChoiceField(label='radio', choices=data, widget=forms.RadioSelect())

### 選択リスト
– forms.ChoiceField(choices=value, widget=forms.Select())
/hello/forms.py

class HelloForm(forms.Form):
	data = [
		('one', 'item 1'),
		('two', 'item 2'),
		('three', 'item 3'),
		('four', 'item 4'),
		('five', 'item 5'),
	]
	choice = forms.ChoiceField(label='radio', choices=data, widget=forms.Select(attrs={'size':5}))

### 複数選択
– forms.MultipleChoiceField(choices=value, widget=forms.SelectMultiple())
/hello/forms.py

class HelloForm(forms.Form):
	data = [
		('one', 'item 1'),
		('two', 'item 2'),
		('three', 'item 3'),
		('four', 'item 4'),
		('five', 'item 5'),
	]
	choice = forms.MultipleChoiceField(label='radio', choices=data, widget=forms.SelectMultiple(attrs={'size':6}))

– 複数項目はgetlistで取得する
/hello/views.py

	def post(self, request):
		ch = request.POST.getlist('choice')
		self.params['result'] = 'you selected: "' + str(ch) + '".'
		self.params['form'] = HelloForm(request.POST)
		return render(request, 'hello/index.html', self.params)

views.py側でfor文をかける

	def post(self, request):
		ch = request.POST.getlist('choice')
		result = '<ol class="list-group"><b>selected:</b>'
		for item in ch:
			result += '<li class="list-group-item">' + item + '</li>'
		result += '</ol>'
		self.params['result'] = result
		self.params['form'] = HelloForm(request.POST)
		return render(request, 'hello/index.html', self.params)

forms.pyでデータ型を用意して、views.pyでそれを利用するってイメージか。

[Django]formモジュール1

## formモジュール
### CharField
– input type=”text”を生成
– requred, min_length, max_length

### EmailField
– input type=”emailを生成

### IntegerField, FloatField
– input type=”number”を生成

### URLField
– input type=”url”

### 日時に関するフィールド
– DateField, TimeField, DateTimeField

### BooleanField
/hello/forms.py

class HelloForm(forms.Form):
	check = forms.BooleanField(label='Checkbox', required=False)

/hello/templates/hello/index.html

<h1 class="display-4 text-primary">{{title}}</h1>
	<p class="h5 mt-4">{{result|safe}}</p>
	<form action="{% url 'index' %}" method="post">
		{% csrf_token %}
		<table>
			{{ form.as_p }}
			<tr>
				<td></td>
				<td><input class="btn btn-primary my-2" type="submit" value="click"></td>
			</tr>
		</table>
	</form>

/hello/views.py

class HelloView(TemplateView):

	def __init__(self):
		self.params = {
			'title': 'Hello',
			'form': HelloForm(),
			'result': None
		}

	def get(self, request):
		return render(request, 'hello/index.html', self.params)

	def post(self, request):
		if('check' in request.POST):
			self.params['result'] = 'Checked!!'
		else:
			self.params['result'] = 'not checked...'
		self.params['form'] = HelloForm(request.POST)
		return render(request, 'hello/index.html', self.params)

### NullBooleanField
– Yes, No, Unknownの項目を持つメニュー

class HelloForm(forms.Form):
	check = forms.NullBooleanField(label='Checkbox')
	def post(self, request):
		chk = request.POST['check']
		self.params['result'] = 'you selected: "' + chk + '".'
		self.params['form'] = HelloForm(request.POST)
		return render(request, 'hello/index.html', self.params)