VagrantでGULTのGUIが立ち上がらない
#include <GL/glut.h>

void display(void){

}

int main(int argc, char *argv[]){
	glutInit(&argc, argv);
	glutCreateWindow(argv[0]);
	glutDisplayFunc(display);
	glutMainLoop();
	return 0;
}
$ ./app
freeglut (./app): failed to open display ”
1.一旦ログアウトしてvagrantを止めます。
$ exit
$ vagrant halt
2. Vagrantfileにssh.forward_x11を追記します。
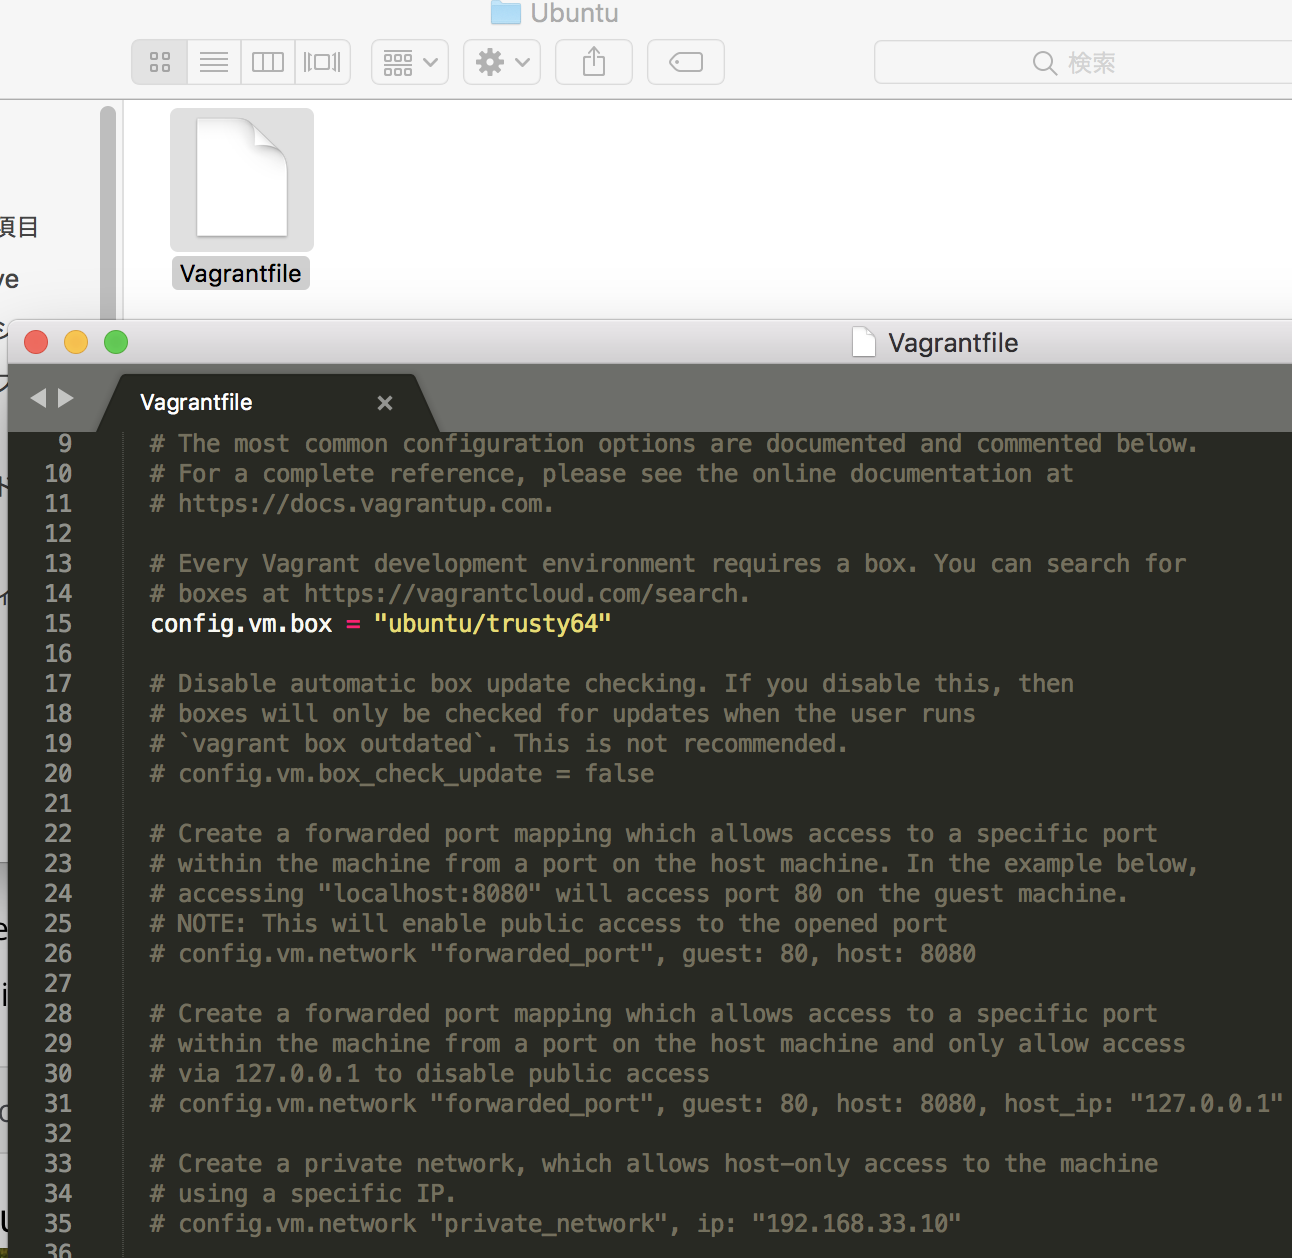
Vagrantfile
Vagrant.configure("2") do |config|
  config.vm.box = "ubuntu/bionic64"
  config.vm.network "private_network", ip: "192.168.33.10"
  config.ssh.forward_x11 = true // 追加
end
https://www.vagrantup.com/docs/vagrantfile/ssh_settings.html
config.ssh.forward_x11 (boolean) – If true, X11 forwarding over SSH connections is enabled. Defaults to false.
X Window Systemとは、UNIX系OSで標準的に用いられるウィンドウシステム。
XQuartzをダウンロード
-> MacユーティリティでXQuartzを起動し、terminalから再度実行
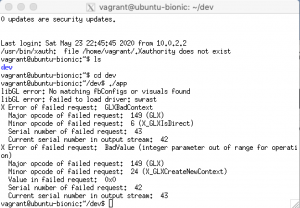
$ ./app
libGL error: No matching fbConfigs or visuals found
libGL error: failed to load driver: swrast
X Error of failed request: GLXBadContext
Major opcode of failed request: 149 (GLX)
Minor opcode of failed request: 6 (X_GLXIsDirect)
Serial number of failed request: 43
Current serial number in output stream: 42
X Error of failed request: BadValue (integer parameter out of range for operation)
Major opcode of failed request: 149 (GLX)
Minor opcode of failed request: 24 (X_GLXCreateNewContext)
Value in failed request: 0x0
Serial number of failed request: 42
Current serial number in output stream: 43
$ sudo ldconfig -p | grep -i gl.so
libwayland-egl.so.1 (libc6,x86-64) => /usr/lib/x86_64-linux-gnu/libwayland-egl.so.1
libwayland-egl.so (libc6,x86-64) => /usr/lib/x86_64-linux-gnu/libwayland-egl.so
libOpenGL.so.0 (libc6,x86-64) => /usr/lib/x86_64-linux-gnu/libOpenGL.so.0
libOpenGL.so (libc6,x86-64) => /usr/lib/x86_64-linux-gnu/libOpenGL.so
libGL.so.1 (libc6,x86-64) => /usr/lib/x86_64-linux-gnu/libGL.so.1
libGL.so (libc6,x86-64) => /usr/lib/x86_64-linux-gnu/libGL.so
libEGL.so.1 (libc6,x86-64) => /usr/lib/x86_64-linux-gnu/libEGL.so.1
libEGL.so (libc6,x86-64) => /usr/lib/x86_64-linux-gnu/libEGL.so
あれ、何故だーーーーーーーーーー
色々検索していたところ、同じ解決方法を発見
https://unix.stackexchange.com/questions/429760/opengl-rendering-with-x11-forwarding
Try the following: 1) ensure you are running up-to-date Xquartz. 2) in a terminal, defaults write org.macosforge.xquartz.X11 enable_iglx -bool true 3) restart xquartz. This worked for me to get a simple java app running. I tried "glxgears" and it starts, but the gears don't turn. I presume they're supposed to
mac側のterminalでX11をenableにする。
$ defaults write org.macosforge.xquartz.X11 enable_iglx -bool true
再度XQuartzでsshログイン
$ ./app
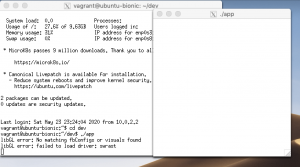
立ち上がったーーーーーーーーーーーー