[Laravel8.46.0] websocket通信できてるのにメッセージが返ってこない時

bootstrap.js


import Echo from 'laravel-echo';

window.Pusher = require('pusher-js');

window.Echo = new Echo({
    broadcaster: 'pusher',
    key: process.env.MIX_PUSHER_APP_KEY,
    cluster: process.env.MIX_PUSHER_APP_CLUSTER,
    
    wsHost: window.location.hostname,
	wsPort: 8000,
	forceTLS: true
    // forceTLS: false,
});

view

<script src="/js/app.js"></script>
    <script>
    	new Vue({
    		el: '#chat',
    		data: {
    			message: '',
                messages: []
    		},
    		methods: {
                getMessages(){

                    const url = '/ajax/chat';
                    axios.get(url)
                        .then((response)=>{

                            this.messages = response.data;
                        })
                },
    			send(){

    				const url = '/ajax/chat';
    				const params = { message: this.message};
    				axios.post(url, params)
    					.then((response) => {
    						this.message = '';
    					});
    			}
    		},
            mounted(){
                this.getMessages();

                Echo.channel('chat')
                    .listen('MessageCreated', (e) =>{
                        this.getMessages();
                    });
            }
    	});
    </script>

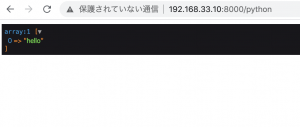
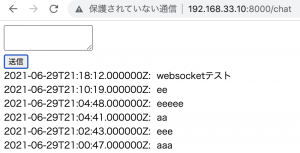
メッセージを送信しても反応しないので、何があかんねん、と思っていたら、コンソールを見て、websocketのconnection failedが出ていなければ、socket通信はできている。

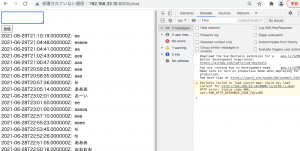
再度ソースコードを見直していたところ、EventでprivateChannelになっているところを、priveteを外したら反応するようになった。
Event/MessageCreated.php

    public function broadcastOn()
    {
        return new Channel('chat');
    }

一日中悩んでトラブルシューティングできなくて愕然としてたが、解決する時は一瞬だ。
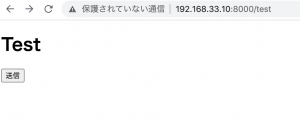
さあ、チャットのフロント作るぞー

[Laravel8.46.0] laravel-echoとpusher-jsでchat機能を実装する

config/app.php
L BroadcastServiceProviderのコメントアウトを外します。

App\Providers\BroadcastServiceProvider::class,

クライアント側で必要なパッケージをインストール
$ npm install –save laravel-echo pusher-js

resources/js/bootstrap.js
L コメントアウトを外します

import Echo from 'laravel-echo';

window.Pusher = require('pusher-js');

window.Echo = new Echo({
    broadcaster: 'pusher',
    key: process.env.MIX_PUSHER_APP_KEY,
    cluster: process.env.MIX_PUSHER_APP_CLUSTER,
    forceTLS: true
});

.env

BROADCAST_DRIVER=pusher
// 省略
PUSHER_APP_ID=
PUSHER_APP_KEY=
PUSHER_APP_SECRET=
PUSHER_APP_CLUSTER=mt1

$ php artisan make:model Message -m

migrationfile
L rollbackしてもう一度作り直します。

    public function up()
    {
        Schema::create('messages', function (Blueprint $table) {
            $table->bigIncrements('id');
            $table->integer('user_id');
            $table->text('message');
            $table->timestamps();
        });
    }

Model
Message.php

    protected $fillable = [
        'user_id',
        'message',
    ];

    public function user(){

    	return $this->belongsTo('App\Models\User');
    }

User.php

    public function messages(){
        return $this->hasMany('App\Models\Message');
    }

php artisan make:controller ChatsController

route

Route::get('/post', [ChatsController::class, 'index']);
Route::get('/messages', [ChatsController::class, 'fetchMessages']);
Route::post('/messages', [ChatsController::class, 'sendMessage']);

ChatsController.php

use App\Models\Message;
use Illuminate\Support\Facades\Auth;
use App\Events\MessageSent;

class ChatsController extends Controller
{
    //
    public function __construct(){
    	$this->middleware('auth');
    }

    public function index(){
    	return view('chat.post');
    }

    public function fetchMessages(){
    	return Message::with('user')->get();
    }

    public function sendMessage(Request $request){
    	$user = Auth::user();

    	$message = $user->messages()->create([
    		'message' => $request->input('message')
    	]);

    	event(new MessageSent($user, $message));

    	return ['status' => 'Message Sent!'];
    }
}

$ php artisan make:event MessageSent
MessageSent.php

use App\Models\User;
use App\Models\Message;

class MessageSent implements ShouldBroadcast
{
    use Dispatchable, InteractsWithSockets, SerializesModels;
    public $user,
    public $message;

    /**
     * Create a new event instance.
     *
     * @return void
     */
    public function __construct(User $user, Message $message)
    {
        //
        $this->user = $user;
        $this->message = $message;
    }

    /**
     * Get the channels the event should broadcast on.
     *
     * @return \Illuminate\Broadcasting\Channel|array
     */
    public function broadcastOn()
    {
        return new PrivateChannel('testApp');
    }
}

routes/channels.php
L プライベートチャンネルをリッスンする場合は、channels.phpで許可する

Broadcast::channel('testApp', function($user){
	return Auth::check();
});

post.blade.php

<!DOCTYPE html>
<html lang="en">
<head>
	<meta charset="UTF-8">
	<meta name="viewport" content="width=device-width, initial-scale=1.0">
	<title>Document</title>
	<link href="{{ mix('css/app.css')}}" rel="stylesheet" type="text/css">
	<meta name="csrf-token" content="{{ csrf_token() }}">
</head>
<body>
	<div id="app">
		<example-component></example-component>
	</div>

	<script src="{{ mix('js/app.js')}}"></script>
</body>
</html>

$ composer require laravel/ui
$ php artisan ui vue
$ npm install && npm run dev

/resources/js/components/ExampleComponent.vue

<template>
    <div>
        <ul>
            <li v-for="(message, key) in messages" :key="key">
                <strong>{{ message.user.name }}</strong>
                {{ message.message }}
            </li>
        </ul>
        <input v-model="text" />
        <button @click="postMessage" :disabled="!textExists">送信</button>
    </div>
</template>

<script>
    export default {
        data(){
            return {
                text: "",
                messages: []
            };
        },
        computed: {
            textExists(){
                return this.text.length > 0;
            }
        },
        created() {
            this.fetchMessages();
            Echo.private("testApp").listen("MessageSent", e=>{
                this.messages.push({
                    message: e.message.message,
                    user: e.user
                });
            });
        },
        methods: {
            fetchMessages(){
                axios.get("/messages").then(response =>{
                    this.messages = response.data;
                });
            },
            postMessage(message){
                axios.post("/messages", {message: this.text}).then(response => {
                    this.text = "";
                });
            }
        }
    }
</script>

あれ? 何やこれ。。。componentが上手く表示されんな。。。

[Laravel8.46.0] 8系でChat機能を実装したい1

$ php artisan –version
Laravel Framework 8.46.0
$ composer require pusher/pusher-php-server
$ php artisan make:model Message -m

migrationfile

    public function up()
    {
        Schema::create('messages', function (Blueprint $table) {
            $table->bigIncrements('id');
            $table->integer('sent_id')->index()->unsigned();
            $table->integer('recived_id')->index()->unsigned();
            $table->text('message');
            $table->timestamps();
        });
    }

model(Message.php)

    protected $fillable = [
        'sent_id',
        'recieved_id',
        'message',
    ];

$ php artisan serve –host 192.168.33.10 –port 8000

register画面からuserを3つぐらい作ります。

$ php artisan make:controller HomeController

route

use App\Http\Controllers\HomeController;

Route::get('/home', [HomeController::class, 'index']);

HomeController.php

use App\Models\User;
use Illuminate\Support\Facades\Auth;

class HomeController extends Controller
{
    //
    public function __construct(){
    	$this->middleware('auth');
    }

    public function index(){
    	$user = Auth::user();
    	$users = User::where('id','<>', $user->id)->get();

    	return view('chat.user_select', compact('users'));
    }
}

layout/app.blade.php
L bootstrap5を追加
L pusher.jsを追加

<link href="https://cdn.jsdelivr.net/npm/bootstrap@5.0.0-beta1/dist/css/bootstrap.min.css" rel="stylesheet" integrity="sha384-giJF6kkoqNQ00vy+HMDP7azOuL0xtbfIcaT9wjKHr8RbDVddVHyTfAAsrekwKmP1" crossorigin="anonymous">

// 省略
            <main>
                @yield('content')
            </main>
// 省略
<script src="https://js.pusher.com/7.0.3/pusher.min.js"></script>
<script
  src="https://code.jquery.com/jquery-3.6.0.min.js"
  integrity="sha256-/xUj+3OJU5yExlq6GSYGSHk7tPXikynS7ogEvDej/m4="
  crossorigin="anonymous"></script>
@yield('script')

user_select.blade.php

@extends('layouts.app')

@section('content')
<div class="container">
	<div class="row">
		<div class="col-md-8 col-md-offset-2">
		</div>
	</div>

	<table class="table">
		<thead>
			<tr>
				<th>#</th>
				<ht>Name</ht>
				<th></th>
			</tr>
		</thead>
		<tbody>
		@foreach($users as $key => $user)
		<tr>
			<td>{{$loop->iteration}}</td>
			<td>{{$user->name}}</td>
			<td><a href="/chat/{{$user->id}}"><button type="button" class="btn btn-primary">Chat</button></a></td>
		</tr>
		</tbody>
	</table>
</div>
@endsection

$ php artisan make:controller ChatController

route

use App\Http\Controllers\ChatController;

Route::get('/chat/{recieved_id}', [ChatController::class, 'index'])->name('chat');
Route::post('/chat/send', [ChatController::class, 'store'])->name('chatSend');

chat/chat.blade.php

@extends('layouts.app')

@section('content')
<div class="container">
	<div class="row">
		<div class="col-md-8 col-md-offset-2">
		</div>
	</div>

	<!-- チャットルーム -->
	<div id="room">
		@foreach($messages as $key => $message)
			@if($message->sent_id == \Illuminate\Support\Facades\Auth::id())
				<div class="send" style="text-align: right">
					<p>{{$message->message}}</p>
				</div>
			@endif

			@if($message->received_id == \Illuminate\Support\Facades\Auth::id())
				<div class="send" style="text-align: right">
					<p>{{$message->message}}</p>
				</div>
			@endif
		@endforeach
	</div>

	<form>
		<textarea name="message" style="width:100%"></textarea>
		<button type="button" id="btn_send" class="btn btn-primary">送信</button>
	</form>

	<input type="hidden" name="sent_id" value="{{$param['sent_id']}}">
	<input type="hidden" name="recieved_id" value="{{$param['recieved_id']}}">
	<input type="hidden" name="login" value="{{\Illuminate\Support\Facades\Auth::id()}}">
</div>
@endsection

@section('script')
<script>
	Pusher.logToConsole = true;

	var pusher = new Pusher('*', {
		cluster: '*',
		encrypted: true
	});

	var pusherChannel = pusher.subscribe('testApp');

	pusherChannel.bind('chat_event', function(data){

		let appendText;
		let login = $('input[name="login"]').val();

		if(data.sent_id === login){
			appendText = '<div class="send" style="text-align:right"><p>' + data.message + '</p></div> ';
		} else if(data.recieved_id === login){
			appendText = '<div class="recieve" style="text-align:left"><p>' + data.message + '</p></div> ';
		} else {
			return false;
		}

		$("#room").append(appendText);

		if(data.recieved_id === login){
			Push.creaet("新着メッセージ",
			{
				body: data.message,
				timeout: 8000,
				onClick: function(){
					window.focus();
					this.close();
				}
			})
		}
	});

	$.ajaxSetup({
		headers : {
			'X-CSRF-TOKEN' : $('meta[name="csrf-token').attr('content'),
		}
	});

	$('#btn_send').on('click', function(){
		$.ajax({
			type: 'POST',
			url: '/chat/send',
			data: {
				message : $('textarea[name="message"]').val(),
                sent_id : $('input[name="sent_id"]').val(),
                recieved_id : $('input[name="recieved_id"]').val(),
			}
		}).done(function(result){
			$('textarea[name="message"]').val('');
		}).fail(function(result){

		});
	});
</script>
@endsection

$ php artisan make:event ChatMessageRecieved
ChatMessageRecieved.php

public function __construct($request)
    {
        //
        $this->request = $request;
    }

    /**
     * Get the channels the event should broadcast on.
     *
     * @return \Illuminate\Broadcasting\Channel|array
     */
    public function broadcastOn()
    {
        return new PrivateChannel('testApp');
    }

    public function broadcastWith(){
        return [
            'message' => $this->request['message'],
            'sent_id' => $this->request['sent_id'],
            'recieved_id' => $this->request['recieved_id'],
        ];
    }

    public function broadcastAs(){
        return 'chat_event';
    }

あ、想定通りに動いてないけど、ちょっと思い出してきた。
pusherは基本jsでonclickでpostしてstoreし、eventを発火させて新しいデータを取得するんだった。
でも確かpusherのcrudentialは.envだった記憶があるんだが。。。

fontawesomeをinputのvalueに表示させたい時

fontawesomeのアイコンをformのinputで表示させたい。

通常は以下のように、i要素で指定する。

<a href="/cart.html"><button type="button" class="btn btn-danger"><i class="fas fa-cart-plus"></i>	Add to cart</button></a>

formでは、classにfas、valueに、”&#x” と ”f**;”を入れる。ここでは、cartのアイコンで、f217

<form action="/cart/store" method="POST">
<input type="submit" class="btn btn-danger fas pt-2 pb-2" value="&#xf217; Add to cart">
</form>

使い方はわかったが、inputの中で使うと、bootstrapのfontと異なる表示に見えるな。。まあ良しとしましょう。

[Laravel8.46.0] 多言語(日・英・中国語)でバリデーションを切り分けて表示したい時

Laravelで多言語(日本語/中国語/英語)のアプリケーションを作っています。
ユーザのロールによって、販売画面は英語・中国語、管理画面は日本語・英語に切り分ける仕様。
その為、config/app.phpの localは英語(en)で設定します。

'locale' => 'en',

管理画面でユーザ登録や商品登録をしようとした時に、日本語のバリデーションを表示させたい。

### バリデーション(Request)作成
$ php artisan make:request CreateClientRequest

CreateClientRequest.php

public function rules()
    {
        return [
            'company' => ['required','max:100'],
            'name' => ['required','unique:users,name','min:2','max:24'],
            'lang' => ['required'],
            // 省略
        ];
    }

-> これだと、英語のバリデーションファイルを読みに行ってしまうので、日本語のバリデーションファイルを作ります。

/resources/lang/ja/validation.php

ここに日本語のvalidationを書きます。

return [
       // 省略
       'required' => ':attributeは必須です。',
       // 省略

    'attributes' => [
        'company'=>'会社名',
        'id'=>'ユーザID',
        'lang'=>'言語',
        // 省略
    ],
];

それで、CreateClientRequestで、この日本語のバリデーションを読み込むように、setlocaleで日本語を指定します。

CreateClientRequest.php

use Illuminate\Support\Facades\App;
    public function rules()
    {

        App::setLocale('ja');
        return [
            //
            'company' => ['required','max:100'],
            'name' => ['required','unique:users,name','min:2','max:24'],
            'lang' => ['required'],
            // 省略
        ];
    }

そうすると、このバリデーションでは、/ja/validation.phpを読みに行ってくれます。

App::setLocale(”); は、バリデーションファイル(Request)だけでなく、Controller側で指定しても、同じように、日本語のバリデーションファイルを読みにいきます。

つまり、config/app.phpで指定した言語以外のバリデーションも、App::setLocale(”)で自由に呼び出すことができるとういわけです。

うおおおおおおおおおおおおおお
俺がやりたかったのコレ。
久々にプログラミングで興奮した。

[Laravel8.46.0] Laravel CollectiveでCountry Listを使いたい時

Select BoxでCountry Listから選択するUIを作る為、Front Endの構築時は以下のmediacollegeのHTMLをはめこんだが、いざLaravel Collectiveで実装する際には、配列で持ってないないといけないので困った。
https://www.mediacollege.com/internet/samples/html/country-list.html

どうやらCountry Listのパッケージがあるみたい。
Github: Monarobase/country-list

### country-listのインストール
$ composer require monarobase/country-list

### configのproviderとaliasesにclass追加。
./config/app.php

'providers' => [
    // ...
    Monarobase\CountryList\CountryListServiceProvider::class,
  ],
 
'aliases' => [
 // ...
 'Countries' => Monarobase\CountryList\CountryListFacade::class,
],

### controller
AdminClientsController.php

use Monarobase\CountryList\CountryListFacade;

    public function create() {

        $countries = CountryListFacade::getList('en');
        // dd($countries);
    	return view('admin.client.input', compact('countries'));
    }

### Resources
input.blade.php

<div class="form-group">
                  {!! Form::label('country', '国・地域') !!}
                  {!! Form::select('country',  $countries, null, ['class' => 'form-control col-md-4', 'placeholder' => 'Select Country...']) !!}
                </div>

上手くできました。
CountryListFacade::getList(‘en’)でcountry listを配列で取得できます。
助かった、危うく無駄な時間を過ごすところだった。。。

[Laravel8.46.0] 8.x系でLaravel Collectiveを使いたい

$ php artisan –version
Laravel Framework 8.46.0

– Laravel Collective公式のドキュメントをざっと見ます。最新バージョンは6.x系のようです。
Laravel Collective

どうもLaravelのバージョンと同じでないと不安になりますが、気にせずインストールしていきます。

$ composer require laravelcollective/html

composer.json

    "require": {
        // 省略
        "laravelcollective/html": "^6.2",
        // 省略
    },

6.2系が入ったようです。実際に使っていきます。

### configのproviderとaliasesにclass追加。
./config/app.php

'providers' => [
    // ...
    Collective\Html\HtmlServiceProvider::class,
    // ...
  ],

'aliases' => [
 // ...
 'Form' => Collective\Html\FormFacade::class,
 'Html' => Collective\Html\HtmlFacade::class,
 // ...
],

### データ挿入
– データは空の状態からコマンドラインでデータを挿入します。migrationは省略。passwordはbycrptの変換サイトで作成します。
INSERT INTO users (name, company, role_id, lang, client_name, password) VALUES (“admin”, “Test Inc.,”, 1, 1, “Taro Yamada”, “$2y$12$4EHyL825F7RvCPRMiAhyEOHjOeP4a9jOqEMxy2LdaU5wBUZXF64U2”);

### Controller
AdminController
– 設計上ではログインユーザのユーザ情報を取得する仕組みですが、テストの為(まだログイン機能を実装していない)、先ほど挿入したデータを引っ張り出します。

use App\Models\User;

public function setting(){
        // $user = Auth::user();
        $user = User::find(1);

    	return view('admin.setting', compact('user'));
    }

### Resource
setting.blade.php

<div class="card-body" width="" height="">
                {!! Form::Model($user, ['method'=>'POST', 'url' => '/admin/setting/confirm']) !!}
                <input type="hidden" name="company" value="{{ $user['company'] }}">
                <input type="hidden" name="name" value="{{ $user['name'] }}">
                <div class="form-group">
                  {!! Form::label('company', '会社名') !!} <span class="badge badge-secondary">必須</span>
                  {!! Form::text('company', null, ['class' => 'form-control col-md-12', 'disabled'=>'disabled']) !!}
                </div>
                <div class="form-group">
                  {!! Form::label('name', 'ユーザID(半角英数字)') !!} <span class="badge badge-secondary">必須</span>
                  {!! Form::text('name', null, ['class' => 'form-control col-md-6', 'disabled'=>'disabled']) !!}
                </div>
                // 省略 
              </div>
              <div class="card-footer ">
                <div class="inner">
                    {!! Form::submit('確認', ['class'=>'btn']) !!}
                </div>
              </div>
              {!! Form::close() !!}
            </div>
          </div>

大丈夫そうです。

simplexml_load_file() でRSSHubから取得できない時

ブラウザからは閲覧できるが、simplexml_load_fileで取得できない。

$rss = simplexml_load_file('https://rsshub.app/36kr/newsflashes');
print_r($rss);

こちらの記事を参考に、ユーザエージェントを指定します。
https://stackoverflow.com/questions/26896633/why-simplexml-load-file-can-not-use-some-xml-rss

$ch = curl_init('https://rsshub.app/36kr/newsflashes');
curl_setopt($ch, CURLOPT_RETURNTRANSFER, true);

curl_setopt($ch, CURLOPT_USERAGENT, 'Mozilla/5.0 (Windows NT 6.3; Win64; x64) AppleWebKit/537.36 (KHTML, like Gecko) Chrome/37.0.2049.0 Safari/537.36');

$feed = curl_exec($ch);
$rss = new SimpleXMLElement($feed);

これでテストしてOKです。
サーバ側でどうやって制御してるのかはきになるところです。

[laravel8.5.19] LaravelでPython3を実行する書き方

Laravelで作成するアプリケーションで、一部の言語に関する処理のところをPython(自然言語処理)で実行したい。
方法としては、1.PHP組み込み関数のexec関数を使用する、2.symfony/processライブラリを使う の2通りがあるようだ。
今回は「exec関数」を使用する。python実行のテストのみなので、以下簡略化して記述している。

### exec関数とは?
exec関数はPHPの組み込み関数で、外部プログラムを実行できる

### Laravelプロジェクトインストール
$ composer create-project –prefer-dist laravel/laravel laravel-python
$ cd laravel-python
$ composer require laravel/jetstream
$ php artisan jetstream:install livewire
$ npm install && npm run dev
$ php artisan migrate
$ php artisan serve –host 192.168.33.10 –port 8000

### Routing
web.php
 L index.bladeからpostした際に、ExecControllerのexecutePython() メソッドでpythonを実行する

use App\Http\Controllers\ExecController;
use App\Http\Controllers\TestController;

Route::post('/python', [ExecController::class, 'executePython']);
Route::get('/test', [TestController::class, 'index']);

### View
index.blade.php
 L フォームのactionから、ExecController@executePythonにpostする

	<h1>Test</h1>
	<form action="python" method="post">
		@csrf
		<input type="submit" name="submit">
	</form>

### Controller
ExecController.php
L exec($command, $output);で実行する。
L $commandは、「python3 ${絶対パス}.py」で実行する
L laravelでは、app_path()でappディレクトリのpathを取得するので、app_path()とする
L execの第二引数である$outputは、コマンドで*.pyを実行した際の出力が返ってくる。

class ExecController extends Controller
{
    //
    public function executePython(Request $request){
    	$path = app_path() . "/Python/app.py";
    	$command = "python3 " . $path;
    	exec($command, $output);
    	dd($output);
    	// return view('index', compact('output'));
    }
}

※テストなのでdd($output)で出力を確認します。

laravel-python/app/Python/app.py
※今回はlaravelプロジェクトのapp/Python/配下にapp.pyを作成した。絶対パスなので、どこれも良いっぽいが、appフォルダに作るのが一般的のよう。今回はテストなので単にprint()するだけにした

print("hello")

### Laravelでpythonを実行した実行結果
bladeで「送信」ボタンを押すと、pythonで*.pyを実行する

実行後
L 配列で返ってくる

返ってきた変数(値)は、viewに再度返却できますね。
うおおおおおおおおおおおおおおおおおおおおおおおおお
やべえええええええええええええええええ
やりたいこと(自然言語処理)の9割くらいはイメージできた!!!!!!!!!!!!!

当初、Pythonの処理(nlpなど)の部分は、サブドメインを取得して別サーバを立ててDjangoで実装しようかと思ってたが、Laravelでpythonを実行できるなら、わざわざそんな冗長なことしなくて良いですね。
よっしゃああああああああああああああああああああああ
設計書作るぞーーーーーーーー

【株式投資】twitterで買い煽り・売り煽りが多いかpython・MeCabで調べる

優秀なトレーダーで、買い煽りが多いか、売り煽りが多いか、定性的に調べたいと思う方も多いだろう。というのも、「買い煽り」「売り煽り」というのは、ポジションを持ったイナゴの心理状態をかなり表しているからだ。当然、株が上がって欲しい時は買い煽りをするし、株価が下落して欲しい時は夢中で売り煽りを行う。外野から見たらやや滑稽に見えるかもしれないが、本人にとってはいたって真剣に行っている。なぜなら、案外、この煽りに影響を受けて売買をする人が多いからだ。話がややズレたが、したがって「買い煽り」「売り煽り」を定性的に分析さえできれば、より冷静に判断することができるので、株式投資のパフォーマンスは飛躍的に向上すると期待できる。そこで、本投稿では、Pythonを使って、買い煽り・売り煽り分析を行う。
yahooファイナンスの掲示板で調べたかったが、スクレイピングが禁止なので、twitterで銘柄コードと一緒につぶやかれている内容で、買い煽りが多いか、売り煽りが多いかを調べる。

自然言語処理の感情分析で極めて重要なのはガゼッタ(辞書)であろう。
東工大の高村教授が作成したPN Tableや東北大学の乾・岡崎研究室の日本語評価極性辞書が有名だが、買い煽り・売り煽りとは全く関係ないだろう。そのため、自分で辞書を作る必要がある。検討を重ね、以下の単語が入ってれば、それぞれ買い煽りのツイート、売り煽りのツイートとして評価することにした。

### 買い煽りのガゼッタ
‘買い’,’買う’,’特買い’,’安い’,’全力’,’爆益’,’ノンホル’,’超絶’,’本物’,’成長’,’反転’,’拾う’,’ホールド’,’踏み上げ’,’国策’,’ストップ高’,’上がる’,’初動’,’クジラ’,’売り豚’,’売り方’,’ハイカラ’,’頑張れ’,’貸借’,’反転’,’応援’,’強い’,’逆日歩’

### 売り煽りのガゼッタ
‘売り’,’売る’,’下がる’,’大損’,’ナイアガラ’,’ガラ’,’ジェットコースター’,’ダメ’,’嵌め込み’,’養分’,’退場’,’追証’,’赤字’,’ワラント’,’仕手’,’特売り’,’高い’,’アホルダー’,’イナゴ’,’撤退’,’倒産’,”,’買い豚’,’買い方’,’信用買’,’逃げろ’,’疑義’,’空売り’,’利確’,’損切’,’振い落とし’

### 銘柄に関連した呟きを取得
– tweepyで取得してテキストデータとして保存する

import tweepy
import datetime
import re
 
keyword = "6343 -RT"
dfile = "test.txt"
 
jsttime = datetime.timedelta(hours=9)
 
Consumer_key = ''
Consumer_secret = ''
Access_token = ''
Access_secret = ''
 
auth = tweepy.OAuthHandler(Consumer_key, Consumer_secret)
auth.set_access_token(Access_token, Access_secret)
 
api = tweepy.API(auth, wait_on_rate_limit = True)
 
q = keyword
 
tweets_data = []
 
 
for tweet in tweepy.Cursor(api.search, q=q, count=5,tweet_mode='extended').items(200):
	tweets_data.append(tweet.full_text + '\n')
 
fname = r"'" + dfile + "'"
fname = fname.replace("'", "")
 
with open(fname, "w", encoding="utf-8") as f:
    f.writelines(tweets_data)

### スコア分類
– つぶやきをMecabで形態素解析を行う
– 買い煽りのガゼッタのワードがつぶやかれたら買い煽り+1ポイント、売り煽りのガゼッタのワードがつぶやかれたら売り煽り+1ポイントとして評価した。

import MeCab

dfile = "test.txt"
 
fname = r"'" + dfile + "'"
fname = fname.replace("'","")
 
mecab = MeCab.Tagger("-Owakati")
 
words = []
 
with open(fname, 'r', encoding="utf-8") as f:
 
    reader = f.readline()
 
    while reader:
 
        node = mecab.parseToNode(reader)
 
        while node:
            word_type = node.feature.split(",")[0]
            if word_type in ["名詞", "動詞", "形容詞", "副詞"]:
                words.append(node.surface)
            node = node.next
        reader = f.readline()


# 買い煽りのgazetteer
buying_set = set(['買い','買う','特買い','安い','全力','爆益','ノンホル','超絶','本物','成長','反転','拾う','ホールド','踏み上げ','国策','ストップ高','上がる','初動','クジラ','売り豚','売り方','ハイカラ','頑張れ','貸借','反転','応援','強い','逆日歩'])

# 売り煽りのgazetter
selling_set = set(['売り','売る','下がる','大損','ナイアガラ','ガラ','ジェットコースター','ダメ','嵌め込み','養分','退場','追証','赤字','ワラント','仕手','特売り','高い','アホルダー','イナゴ','撤退','倒産','','買い豚','買い方','信用買','逃げろ','疑義','空売り','利確','損切','振い落とし'])

def classify_category(text):

	buying_score = 0
	selling_score = 0

	for ele in words:
		element = ele.split("\t")
		if element[0] == "EOS":
			break

		surface = element[0]

		if surface in buying_set:
			buying_score += 1
		if surface in selling_set:
			selling_score += 1

	print("買い煽りスコア:" + str(buying_score))
	print("売り煽りスコア:" + str(selling_score))

classify_category(words)

今回は、先日の金曜日にストップ高をつけたフリージア・マクロス(6343)で調べた。
$ python3 app.py
買い煽りスコア:13
売り煽りスコア:0

結果、買い煽りだらけとなった。
空売りを入れよう。