[SpringBoot2.4.2] postgresのデータをselect文で全件取得して表示する

UsersRepository.java

package com.example.demo;
import java.util.ArrayList;
import java.util.List;
import java.util.Map;

import org.springframework.beans.factory.annotation.Autowired;
import org.springframework.jdbc.core.JdbcTemplate;
import org.springframework.stereotype.Repository;

@Repository
public class UsersRepository {
	
	private final JdbcTemplate jdbcTemplate;
	
	@Autowired
	public UsersRepository(JdbcTemplate jdbcTemplate) {
		this.jdbcTemplate = jdbcTemplate;
	}
	
	public void insertUsers(Users users) {
		jdbcTemplate.update("INSERT INTO users(name,department) Values (?,?)",
				users.getName(), users.getDepartment());
	}
	
	public List<Users> getAll(){
		String sql = "select id, name, department from users";
		List<Map<String, Object>>usersList = jdbcTemplate.queryForList(sql);
		List<Users> list = new ArrayList<>();
		for(Map<String, Object> str1: usersList) {
			Users users = new Users();
			users.setId((int)str1.get("id"));
			users.setName((String)str1.get("name"));
			users.setDepartment((String)str1.get("department"));
			list.add(users);
		}
		return list;
	}
}

MainController.java

package com.example.demo;
import java.util.List;
import org.springframework.stereotype.Controller;
import org.springframework.beans.factory.annotation.Autowired;
import org.springframework.ui.Model;
import org.springframework.web.bind.annotation.GetMapping;
import org.springframework.web.bind.annotation.RequestMapping;
import org.springframework.web.bind.annotation.RequestParam;

@Controller
@RequestMapping("/test1")
public class MainController {
	@Autowired
	private UsersRepository usersRepository;
	
	@GetMapping("index")
	public String index(Model model) {
		List<Users> list = usersRepository.getAll();
		model.addAttribute("UsersList", list);
		return "test1/index";
	}

index.html
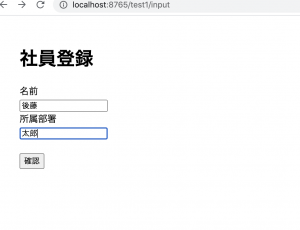
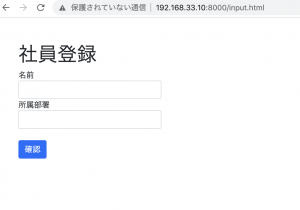
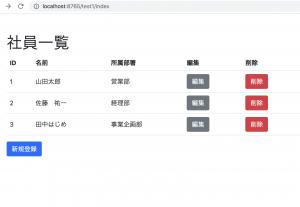
L 文字を接続する際は、”‘string’ + ${list}”とする
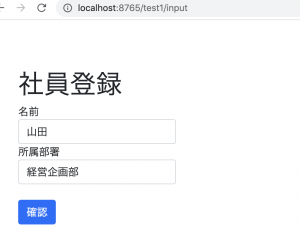
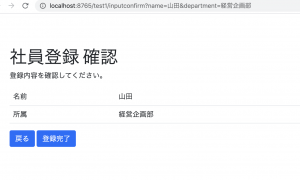
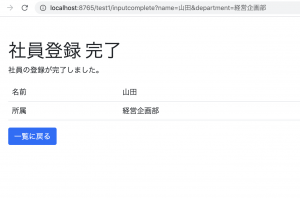
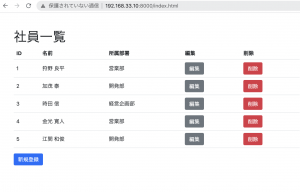
<h1>社員一覧</h1>
<div class="col-md-8">
<table class="table">
	<tr><th>ID</th><th>名前</th><th>所属部署</th><th>編集</th><th>削除</th></tr>
	<tr th:each="list: ${UsersList}">
		<td th:text="${list.id}"></td><td th:text="${list.name}">狩野 良平</td><td th:text="${list.department}">営業部</td><td><a th:href="'/edit/' + ${list.id}"><button type="button" class="btn btn-secondary">編集</button></a></td><td><a th:href="'/delete/' + ${list.id}"><button type="button" class="btn btn-danger" onclick="location.href='/delete_complete.html'">削除</button></a></td>
	</tr>
</table>

select allはわかった。
Javaの map, list, arrayListの使い方を理解する必要がある。

[SpringBoot2.4.2] thymeleafの入力データをpostgresにINSERTする

pom.xml

		<dependency>
			<groupId>org.springframework.boot</groupId>
			<artifactId>spring-boot-starter-data-jdbc</artifactId>
		</dependency>
		
		<dependency>
			<groupId>org.postgresql</groupId>
			<artifactId>postgresql</artifactId>
			<scope>runtime</scope>
		</dependency>

application.properties

spring.jpa.database=POSTGRESQL
spring.datasource.url=jdbc:postgresql://localhost:5432/test
spring.datasource.username=root
spring.datasource.password=

### データ格納用のDBテーブル作成
$ psql -U root test
psql: error: could not connect to server: No such file or directory
Is the server running locally and accepting
connections on Unix domain socket “/tmp/.s.PGSQL.5432”?
ん?
$ postgres -D /usr/local/var/postgres
$ brew services restart postgresql
test=> \d
test=> CREATE TABLE users (
id SERIAL NOT NULL,
name varchar(255),
department varchar(255),
PRIMARY KEY(id)
);

### Repository
Users.java

package com.example.demo;

public class Users {
	private Integer id;
	private String name;
	private String department;

	public Integer getId() {
		return id;
	}
	public String getName() {
		return name;
	}
	public String getDepartment() {
		return department;
	}
	public void setName(String name) {
		this.name = name;
	}
	public void setDepartment(String department) {
		this.department = department;
	}
}

UsersRepository.java

package com.example.demo;

import org.springframework.beans.factory.annotation.Autowired;
import org.springframework.jdbc.core.JdbcTemplate;
import org.springframework.stereotype.Repository;

@Repository
public class UsersRepository {
	
	private final JdbcTemplate jdbcTemplate;
	
	@Autowired
	public UsersRepository(JdbcTemplate jdbcTemplate) {
		this.jdbcTemplate = jdbcTemplate;
	}
	
	public void insertUsers(Users users) {
		jdbcTemplate.update("INSERT INTO users(name,department) Values (?,?)",
				users.getName(), users.getDepartment());
	}
}

MainController.java

package com.example.demo;
import org.springframework.stereotype.Controller;
import org.springframework.beans.factory.annotation.Autowired;
import org.springframework.ui.Model;
import org.springframework.web.bind.annotation.GetMapping;
import org.springframework.web.bind.annotation.RequestMapping;
import org.springframework.web.bind.annotation.RequestParam;

@Controller
@RequestMapping("/test1")
public class MainController {
	@Autowired
	private UsersRepository usersRepository;
	
	
	@GetMapping("input")
	public String input1() {
		return "test1/input";
	}
	
	@GetMapping("inputconfirm")
	public String output1(
			@RequestParam(name = "name") String name,
			@RequestParam(name = "department") String department,
			Model model) {
			model.addAttribute("name", name);
			model.addAttribute("department", department);
			return "test1/input_confirm";
	}
	
	@GetMapping("inputcomplete")
	public String output2(
			@RequestParam(name = "name") String name,
			@RequestParam(name = "department") String department,
			Model model) {
		    Users users = new Users();
		    users.setName(name);
		    users.setDepartment(department);
		    usersRepository.insertUsers(users);
		    
			model.addAttribute("name", name);
			model.addAttribute("department", department);
			return "test1/input_complete";
	}
	
}

view

postgres側
test=> select * from users;
id | name | department
—-+———-+————
1 | 山田太郎 | 営業部
(1 row)

test=> select * from users;
id | name | department
—-+————+————
1 | 山田太郎 | 営業部
2 | 佐藤 祐一 | 経理部
(2 rows)

入力できてるーーーーーーーーーーーーーーーーー
ぎゃあああああああああああああああああああああああああああああ
😇😇😇😇😇😇😇😇😇😇😇😇😇

なんとなくServiceとRepositoryとControllerとthymeleafの関係性がわかってきたああああああああああ

[SpringBoot2.4.2] 登録確認画面を作る

src/main/resources/templates/test1/input_confirm.html
 L thymeleafでinput typeのvalueを取得して表示する

<form class=""  method="get" action="inputcomplete">
<input type="hidden" name="name" th:value="${name}">
<input type="hidden" name="department" th:value="${department}">
<table class="table">
	<tr><td>名前</td><td th:text="${name}">狩野 良平</td></tr>
	<tr><td>所属</td><td th:text="${department}">営業部</td></tr>
</table>
<button type="button" class="btn btn-primary" onclick="location.href='/test1/input'">戻る</button>
<button type="submit" class="btn btn-primary">登録完了</button>
</form>

MainController.java
 L completeもconfirmと基本は同じ、RequestParamで取得する

	@GetMapping("inputcomplete")
	public String output2(
			@RequestParam(name = "name") String name,
			@RequestParam(name = "department") String department,
			Model model) {
			model.addAttribute("name", name);
			model.addAttribute("department", department);
			return "test1/input_complete";
	}

src/main/resources/templates/test1/input_complete.html

	<link th:href="@{/css/style.css}" rel="stylesheet" type="text/css">

// 省略

<h1>社員登録 完了</h1>
<div class="col-md-8">
<p>社員の登録が完了しました。</p>
<table class="table">
	<tr><td>名前</td><td th:text="${name}">狩野 良平</td></tr>
	<tr><td>所属</td><td th:text="${department}">営業部</td></tr>
</table>
<button type="button" class="btn btn-primary" onclick="location.href='/index'">一覧に戻る</button>
</div>

GetではなくPostにしたいが、Getなら凄く簡単だということはわかった。
ファイルのルーティングはControllerでやるのね。

で、この入力データをINSERTしたい。

[SpringBoot2.4.2] ユーザ登録画面を作る

src/main/resources/templates にinput.htmlファイルを作ります。
formはgetメソッドで、遷移先はinputconfirmとする
thymeleafを使う

<!DOCTYPE html>
<html xmlns:th="http://www.thymeleaf.org">
<head>
	<meta charset="UTF-8">
	<meta name="viewport" content="width=device-width, initial-scale=1.0">
	<title>社員登録</title>
<!-- 	<link href="https://cdn.jsdelivr.net/npm/bootstrap@5.0.0-beta1/dist/css/bootstrap.min.css" rel="stylesheet" integrity="sha384-giJF6kkoqNQ00vy+HMDP7azOuL0xtbfIcaT9wjKHr8RbDVddVHyTfAAsrekwKmP1" crossorigin="anonymous">
	<link rel="stylesheet" href="https://cdnjs.cloudflare.com/ajax/libs/font-awesome/5.14.0/css/all.min.css"> -->
	<link th:href="@{/css/style.css}" rel="stylesheet" type="text/css">
</head>
<body>
<h1>社員登録</h1>
<div class="col-md-8">
<form class="form-inline" method="get" action="inputconfirm">
	<div class="form-group">
	    <label class="control-label col-md-2">名前</label>
	    <div class="col-md-4">
	        <input type="text" name="name" class="form-control">
	    </div>
	</div>
	<div class="form-group">
        <label class="control-label col-md-2">所属部署</label>
        <div class="col-md-4">
            <input type="text" name="department" class="form-control">
        </div>
    </div>
    <br>
	<button type="submit" class="btn btn-primary">確認</button>
</form>
</div>

### SpringBootでのCSSファイル
sassで作ったcssファイルは src/main/resources/static 配下に置く

<link th:href="@{/css/style.css}" rel="stylesheet" type="text/css">

### MainController.java
– GetMappingでpathを指定する

package com.example.demo;
import org.springframework.stereotype.Controller;
import org.springframework.ui.Model;
import org.springframework.web.bind.annotation.GetMapping;
import org.springframework.web.bind.annotation.RequestMapping;
import org.springframework.web.bind.annotation.RequestParam;

@Controller
@RequestMapping("/test1")
public class MainController {
	
	@GetMapping("input")
	public String input1() {
		return "test1/input";
	}
	
	@GetMapping("inputconfirm")
	public String output1(
			@RequestParam(name = "name") String name,
			@RequestParam(name = "department") String department,
			Model model) {
			model.addAttribute("name", name);
			model.addAttribute("department", department);
			return "test1/input_confirm";
	}
	
}

test1/input_confirm.html

<!DOCTYPE html>
<html xmlns:th="http://www.thymeleaf.org">
<head>
	<meta charset="UTF-8">
	<meta name="viewport" content="width=device-width, initial-scale=1.0">
	<title>社員登録 確認</title>
<!-- 	<link href="https://cdn.jsdelivr.net/npm/bootstrap@5.0.0-beta1/dist/css/bootstrap.min.css" rel="stylesheet" integrity="sha384-giJF6kkoqNQ00vy+HMDP7azOuL0xtbfIcaT9wjKHr8RbDVddVHyTfAAsrekwKmP1" crossorigin="anonymous">
	<link rel="stylesheet" href="https://cdnjs.cloudflare.com/ajax/libs/font-awesome/5.14.0/css/all.min.css"> -->
	<link th:href="@{/css/style.css}" rel="stylesheet" type="text/css">
</head>
<body>
<h1>社員登録 確認</h1>
<div class="col-md-8">
<p>登録内容を確認してください。</p>
<form class="">
<table class="table">
	<tr><td>名前</td><td th:text="${name}">狩野 良平</td></tr>
	<tr><td>所属</td><td th:text="${department}">営業部</td></tr>
</table>
</form>
<button type="button" class="btn btn-primary" onclick="location.href='/input.html'">戻る</button>
<button type="button" class="btn btn-primary" onclick="location.href='/input_complete.html'">登録完了</button>
</div>

<script src="https://cdnjs.cloudflare.com/ajax/libs/popper.js/1.16.1/umd/popper.min.js"></script>
<script src="https://cdnjs.cloudflare.com/ajax/libs/twitter-bootstrap/5.0.0-alpha1/js/bootstrap.min.js"></script>
</body>
</html>

あれ? もしかして上手くいってる??

[RabbitMQ] Publish/Subscribe

Listing exchanges
$ sudo rabbitmqctl list_exchanges
Listing exchanges …
direct
amq.direct direct
amq.fanout fanout
amq.headers headers
amq.match headers
amq.rabbitmq.log topic
amq.rabbitmq.trace topic
amq.topic topic
…done.

emit_log.php

require_once __DIR__ . '/vendor/autoload.php';
use PhpAmqpLib\Connection\AMQPStreamConnection;
use PhpAmqpLib\Message\AMQPMessage;

$connection = new AMQPStreamConnection('localhost', 5672, 'guest', 'guest');
$channel = $connection->channel();

$channel->queue_declare('logs', 'fanout', false, false, false);

$data = implode('', array_slice($argv, 1));
if(empty($data)){
	$data = "info:Hello World!";
}
$msg = new AMQPMessage($data);
$channel->basic_publish($msg, 'logs');

echo '[x]Sent', $data, "\n";

$channel->close();
$connection->close();

receive_logs.php

require_once __DIR__ . '/vendor/autoload.php';
use PhpAmqpLib\Connection\AMQPStreamConnection;

$connection = new AMQPStreamConnection('localhost', 5672, 'guest', 'guest');
$channel = $connection->channel();

$channel->queue_declare('logs', 'fanout', false, false, false);

list($queue_name,,) = $channel->queue_declare("", false, false, true, false);

$channel->queue_bind($queue_name, 'logs');

echo " [*] Waiting for messages. To exit press CTRL+C\n";

$callback = function ($msg) {
  echo ' [x]', $msg->body, "\n";
};

$channel->basic_consume($queue_name, '', false, true, false, false, $callback);

while ($channel->is_consuming()) {
    $channel->wait();
}

$channel->close();

$ php receive_logs.php
PHP Fatal error: Uncaught PhpAmqpLib\Exception\AMQPProtocolChannelException: NOT_FOUND – no queue ‘logs’ in vhost ‘/’ in /home/vagrant/dev/mailer/vendor/php-amqplib/php-amqplib/PhpAmqpLib/Channel/AMQPChannel.php:216

なんやこれは。。。よーわからん。。

[RabbitMQ] Work Queues

new_task.php

require_once __DIR__ . '/vendor/autoload.php';
use PhpAmqpLib\Connection\AMQPStreamConnection;
use PhpAmqpLib\Message\AMQPMessage;

$connection = new AMQPStreamConnection('localhost', 5672, 'guest', 'guest');
$channel = $connection->channel();

$channel->queue_declare('hello', false, false, false, false);

$data = implode('', array_slice($argv, 1));
if(empty($data)){
	$data = "Hello World!";
}
$msg = new AMQPMessage($data);

$channel->basic_publish($msg, '', 'hello');

echo '[x] Sent', $data, "\n";


$channel->close();
$connection->close();

worker.php

require_once __DIR__ . '/vendor/autoload.php';
use PhpAmqpLib\Connection\AMQPStreamConnection;

$connection = new AMQPStreamConnection('localhost', 5672, 'guest', 'guest');
$channel = $connection->channel();

$channel->queue_declare('hello', false, false, false, false);

echo " [*] Waiting for messages. To exit press CTRL+C\n";

$callback = function ($msg) {
  echo ' [x] Received ', $msg->body, "\n";
  sleep(substr_count($msg->body,'.'));
  echo "[x] Done\n";
};

$channel->basic_consume('hello', '', false, true, false, false, $callback);

while ($channel->is_consuming()) {
    $channel->wait();
}

$ php new_task.php “A very hard task which takes two seconds..”
[x] SentA very hard task which takes two seconds..

$ php worker.php
[*] Waiting for messages. To exit press CTRL+C
[x] Received Hello World!
[x] Done
[x] Received Hello World!
[x] Done
[x] Received A very hard task which takes two seconds..
[x] Done

worker.phpのshellを複数立てると、分散して処理される
[vagrant@localhost mailer]$ php new_task.php First message.
[x] SentFirstmessage.
[vagrant@localhost mailer]$ php new_task.php Second message..
[x] SentSecondmessage..
[vagrant@localhost mailer]$ php new_task.php Third message…
[x] SentThirdmessage…
[vagrant@localhost mailer]$ php new_task.php Fourth message….
[x] SentFourthmessage….

$ php worker.php
[*] Waiting for messages. To exit press CTRL+C
[x] Received Secondmessage..
[x] Done
[x] Received Fourthmessage….
[x] Done
すげえ

require_once __DIR__ . '/vendor/autoload.php';
use PhpAmqpLib\Connection\AMQPStreamConnection;
use PhpAmqpLib\Message\AMQPMessage;

$connection = new AMQPStreamConnection('localhost', 5672, 'guest', 'guest');
$channel = $connection->channel();

$channel->queue_declare('task_queue', false, true, false, false);

$data = implode('', array_slice($argv, 1));
if(empty($data)){
	$data = "Hello World!";
}
$msg = new AMQPMessage(
	$data,
	array('delivery_mode'=> AMQPMessage::DELVERY_MODE_PERSISTENT)
);

$channel->basic_publish($msg, '', 'task_queue');

echo '[x] Sent', $data, "\n";


$channel->close();
$connection->close();
require_once __DIR__ . '/vendor/autoload.php';
use PhpAmqpLib\Connection\AMQPStreamConnection;

$connection = new AMQPStreamConnection('localhost', 5672, 'guest', 'guest');
$channel = $connection->channel();

$channel->queue_declare('task_queue', false, true, false, false);

echo " [*] Waiting for messages. To exit press CTRL+C\n";

$callback = function ($msg) {
  echo ' [x] Received ', $msg->body, "\n";
  sleep(substr_count($msg->body,'.'));
  echo "[x] Done\n";
  $msg->ack();
};

$channel->basic_qos(null, 1, null);
$channel->basic_consume('task_queue', '', false, false, false, false, $callback);

while ($channel->is_consuming()) {
    $channel->wait();
}

$channel->close();
$connection->close();

queueの振る舞いだが、わかったようでわからんな。。

RabbitMQとは

RabbitMQとは
-> pivotalによって開発されているオープンソースメッセージブローカー
-> AMQP, STOMP, MQTT, HTTPに対応

AMAPとは?
– メッセージ転送に使われる通信プロトコル

Exchange
– Exchange は、生成されたMessageを受け取る役割
Binding
– ExchangeとMessageQueueの対応付け
Message Queue
– Messageを蓄積し、Consumer Applicationnに引き渡す

Publisher Applicationによって生成されたMessageは、Exchangeに渡される
ExchangeはBindingに基づいて、Messageを適切なMessage Queueに引き渡す
Consumer Applicationによって、Message QueueからMessageが取り出される

Direct
– Direct な Exchange は、Messageに付与されているrouting keyと、bindingに設定されているbinding key を見て、routing key = binding key となるような、Message Queue に Message を配送
Fanout
– Fanout なExchangeは、bindされているMessage Queueすべてに受け取ったメッセージの配送
Topic
– メッセージにrouting keyを指定して、そのkeyを元に配送するMessage Queueを選択

RabbitMQは、オープンソースでErlangで記述

公式サイト: https://www.rabbitmq.com/

ちょっと理解するのに時間がかかりそう

RabbitMQでMailerQを実行する

$ sudo yum install php-pecl-amqp

setting.php

$address = 'amqp://guest:guest@192.168.33.10';
$outbox = 'outbox_test';
$resultbox = 'results_test';

$recipientDomain = 'gmail.com';
$recipientEmail = 'hogehoge@gmail.com';
$fromAddress = 'info@hpscript.com';

send.php

require_once('settings.php');

try {
	$connection = new AMQPConnection(array(
		'host' = $hostname,
		'login' => $username,
		'password' => $password
	));

	$connection->connect();
}
catch(AMQPException $exception){
	echo "Could not establish a connection to the RabbitMQ server.\n";
}

try {
	$channel = new AMQPChannel($connection);
} catch (AMQPConnectionException $exception){
	echo "Connection to the broker was lost(creating channel).\n";
}

try {
	$exchange = new AMQPExchange($channel);
	$exchange->setName('exchange1');
	$exchange->setType('fanout');
	$exchange->declareExchange();
} catch (AMQPExchangeException $exception){
	echo "CHannel is not connected to broker(declaring exchange).\n";
} catch (AMQPConnectionException $exception){
	echo "Connection to the broker was lost(declaring exchange).\n";
}

try {
	$queue = new AMQPQueue($channel);
	$queue->setName($outbox);
	$queue->setFlags(AMQP_DURABLE);
	$queue->declareQueue();
	$queue->bind('exchange1','key2');
} catch (AMQPQueueException $exception){
	echo "Channel is not connected to a broker(creating queue).\n";
} catch (AMQPConnectionException $exception){
	echo "Connection to the broker was lost.(creating queue)/\n";
}

$jsonMessage = json_encode(array(
	'envelope'=>$fromAddress,
	'recipient' => $recipientEmail,
	'mime' => "From:".$fromAddress."\r\n"
		. "To:". $recipientEmail . "\r\n"
		. "Subject: Example subject\r\n\r\n"
		. "This is the example message text"
));

try {
	$message = $exchange->publish($jsonMessage,'key2');
} catch (AMQPExchangeException $exception){
	echo "Channel is not connected to a broker(publishing message on queue).\n";
} catch (AMQPConnectionException $exception){
	echo "Connection to the broker was lost(publishing message on queue).\n";
} catch (AMQPChannelException $exception){
	echo "The channel is not open(publishing message on queue).\n";
}

$connection->disconnect();
require_once('settings.php');

try {
	$connection = new AMQPConnection(array(
		'host' => $hostname,
		'login' => $username,
		'password' => $password,
		'vhost' => $vhost

	));

	$connection->connect();
} catch (AMQPException $exception){
	echo "Could not establish a connection to the RabbitMQ servier.\n";
}

try {
	$channel = new AMQPChannel($connection);
} catch (AMQPConnectionException $exception){
	echo "Connection to the broker was lost(creating channel).\n";
}

try {
	$queue = new AMQPQueue($channel);
	$queue->setName($resultbox);
	$queue->setFlags(AMQP_DURABLE);
	$queue->bind('exchange1','key2');
	$queue->declareQueue();
} catch(AMQPQueueException $exception){
	echo "Channel is not connected to a broker(creating queue).\n";
} catch (AMQPConnectionException $exception){
	echo "Connection to the broker was lost.(creating queue)/\n";
}

while ($envelope = $queue->get()){
	echo "Received:\n";
	echo $envelope->getBody(). "\n";
	echo "----------------------------------------------\n\n";
}

$connection->disconnect();

$ php result.php
PHP Fatal error: Uncaught Error: Class ‘AMQPConnection’ not found in /home/vagrant/dev/mailer/result.php:6
Stack trace:
#0 {main}
thrown in /home/vagrant/dev/mailer/result.php on line 6 

ん? どういうこと?
RabbitMQの使い方がよくわかってないな。。

[AmazonLinux2] RabbitMQをインストールして実行する

$ sudo yum -y update
// epelをインストール
$ sudo yum install -y https://dl.fedoraproject.org/pub/epel/epel-release-latest-7.noarch.rpm
$ sudo yum-config-manager –enable epel
// erlangをインストール
$ sudo yum install erlang –enablerepo=epel
$ sudo yum install yum-plugin-versionlock
$ sudo yum versionlock gcc-*
$ sudo yum install -y socat
$ sudo yum install logrotate
$ sudo rpm –import https://dl.bintray.com/rabbitmq/Keys/rabbitmq-release-signing-key.asc
$ sudo yum install rabbitmq-server

$ sudo rabbitmq-plugins enable rabbitmq_management
$ chkconfig rabbitmq-server on
$ sudo systemctl start rabbitmq-server
$ systemctl status rabbitmq-server
● rabbitmq-server.service – RabbitMQ broker
Loaded: loaded (/usr/lib/systemd/system/rabbitmq-server.service; disabled; vendor preset: disabled)
Active: active (running) since 火 2021-02-16 09:31:04 JST; 3s ago
Main PID: 28564 (beam)
CGroup: /system.slice/rabbitmq-server.service
├─28564 /usr/lib64/erlang/erts-5.10.4/bin/beam -W w -K true -A30 -P 1048576 — -root /u…
├─28636 inet_gethost 4
└─28637 inet_gethost 4
$ sudo rabbitmqctl list_queues
Listing queues …
…done.

$ php send.php
[x] sent ‘Hello World!’
$ php recieve.php
[*] Waiting for messages. To exit press CTR+C
[x] Received Whats up

ぎゃあああああああああああああああああああああああ
助けてくれええええええええええええええええええええええええええええ