【React 17.0.2】属性(props)と状態(state)

Reactコンポーネントでも親子関係を持つと考えられる

<Parent>
	<ChildOne />
	<ChildTwo>
		<Baby />
	</ChildTwo>
</Parent>

props: 親から子へ渡される属性値 ※子コンポーネントで変更できない
state: 子の内部状態 ※親コンポーネントから参照・変更できない
L stateが更新されるとstateを持つコンポーネントが再レンダリングされる

### props
外部から渡される属性値は、propsと呼ぶ

<Component
	string="this is string"
	number={123}
	bool={true}
	array={[9,8,7]}
	object={{ hello: 'world'}}
	func = {a=> a*2}
	variable={something}
/>

<button
	id="the-button"
	className="button is-primary"
	onClick={handleClick}
>Button</button>
<label htmlFor="the-id">Label</label>

<input
	type="text"
	id="email"
	arial-labelledby="the-label"
	aria-required="true"
/>

### イベント処理
イベントの処理は別に書く

const handleClick = () => {
	
}

const button = <button onClick={handleClick}>Click me</button>;

### カスタム属性
独自要素には自由にpropsを定義できる

<Component customProp={something} />
<Layout
	header={<Header />}
	content={<Content />}
	footer={<Footer />}
/>

<Panel narrow>...</Panel>

### state
コンポーネント内部でデータを管理したい場合は、useState関数(state)を使う
  L useStateは更新されたデータを覚えていて、2回目以降はそちらを使う

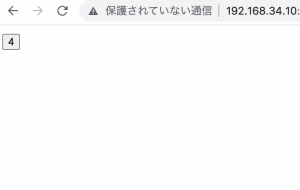
		function CountButton(){
			const countState = React.useState(0);
 
			const count = countState[0]; // 状態
			const setCount = countState[1]; // 状態を更新するための関数

			const handleClick = () => setCount(count + 1);

			return <button onClick={handleClick}>{count}</button>;
		}

		const root = document.getElementById('root');


		ReactDOM.render(<CountButton />, root);

stateによる更新の影響範囲を確認

		function Parent(){
			const [num, setNum] = React.useState(0);

			const handleClick = () => setNum(num + 1);

			return(
				<>
					<p><button onClick={handleClick}>{num}</button></p>
					<p><Child num={num} /></p>
					<p><Child num={num} /></p>
				</>
			);
		}

		function Child({ num }){
			const [myNum, setMyNum] = React.useState(0);

			const handleClick = () => setMyNum(myNum + 1);

			return (
				<button className="child" onClick={handleClick}>
					{num + myNum}
				</button>
			);
		}

### フック
フックはReactの便利な機能を導入できるヘルパー関数
useStateはフックの一つ

なるほど、propsだけでなくuseStateを使って開発していくのね。
なんとなくイメージが沸きました。

Reactとは?何のメリットがあるのか?

– ReactとはDOM操作ライブラリでコンポーネント指向の開発スタイル
– ReactのDOM操作の特徴
  L 仮想DOM(Virtual DOM)
  L データとUIの同期
– Reactは具体的なDOM操作はコーディングせず、before afterのデータを更新する
– 仮想DOMの仕組みはReactのほか、Vue.jsでも採用されている
– props(属性)やstate(状態)といったReactが管理するデータを更新する

e.g. : JSでdom操作を書く場合

<div id="root"></div>
	<script>
		const element = document.createElement('p');
		element.id = 'the-text';
		element.className = 'text';
		element.innerText = 'Hello world';
		const root = document.getElementById('root');
		root.insertAdjacentElement('beforeend', element);
	</script>

入れ子(ul,li)の場合はこう書く
L React.createElementはReact要素を返却する
  L ReactDOM.renderは、第一引数がReact要素、第二引数がReact要素を内部に描画する親要素

		const element = React.createElement('ul', {className: 'list'}, [
				React.createElement('li', {className: 'list-item'}, ['one']),
				React.createElement('li', {className: 'list-item'}, ['two']),
				React.createElement('li', {className: 'list-item'}, ['three'])
			]);

### JSXはcreateElement
CDNからBabelを読み込んだ状態でscriptのtypeにbabelを指定すると実行される
JSXの構文は機能的にはcreateElementと同一

<script crossorigin src="https://unpkg.com/react@16/umd/react.development.js"></script>
	<script crossorigin src="https://unpkg.com/react-dom@16/umd/react-dom.development.js"></script>
	<script src="https://unpkg.com/@babel/standalone/babel.min.js"></script>

	<script type="text/babel">
		const element = <p id="the-text" className="text">Hello React</p>;
		const root = document.getElementById('root');

		ReactDOM.render(element, root);
	</script>

React.createElementの属性値をpropsと言う。第三引数は第二引数のchildrenプロパティとして渡すこともできるので、以下のようにしても同じ。ただし、視認性の問題からタグで囲むことの方が多い

const element = <p id="the-text" className="text" children="JSX & babel" />;

JSXには、単一のルート要素を持つべきというルールがあるため、複数の要素を入れる場合は、親要素としてDivタグで囲むようにする
下記の場合はdiv要素がないとエラーで実行できない

const element = (
	<div>
		<article>...</article>
		<aside>...</aside>
	</div>
);

ただし、Fragment要素を利用した方がbetter

const element = (
	<React.Fragment>
		<article>...</article>
		<aside>...</aside>
	</React.Fragment>
);
const element = (
	<>
		<article>...</article>
		<aside>...</aside>
	</>
);

### 値の埋め込み

		const name = 'john';
		const element = <p id="the-text" className="text">{name}</p>;
		const members = [
			{name: 'John', instrument: 'guitar'},
			{name: 'Paul', instrument: 'bass'},
			{name: 'George', instrument: 'guitar'},
			{name: 'Ringo', instrument: 'drums'}
		];

		const element = (
			<ul>
				{members.map(member => (
					<li key={member.name}>
						{member.name} plays {member.instrument}
					</li>
					))}
			</ul>
		);

### コンポーネントを定義
Reactでは独自要素を作ることができ、独自要素はコンポーネントと呼ばれ、関数として定義します。
関数名はネイティブと区別するため必ず大文字で始め、React要素を返却する

function Sample(props){
			return <p id={props.id} className="text">{props.children}</p>
		}

		const root = document.getElementById('root');


		ReactDOM.render(<Sample id="the-text">Props Test</Sample>, root);

DOM操作のロジック部分と、表示部分を明示的に分けて記述してるのか
なるほど、良く考えられてて面白いですね。
最初ちょっと抵抗感ありましたけど、仕組みを理解すると分かりやすいです。

Ubuntu20.04でReactの環境構築

### ubuntuにnodejs, npm, yarnをインストール
$ cat /etc/os-release
NAME=”Ubuntu”
VERSION=”20.04.3 LTS (Focal Fossa)”
$ sudo apt update
$ sudo apt install nodejs
$ nodejs -v
v10.19.0
$ sudo apt install npm
$ npm -v
6.14.4
$ curl -sS https://dl.yarnpkg.com/debian/pubkey.gpg | sudo apt-key add
$ echo “deb https://dl.yarnpkg.com/debian/ stable main” | sudo tee /etc/apt/sources.list.d/yarn.list
$ sudo apt install yarn
$ yarn -v
1.22.5
※yarnはrepositoryを入れないとinstallできないので注意が必要

### project作成
$ yarn create react-app hello
$ cd hello
$ yarn start

src/index.js
L 変更なし

import React from 'react';
import ReactDOM from 'react-dom';
import './index.css';
import App from './App';
import reportWebVitals from './reportWebVitals';

ReactDOM.render(
  <React.StrictMode>
    <App />
  </React.StrictMode>,
  document.getElementById('root')
);

src/App.js

function App() {
  return (
    <div className="App">
      <h1>Hello React!</h1>
    </div>
  );
}

export default App;

きゃー☺️

[React] 基礎

<body>
	<div id="root"></div>
</body>
<script crossorigin src="https://unpkg.com/react@17/umd/react.production.min.js"></script>
<script crossorigin src="https://unpkg.com/react-dom@17/umd/react-dom.production.min.js"></script>
<script src="https://cdnjs.cloudflare.com/ajax/libs/babel-standalone/6.26.0/babel.min.js"></script>
<script type="text/babel">
ReactDOM.render(
  <h1>Hello world</h1>,
  document.getElementById('root')
);
</script>

jsxはjsの拡張構文でタグを含められる
コンパイルすれば、babelは使用しなくて良い

<body>
	<div id="content">
		
	</div>
</body>
<script crossorigin src="https://unpkg.com/react@17/umd/react.production.min.js"></script>
<script crossorigin src="https://unpkg.com/react-dom@17/umd/react-dom.production.min.js"></script>
<script src="https://cdnjs.cloudflare.com/ajax/libs/babel-standalone/6.26.0/babel.min.js"></script>
<script type="text/babel">
class ComponentBox extends React.Component{
	render(){
		return (
			<div className="ComponentBox">
			Component Box
			</div>
		);
	}
};
ReactDOM.render(
	<ComponentBox/>,
	document.getElementById('content')
);
</script>
</html>

<script type="text/babel">
class Layout extends React.Component{
	render(){
		return (
			<h1>welcome!</h1>
		);
	}
};
const app = document.getElementById('app');
ReactDOM.render(
	<Layout/>, app
);
</script>

こういうこともできる

class Layout extends React.Component{
	constructor(){
		super();
		this.name = "Hpscript";
	}
	render(){
		return (
			<h1>It's {this.name}</h1>
		);
	}
};

なるほどー

Reduxを始める

まずReact.js&webpack&babelから
#################
$ npm init
$ npm install –save-dev webpack webpack-cli webpack-dev-server
$ npm install –save-dev @babel/core @babel/preset-env @babel/preset-react babel-loader
$ npm install –save-dev react react-dom
$ npm install –save-dev @babel/plugin-proposal-class-properties

.babelrc作成

{
	"plugins": [
		"@babel/plugin-proposal-class-properties"
	]
}

webpack.config.jsの作成
srcディレクトリの作成
#################

ここから、Reduxを使い始めたい。
公式に沿ってやっていく。(https://redux.js.org/introduction/getting-started)

npm i react-redux

$ npm install --save-dev react-redux
$ npm install --save-dev redux

basic example

import { createStore } from 'redux'

function counter(state = 0, action){
	swtich(action.type){
		case 'INCREMENT':
			return state + 1
		case 'DECREMENT':
			return state - 1
		default:
			return state
	}	
}

let store = createStore(counter)

store.subscribe(() => console.log(store.getState()))

store.dispatch({ type: 'INCREMENT' })

createStoreで状態遷移を管理?
全体の動きがよくわからんな。。

React.jsでカレンダーを作ろう 5

webpack.config.jsでは、moduleの前に、outputファイルを書くらしい。

context:path.join(__dirname, "src"),
	entry: "./js/client.js",
	output: {
		path: __dirname + "/src/",
		filename: "client.min.js"
	},
	module: {
		rules: [
			{
				test: /\.css$/i,
	        	use: ['style-loader', 'css-loader'],
			},
			{
			test: /\.jsx?$/,
				exclude: /(node_modules|bower_components)/,
				use: [{
					loader: 'babel-loader',
					options: {
						presets: ['@babel/preset-react', '@babel/preset-env']
					}
				}]
		}]
	},

$ npm start

きたーーーーーーーーーーーーーーーーーーーー
stylingはmoduleのCalendar.cssを編集すれば良さそうですね。
OK、とりあえず、Caledarはこれで良し^^

React.jsでカレンダーを作ろう 4

>You may need an appropriate loader to handle this file type

githubのissueを見ると、wojtekmaj が、style-loaderを入れろ、って言ってますね。

https://github.com/wojtekmaj/react-calendar/issues/97

$ npm install –save-dev css-loader
$ npm install –save-dev style-loader

で、入れたので、
$ npm start

> .react-calendar {
| width: 350px;
| max-width: 100%;
@ ../node_modules/react-calendar/dist/entry.js 48:0-25
@ ./js/client.js

あ、webpack.config.jsに追加するのね。

rules: [
			{
				test: /\.css$/i,
	        	use: ['style-loader', 'css-loader'],
			},
			{
			test: /\.jsx?$/,
				exclude: /(node_modules|bower_components)/,
				use: [{
					loader: 'babel-loader',
					options: {
						presets: ['@babel/preset-react', '@babel/preset-env']
					}
				}]
		}]

で、再度npm start

+ 66 hidden modules
ℹ 「wdm」: Compiled successfully.

OK。あれ、何も表示されない。
なぜえええええええええええええええええええええ

React.jsでカレンダーを作ろう 3

Add @babel/plugin-proposal-class-properties (https://git.io/vb4SL) to the ‘plugins’
と出ているので、インストールします

[vagrant@localhost react]$ npm install –save-dev @babel/plugin-proposal-class-properties


.babelrcに以下を追加

{
	"plugins": [
		"@babel/plugin-proposal-class-properties"
	]
}

$ npm start

RROR in ../node_modules/react-calendar/dist/Calendar.css 1:0
Module parse failed: Unexpected token (1:0)
You may need an appropriate loader to handle this file type, currently no loaders are configured to process this file. See https://webpack.js.org/concepts#loaders
> .react-calendar {
| width: 350px;
| max-width: 100%;
@ ../node_modules/react-calendar/dist/entry.js 48:0-25
@ ./js/client.js
ℹ 「wdm」: Failed to compile.

何いいいいいいいいいい
諦めんぞ、俺は。

React.jsでカレンダーを作ろう 2

さて、React.js + webpack + babelの環境ができたので、カレンダーを作っていきます。

# react-calendar のインストール
$ npm install react-calendar

jsはこうかな。

import React, { Component } from "react";
import ReactDOM from "react-dom";
import Calendar from 'react-calendar';

class Layout extends Component {
	state = {
		date: new Date(),
	}

	onChange = date => this.setState({ date })

	render(){
		return (
			<div>
				<Calendar
					onChange={this.onChange}
					value={this.state.date}
				/>
			</div>
		);
	}
}

const app = document.getElementById('app');
ReactDOM.render(<Layout/>, app);

$ npm start

ERROR in ./js/client.js
Module build failed (from ../node_modules/babel-loader/lib/index.js):
SyntaxError: /home/vagrant/react/src/js/client.js: Support for the experimental syntax ‘classProperties’ isn’t currently enabled (6:8):

4 |
5 | class Layout extends React.Component {
> 6 | state = {
| ^
7 | date: new Date(),
8 | }
9 |
Add @babel/plugin-proposal-class-properties (https://git.io/vb4SL) to the ‘plugins’ section of your Babel config to enable transformation

ん? これが必要?

npmでReact.jsの環境を作る

react-calendarがnpmなので、npmで環境を作ります。

$ npm init
$ npm install –save-dev webpack webpack-cli webpack-dev-server
$ npm install –save-dev @babel/core @babel/preset-env @babel/preset-react babel-loader

ここまでは、これまでやってきた通り

$ npm install –save-dev react react-dom
npm ERR! code ENOSELF
npm ERR! Refusing to install package with name “react” under a package

?? package.jsonのnameがreactで同じだからインストールできないとのこと
“name”: “react1” に変更して、再度実行

$ npm install –save-dev react react-dom

続いてwebpackの設定

var debug = process.env.NODE_ENV !== "production";
var webpack = require('webpack');
var path = require('path');

module.exports = {
	context:math.josin(__dirname, "src"),
	entry: "./js/client.js",
	module: {
		rules: [{
			text: /\.jsx?$/,
				exclude: /(node_modules|bower_components)/,
				use: [{
					loader: 'babel-loader',
					options: {
						presents: ['@babel/preset-react', '@babel/preset-env']
					}
				}]
		}]
	},
	output: {
		path: __dirname + "/src/",
		filename: "client.min.js"
	},
	plugins: debug ? [] : [
		new webpack.optimize.OccurrenceOrderPlugin(),
		new webpack.optimize.UglifyJsPlugin({ mangle: false, sourcemap: false}),
	]
};

./src/index.html

<!DOCTYPE html>
<html lang="en">
<head>
	<meta charset="UTF-8">
	<title>React</title>
	<link href="https://maxcdn.bootstrapcdn.com/bootswatch/3.3.6/cosmo/bootstrap.min.css" type="text/css" rel="stylesheet"/>
</head>
<body>
	<div id="app"></div>
	<script src="client.min.js"></script>
</body>
</html>

ここまでで、Reactの環境構築完了!?

import React from "react"
import ReactDOM from "react-dom"

class Layout extends React.Component {
	render(){
		return (
			<h1>Welcome</h1>
		);
	}
}

const app = document.getElementById('app');
ReactDOM.render(<Layout/>, app);

[vagrant@localhost react]$ webpack –mode development
Hash: 12eaf7dc67869ad64caf
Version: webpack 4.41.2
Time: 1874ms
Built at: 2019-11-20 15:39:17
Asset Size Chunks Chunk Names
client.min.js 1.08 MiB main [emitted] main
Entrypoint main = client.min.js
[./js/client.js] 2.69 KiB {main} [built]
+ 11 hidden modules

何言いいいいいいいいいいいいいい