[AWS] bastionサーバからprivate route tableへのSSHログインの方法 [ドハマり]

まず、public route table (public subnet割り当て)と private route table(private subnet割り当て) を作ります。

public route table
– internet gatewayを割り当てています。
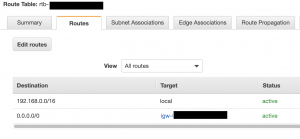
private route table
– 後でnat gatewayを割り当て

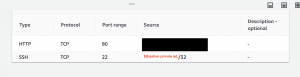
private subnetに配置しているEC2のセキュリティグループのインバウンドルール
-> sshのルールで、bastion serverの ${private IPv4 ip}/32 を設定する

### ローカルからbastionにssh
$ ssh ec2-user@${basionserverのpublic ip} -i ~/.ssh/*.pem

そして、bastionサーバにログインし、/.sshに 秘密鍵(*.pem)を配置する

### bastionからprivate subnetのec2にログイン
$ ssh -i .ssh/*.pem ec2-user@${bastionserverのprivate ip}

すごいハマった。3時間ぐらい。
ローカルからはpublic ipでsshログインするけど、bationからはprivate IPv4 ipでログインする
これ違い理解してないと、なんでログインできないか永遠にわからなかったわ

[OpenCV4.5.0] 画像の差分を抽出

2つ画像を用意します。
※プロントで作業しています。ワイヤレスマウスUBS

import cv2
import numpy as np

img_last = cv2.imread(“a.jpg”)
img_last = cv2.cvtColor(img_last, cv2.COLOR_BGR2GRAY) # 白黒化
img_last = cv2.GaussianBlur(img_last, (9, 9), 0) # ぼかし
img_last = cv2.threshold(img_last, 100, 255, cv2.THRESH_BINARY)[1] # 画像の二値化

img = cv2.imread(“b.jpg”)
img_current = cv2.cvtColor(img, cv2.COLOR_BGR2GRAY)
img_current = cv2.GaussianBlur(img_current, (9, 9), 0)
img_current = cv2.threshold(img_current, 100, 255, cv2.THRESH_BINARY)[1]

img_diff = cv2.absdiff(img_last, img_current)
cnts = cv2.findContours(img_diff, cv2.RETR_EXTERNAL, cv2.CHAIN_APPROX_SIMPLE)[0]

for pt in cnts:
x, y, w, h = cv2.boundingRect(pt)
if w < 30: continue cv2.rectangle(img, (x, y), (x+w, y+h), (0, 255, 0), 2) cv2.imwrite("result.png", img) [/python]

OK, Let’s Gooooooooooooooooooooo

[OpenCV4.5.0]NumPyを使って赤色のみ抽出

import cv2
import numpy as np

img = cv2.imread("rose.jpg")

img[:, :, 0] = 0
img[:, :, 1] = 0

cv2.imwrite("result.png", img)

before

after

### HSVで赤っぽい部分の輪郭を表示

import cv2
import numpy as np

img = cv2.imread("rose.jpg")

hsv = cv2.cvtColor(img, cv2.COLOR_BGR2HSV_FULL)
h = hsv[:, :, 0]
s = hsv[:, :, 1]
v = hsv[:, :, 2]

img2 = np.zeros(h.shape, dtype=np.uint8)
img2[(h > 200)  & (s > 100)] = 255

cv2.imwrite("result.png", img2)

ほう

OpenCV+vagrantでmac内蔵カメラが効かない?

ブラウザ上でカメラを起動するのであれば、httpsサーバに変更してChromeでカメラを許可にすれば良いんだが… openCVでカメラ画像の読み込もうとしてエラーになった。。。

import cv2
import numpy as np

cap = cv2.VideoCapture(-1)
while True:

	_, frame = cap.read()
	frame = cv2.resize(frame, (500, 300))

	cv2.imshow('OpenCV web camera', frame)

	k = cv2.waitKey(1)
	if k == 27 or k == 13: break

cap.release()
cv2.destroyAllWindows()

$ python3 app.py
[ WARN:0] global /root/opencv_build/opencv/modules/videoio/src/cap_v4l.cpp (880) open VIDEOIO(V4L2): can’t find camera device
Traceback (most recent call last):
File “app.py”, line 8, in
frame = cv2.resize(frame, (500, 300))
cv2.error: OpenCV(4.5.0-dev) /root/opencv_build/opencv/modules/imgproc/src/resize.cpp:4051: error: (-215:Assertion failed) !ssize.empty() in function ‘resize’

No /dev/video in WSL (1 or 2).が原因っぽいが。。
Videoは今すぐは使わないが、、、
とりあえず動画ファイルの読み込みVideoCapture(‘*.mp4’)で再度やってみよう

cap = cv2.VideoCapture("fuji.mp4")
print(type(cap))
print(cap.isOpened())

$ python3 app.py

False

isOpened()でfalseなので、読み込めてない。

build infoを見る
Video I/O:
DC1394: NO
FFMPEG: NO
avcodec: NO
avformat: NO
avutil: NO
swscale: NO
avresample: NO
GStreamer: NO
v4l/v4l2: YES (linux/videodev2.h)

Video I/Oに問題があるみたい。
なるほど、buildか。。

[OpenCV4.5.0] RPAっぽい葉書から郵便番号の抽出2

元画像

scikit-learnの Handwritten Digits Data SetのSVMの学習済データから予想する。

import cv2
import matplotlib.pyplot as plt

def detect_zipno(fname):
	img = cv2.imread(fname)
	h, w = img.shape[:2]
	img = img[0:h//6, w//3:]

	gray = cv2.cvtColor(img, cv2.COLOR_BGR2GRAY)
	gray = cv2.GaussianBlur(gray, (1, 1), 0)
	im2 = cv2.threshold(gray, 140, 255, cv2.THRESH_BINARY_INV)[1]

	cnts = cv2.findContours(im2, cv2.RETR_LIST, cv2.CHAIN_APPROX_SIMPLE)[0]

	result = []
	for pt in cnts:
		x, y, w, h = cv2.boundingRect(pt)
		if not(50 < w < 70): continue
		result.append([x, y, w, h])
	result = sorted(result, key=lambda x: x[0])

	result2 = []
	lastx = -100
	for x, y, w, h in result:
		if(x - lastx) < 10: continue
		result2.append([x, y, w, h])
		lastx = x
	for x, y, w, h in result2:
		cv2.rectangle(img, (x, y), (x+w, y+h), (0, 255, 0), 3)
	return result2, img

if __name__ == '__main__':

	cnts, img = detect_zipno("postcard.png")

	cv2.cvtColor(img, cv2.COLOR_BGR2RGB)
	cv2.imwrite("result.png", img)

$ python3 predict_zip.py
[9]
[2]
[5]
[4]
[3]
[4]
[8]

駄目だ、2と4しか合ってない
ただ、やり方の流れはわかった。
データセットの量を多くして、二次元配列を8x8ピクセルではなく、もう少し細かくしたら、結果が変わりそうだ。

[OpenCV4.5.0] RPAっぽい葉書から郵便番号の抽出

まず、葉書の郵便番号部分を抽出する。
元画像

import cv2
import matplotlib.pyplot as plt

def detect_zipno(fname):
	img = cv2.imread(fname)
	h, w = img.shape[:2]
	img = img[0:h//2, w//3:]

	gray = cv2.cvtColor(img, cv2.COLOR_BGR2GRAY)
	gray = cv2.GaussianBlur(gray, (3, 3), 0)
	im2 = cv2.threshold(gray, 140, 255, cv2.THRESH_BINARY_INV)[1]

	cnts = cv2.findContours(im2, cv2.RETR_LIST, cv2.CHAIN_APPROX_SIMPLE)[0]

	result = []
	for pt in cnts:
		x, y, w, h = cv2.boundingRect(pt)
		if not(50 < w < 70): continue
		result.append([x, y, w, h])
	result = sorted(result, key=lambda x: x[0])

	result2 = []
	lastx = -100
	for x, y, w, h in result:
		if(x - lastx) < 10: continue
		result2.append([x, y, w, h])
		lastx = x
	for x, y, w, h in result2:
		cv2.rectangle(img, (x, y), (x+w, y+h), (0, 255, 0), 3)
	return result2, img

if __name__ == '__main__':

	cnts, img = detect_zipno("postcard.png")

	cv2.cvtColor(img, cv2.COLOR_BGR2RGB)
	cv2.imwrite("result.png", img)

$ python3 app.py

なんでやねん。なんで"2"と"4"が抽出されない。。。
前処理を少し変える。

	img = img[0:h//5, w//3:] # h//3 -> h//5

4が抽出されない。
なぜだ?? ぼかしの周囲のサイズを変えてみる。

	gray = cv2.GaussianBlur(gray, (1, 1), 0)

おおおおおおおおおおおおおおおおお
AI開発で、パラメータを調整するって、こういうこと????
うん、ちょっと興奮しました。
デバッグとはなんか感覚が違いますね。

あれ、というかこれ、記入する領域がわかってたらtesseractでOCRすりゃいいんだから、RPAできんじゃん。。
選挙システムとか注文書とか。。

[OpenCV4.5.0] 輪郭抽出

まず花の写真を用意します。 コスモスかな。

二値化

import cv2
import matplotlib.pyplot as plt

img = cv2.imread("flower.jpg")
img = cv2.resize(img, (300, 169))

gray = cv2.cvtColor(img, cv2.COLOR_BGR2GRAY) # gray化
gray = cv2.GaussianBlur(gray, (7, 7), 0) # Gaussianぼかし
im2 = cv2.threshold(gray, 140, 240, cv2.THRESH_BINARY_INV)[1] # threshold閾値処理 グレースケール画像を2値画像化

cv2.imwrite("threshold.png", im2)

GaussianBlurは細かな箇所を抽出しないようにぼかす。
findContoursで輪郭を抽出する。

import cv2
import matplotlib.pyplot as plt

img = cv2.imread("flower.jpg")
img = cv2.resize(img, (300, 169))

gray = cv2.cvtColor(img, cv2.COLOR_BGR2GRAY) # gray化
gray = cv2.GaussianBlur(gray, (7, 7), 0) # Gaussianぼかし
im2 = cv2.threshold(gray, 140, 240, cv2.THRESH_BINARY_INV)[1] # threshold閾値処理 グレースケール画像を2値画像化

# cv2.imwrite("threshold.png", im2)
cnts = cv2.findContours(im2, cv2.RETR_LIST, cv2.CHAIN_APPROX_SIMPLE)[0]

for pt in cnts:
	x, y, w, h = cv2.boundingRect(pt)

	# if w < 30 or w > 200: continue
	print(x,y,w,h)
	cv2.rectangle(img, (x,y), (x+w, y+h), (0, 255, 0), 2)

cv2.cvtColor(img, cv2.COLOR_BGR2RGB)
cv2.imwrite("find.png", img)

$ python3 app.py
245 91 2 1
182 76 20 18
0 0 300 169

花びらを輪郭にしたかったんですが、雄しべ雌しべが輪郭になってしまいました。
画像を変えてみましょう。

こちらは上手くいきました。
入力値のスクリーニングが鍵やな。

[sklearn] SVMでillustratorで書いた数字を判定しよう

まずイラレで文字画像を作ります。


それを学習データから判定します。

import cv2
import joblib

def predict_digit(filename):
	clf = joblib.load("digits.pkl")
	# 自分で用意した手書きの画像ファイルを読み込む
	my_img = cv2.imread(filename)
	my_img = cv2.cvtColor(my_img, cv2.COLOR_BGR2GRAY)
	my_img = cv2.resize(my_img, (8, 8))
	my_img = 15 - my_img // 16 # 白黒反転

	my_img = my_img.reshape((-1, 64)) # 二次元を一次元に変換
	res = clf.predict(my_img)
	return res[0]

n = predict_digit("2.png")
print("2.png = " + str(n))
n = predict_digit("5.png")
print("5.png = " + str(n))
n = predict_digit("8.png")
print("8.png = " + str(n))

$ python3 app.py
2.png = 3
5.png = 7
8.png = 3

おいおいおい、全然合ってないじゃん
まー、2と3、5と7、8と3は似てるといえば似てるけど、せめて一個ぐらい合ってもいいのに。。

[sklearn] 手書き数字のデータセットから学習

まずmatplotlibとsklearnを入れます。

$ sudo pip3 install matplotlib
$ sudo pip3 install sklearn

scikit-learnに付属しているHandwritten Digits Data Setを使います。

import matplotlib.pyplot as plt

from sklearn import datasets
digits = datasets.load_digits()

d0 = digits.images[0]
print(d0)

$ python3 app.py
[[ 0. 0. 5. 13. 9. 1. 0. 0.]
[ 0. 0. 13. 15. 10. 15. 5. 0.]
[ 0. 3. 15. 2. 0. 11. 8. 0.]
[ 0. 4. 12. 0. 0. 8. 8. 0.]
[ 0. 5. 8. 0. 0. 9. 8. 0.]
[ 0. 4. 11. 0. 1. 12. 7. 0.]
[ 0. 2. 14. 5. 10. 12. 0. 0.]
[ 0. 0. 6. 13. 10. 0. 0. 0.]]

### 画像の学習

from sklearn.model_selection import train_test_split # 学習用データとテスト用データに分割
from sklearn import datasets, svm, metrics # データセット、SupportVectorMachine, metrics
from sklearn.metrics import accuracy_score

digits = datasets.load_digits()
x = digits.images # 画像
y = digits.target # 数字
x = x.reshape((-1, 64)) # 画像の二次元配列を一次元配列に変換

x_train, x_test, y_train, y_test = train_test_split(x, y, test_size=0.2)

# データ学習
clf = svm.LinearSVC()
clf.fit(x_train, y_train)

y_pred = clf.predict(x_test) # 学習データを元にテスト画像から数字を予測
print(accuracy_score(y_test, y_pred)) # 答えと予想の精度を確認

92%の精度
$ python3 app.py
/usr/local/lib64/python3.6/site-packages/sklearn/svm/_base.py:977: ConvergenceWarning: Liblinear failed to converge, increase the number of iterations.
“the number of iterations.”, ConvergenceWarning)
0.9277777777777778

手順としては、
(1)画像をピクセルの二次元配列データにして、データセットとラベルをセットに保存
(2)上記データセットを集める
(3)ピクセルの二次元配列を一次元配列に変換し、学習用データとテスト用データに分割する
(4)SVMで学習用データを学習
(5)テストデータから正解を予測
(6)制度をチェックする

### 学習済みデータの保存/呼び出し
※from sklearn.externals import joblibだとバインドされないので注意

import joblib
# 学習用データの保存
joblib.dump(clf, 'digits.pkl')

呼び出し

import joblib
clf = joblib.load("digits.pkl")

$ python3 app.py
0.9777777777777777

なるほど、OpenCVで画像を二次元配列にするわけだな
フローはほぼ理解した

[OpenCV4.5.0] 顔検知 + モザイク

顔を検知し、モザイク処理を施す

import cv2
from mosaic import mosaic as mosaic

cascade_file = "haarcascades/haarcascade_frontalface_alt.xml"
cascade = cv2.CascadeClassifier(cascade_file)

img = cv2.imread("1.jpg")
img_gray = cv2.cvtColor(img, cv2.COLOR_BGR2GRAY)

face_list = cascade.detectMultiScale(img_gray, minSize=(50,50))

if len(face_list) == 0:
	print("false")
	quit()

for (x,y,w,h) in face_list:
	img = mosaic(img, (x, y, x+w, y+h), 10)

cv2.imwrite("mosaic.png", img)

before

after

OK
後はユースケース特化型、画像のデータセットを学習させて検知する方法をマスターしたい。
まー、課題です。