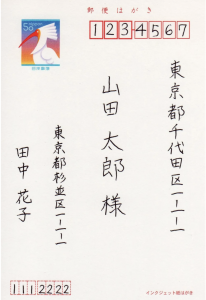
[OpenCV4.5.0] RPAっぽい葉書から郵便番号の抽出

まず、葉書の郵便番号部分を抽出する。
元画像

import cv2
import matplotlib.pyplot as plt

def detect_zipno(fname):
	img = cv2.imread(fname)
	h, w = img.shape[:2]
	img = img[0:h//2, w//3:]

	gray = cv2.cvtColor(img, cv2.COLOR_BGR2GRAY)
	gray = cv2.GaussianBlur(gray, (3, 3), 0)
	im2 = cv2.threshold(gray, 140, 255, cv2.THRESH_BINARY_INV)[1]

	cnts = cv2.findContours(im2, cv2.RETR_LIST, cv2.CHAIN_APPROX_SIMPLE)[0]

	result = []
	for pt in cnts:
		x, y, w, h = cv2.boundingRect(pt)
		if not(50 < w < 70): continue
		result.append([x, y, w, h])
	result = sorted(result, key=lambda x: x[0])

	result2 = []
	lastx = -100
	for x, y, w, h in result:
		if(x - lastx) < 10: continue
		result2.append([x, y, w, h])
		lastx = x
	for x, y, w, h in result2:
		cv2.rectangle(img, (x, y), (x+w, y+h), (0, 255, 0), 3)
	return result2, img

if __name__ == '__main__':

	cnts, img = detect_zipno("postcard.png")

	cv2.cvtColor(img, cv2.COLOR_BGR2RGB)
	cv2.imwrite("result.png", img)

$ python3 app.py

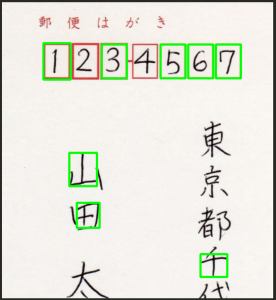
なんでやねん。なんで"2"と"4"が抽出されない。。。
前処理を少し変える。

	img = img[0:h//5, w//3:] # h//3 -> h//5

4が抽出されない。
なぜだ?? ぼかしの周囲のサイズを変えてみる。

	gray = cv2.GaussianBlur(gray, (1, 1), 0)
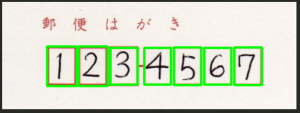
おおおおおおおおおおおおおおおおお
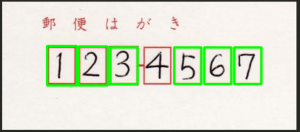
AI開発で、パラメータを調整するって、こういうこと????
うん、ちょっと興奮しました。
デバッグとはなんか感覚が違いますね。

あれ、というかこれ、記入する領域がわかってたらtesseractでOCRすりゃいいんだから、RPAできんじゃん。。
選挙システムとか注文書とか。。

[OpenCV4.5.0] 輪郭抽出

まず花の写真を用意します。 コスモスかな。

二値化

import cv2
import matplotlib.pyplot as plt

img = cv2.imread("flower.jpg")
img = cv2.resize(img, (300, 169))

gray = cv2.cvtColor(img, cv2.COLOR_BGR2GRAY) # gray化
gray = cv2.GaussianBlur(gray, (7, 7), 0) # Gaussianぼかし
im2 = cv2.threshold(gray, 140, 240, cv2.THRESH_BINARY_INV)[1] # threshold閾値処理 グレースケール画像を2値画像化

cv2.imwrite("threshold.png", im2)

GaussianBlurは細かな箇所を抽出しないようにぼかす。
findContoursで輪郭を抽出する。

import cv2
import matplotlib.pyplot as plt

img = cv2.imread("flower.jpg")
img = cv2.resize(img, (300, 169))

gray = cv2.cvtColor(img, cv2.COLOR_BGR2GRAY) # gray化
gray = cv2.GaussianBlur(gray, (7, 7), 0) # Gaussianぼかし
im2 = cv2.threshold(gray, 140, 240, cv2.THRESH_BINARY_INV)[1] # threshold閾値処理 グレースケール画像を2値画像化

# cv2.imwrite("threshold.png", im2)
cnts = cv2.findContours(im2, cv2.RETR_LIST, cv2.CHAIN_APPROX_SIMPLE)[0]

for pt in cnts:
	x, y, w, h = cv2.boundingRect(pt)

	# if w < 30 or w > 200: continue
	print(x,y,w,h)
	cv2.rectangle(img, (x,y), (x+w, y+h), (0, 255, 0), 2)

cv2.cvtColor(img, cv2.COLOR_BGR2RGB)
cv2.imwrite("find.png", img)

$ python3 app.py
245 91 2 1
182 76 20 18
0 0 300 169

花びらを輪郭にしたかったんですが、雄しべ雌しべが輪郭になってしまいました。
画像を変えてみましょう。

こちらは上手くいきました。
入力値のスクリーニングが鍵やな。

[OpenCV4.5.0] 顔検知 + モザイク

顔を検知し、モザイク処理を施す

import cv2
from mosaic import mosaic as mosaic

cascade_file = "haarcascades/haarcascade_frontalface_alt.xml"
cascade = cv2.CascadeClassifier(cascade_file)

img = cv2.imread("1.jpg")
img_gray = cv2.cvtColor(img, cv2.COLOR_BGR2GRAY)

face_list = cascade.detectMultiScale(img_gray, minSize=(50,50))

if len(face_list) == 0:
	print("false")
	quit()

for (x,y,w,h) in face_list:
	img = mosaic(img, (x, y, x+w, y+h), 10)

cv2.imwrite("mosaic.png", img)

before

after

OK
後はユースケース特化型、画像のデータセットを学習させて検知する方法をマスターしたい。
まー、課題です。

[OpenCV4.5.0]モザイク処理を試す

元画像

一部分を切り抜いて、縮小する

縮小した部分を拡大する

-> モザイクがかかったように見える(ドットを縮小して拡大したため)

これをプログラムで書く。
mosaic.py

import cv2

def mosaic(img, rect, size): # rectはモザイクをかける領域
	(x1, y1, x2, y2) = rect 
	w = x2 - x1 # width
	h = y2 - y1 # height
	i_rect = img[y1:y2, x1:x2]

	i_small = cv2.resize(i_rect, (size, size)) # 対象領域を指定したサイズに縮小
	i_mos = cv2.resize(i_small, (w, h), interpolation=cv2.INTER_AREA) # 対象領域に拡大
	img2 = img.copy()
	img2[y1:y2, x1:x2] = i_mos # 埋め込み
	return img2

app.py

import cv2
from mosaic import mosaic as mosaic

img = cv2.imread("cat.jpeg")
mos = mosaic(img, (50, 50, 400, 400), 10)

cv2.imwrite("cat-mosaic.png", mos)

なんやこれ、めっちゃ面白いな。
mosaic(img, rect, size): のsizeの値を小さくすると、モザイクが荒くなります。

[OpenCV4.5.0] haarcascadesで顔検出をやってみよう

OpenCVで顔検出をやりたい。画像は以下のサッカー中の二人。

元画像

### 前準備
– 顔検出に使うカスケードファイルを使います。
haarcascades
$ mkdir haarcascades
$ cd haarcascades
$ wget https://github.com/opencv/opencv/blob/master/data/haarcascades/haarcascade_frontalface_alt.xml

###

import cv2

cascade_file = "haarcascades/haarcascade_frontalface_alt.xml"
cascade = cv2.CascadeClassifier(cascade_file)

img = cv2.imread("1.jpg")
img_gray = cv2.cvtColor(img, cv2.COLOR_BGR2GRAY)

face_list = cascade.detectMultiScale(img_gray, minSize=(150,150))

if len(face_list) == 0:
	print("false")
	quit()

for (x,y,w,h) in face_list:
	print(" 顔の座標=", x, y, w, h)
	red = (0, 0, 255)
	cv2.rectangle(img, (x, y), (x+w, y+h), red, thickness=20)

cv2.imwrite("face-detect.png", img)

$ python3 app.py
SystemError: returned a result with an error set

ん?
haarcascade_frontalface_alt.xmlを、opencvの公式からダウンロードして、上書き

$ python3 app.py
顔の座標= 141 47 60 60
顔の座標= 318 47 59 59

なんだこれ、やべーな。

[OpenCV4.5.0]基礎

### 画像の読み込み
imreadを使う

import cv2

img = cv2.imread("1.jpeg")
print(img)

[[254 255 253]
[254 255 253]
[254 255 253]

[254 255 253]
[254 255 253]
[254 255 253]]
… // 省略

### 画像の保存
imwrite(“*”, 読み込み画像) とする

import cv2

img = cv2.imread("1.jpeg")
cv2.imwrite("out.png", img)

### 画像のリサイズ

img = cv2.imread("1.jpeg")
img2 = cv2.resize(img, (600, 300))
cv2.imwrite("out.png", img2)

### 画像の切り取り

img = cv2.imread("1.jpg")
img2 = img[150:300, 150:300]
img2 = cv2.resize(img2, (300, 300))
cv2.imwrite("out.png", img2)

before

after

あ、これは面白いかも、顔認証して、顔だけアップとかできそうですね。

[OpenCV4.5.0] 試しに使ってみる: COLOR_BGR2GRAY

とりあえずCVを使ってみます。

$ sudo python3 -m pip install pillow

app.py

import cv2

img = cv2.imread("./img/ship.jpg")

imgG = img.mean(axis=2)

from PIL import Image
imgP = Image.fromarray(imgG)
imgP = imgP.convert('RGB')
imgP.save('./img/ship2.jpg')

before

after

ほう、そういうこと?

grayscale化

imgG = cv2.cvtColor(img, cv2.COLOR_BGR2GRAY)

強力な武器を手に入れた気分だな。
武器の使い方が分からんから、本屋に行きたい。

[OpenCV4.5.0] CentOS8に入れる手順

centos8のvagrant boxを入れてから、opencvをインストールします。git cloneするため、gitのインストールも必要です。

$ vagrant box add generic/centos8
$ vagrant init generic/centos8
$ vagrant up
$ vagrant ssh
$ sudo yum update

$ git –version
-bash: git: command not found
$ sudo yum -y install gcc curl-devel expat-devel gettext-devel openssl-devel zlib-devel perl-ExtUtils-MakeMaker autoconf
$ cd /usr/local/src/
// gitを入れる 省略

$ sudo su
$ dnf install epel-release make git gcc gcc-c++ cmake3 qt5-qtbase-devel python3 python3-devel python3-pip cmake python3-devel python3-numpy gtk2-devel libpng-devel libwebp-devel libjpeg-turbo-devel libtiff-devel tbb-devel freeglut-devel mesa-libGL mesa-libGL-devel boost boost-thread boost-devel gstreamer1-plugins-base -y
$ mkdir -p ~/opencv_build
$ cd ~/opencv_build
$ git clone https://github.com/opencv/opencv.git
$ git clone https://github.com/opencv/opencv_contrib.git

$ cd opencv
$ mkdir build
$ cd build
$ cmake -D CMAKE_BUILD_TYPE=RELEASE -D CMAKE_INSTALL_PREFIX=/usr/local -D INSTALL_C_EXAMPLES=ON -D INSTALL_PYTHON_EXAMPLES=ON -D OPENCV_GENERATE_PKGCONFIG=ON -D OPENCV_EXTRA_MODULES_PATH=~/opencv_build/opencv_contrib/modules -D BUILD_EXAMPLES=ON ..
$ make -j4
// 凄い時間がかかる
$ make install
$ ln -s /usr/local/lib64/pkgconfig/opencv4.pc /usr/share/pkgconfig/
$ ldconfig
$ pkg-config –modversion opencv4
4.5.0

$ python3 -c “import cv2; print(cv2.__version__)”
4.5.0-dev

ぎゃあああああああああああああああああああああ
いい週末になった

[OpenCV4.5.0] CentOSインストール

Ubuntuに入れる予定ですが、まずはCentOSで試します。

### yum update
$ sudo yum update

### 依存パッケージインストール
$ sudo yum install -y git gcc bzip2 bzip2-devel openssl openssl-devel readline readline-devel sqlite-devel
$ sudo yum install -y cmake libjpeg-devel libtiff-devel libpng-devel jasper-devel
$ sudo yum install -y mesa-libGL-devel libXt-devel libgphoto2-devel nasm libtheora-devel
$ sudo yum install -y autoconf automake gcc-c++ libtool yasm openal-devel blas blas-devel atlas atlas-devel lapack lapack-devel
$ sudo yum install -y tbb-devel

### Git clone
https://github.com/opencv/opencv/tags
tagsを見ると、4.5.0が最新っぽい

$ cd /usr/local/src
$ sudo git clone https://github.com/opencv/opencv.git
$ sudo git clone https://github.com/opencv/opencv_contrib.git
$ cd opencv_contrib
$ sudo git checkout -b 4.5.0 refs/tags/4.5.0
$ cd ../opencv/
$ sudo git checkout -b 4.5.0 refs/tags/4.5.0

### Build
$ sudo mkdir build
$ cd build

$ sudo wget https://cmake.org/files/v3.6/cmake-3.6.2.tar.gz
$ sudo tar xvf cmake-3.6.2.tar.gz
$ cd cmake-3.6.2
$ sudo ./bootstrap && make && make install

$ cd ..
$ cmake -D CMAKE_BUILD_TYPE=Release \
-D CMAKE_INSTALL_PREFIX=/usr/local \
-D WITH_TBB=ON \
-D OPENCV_EXTRA_MODULES_PATH=../../opencv_contrib/modules ..
$ make -j7

あれ、これだと上手くいかんな。。。
CentOSは8系が最新だから、8系でテストしないといかんか。。。

OpenCVの映像処理

OpenCVでは画像を独自の多次元配列構造体に格納する(iplimage形式)
カメラ映像もしくはビデオファイルから取得した映像もフレーム単位の画像として処理される

映像も連続した画像というイメージか。紙芝居とビデオ映像は別物だと思っていたけど、原理は基本的には同じか。