textFieldの値をpostしてreturnのjsonをparseする

URL.httpMethod = “POST”, postdata.data(using: String.Encoding.utf8) とします。
URLSession.shared.dataTask(with: request as URLRequest)

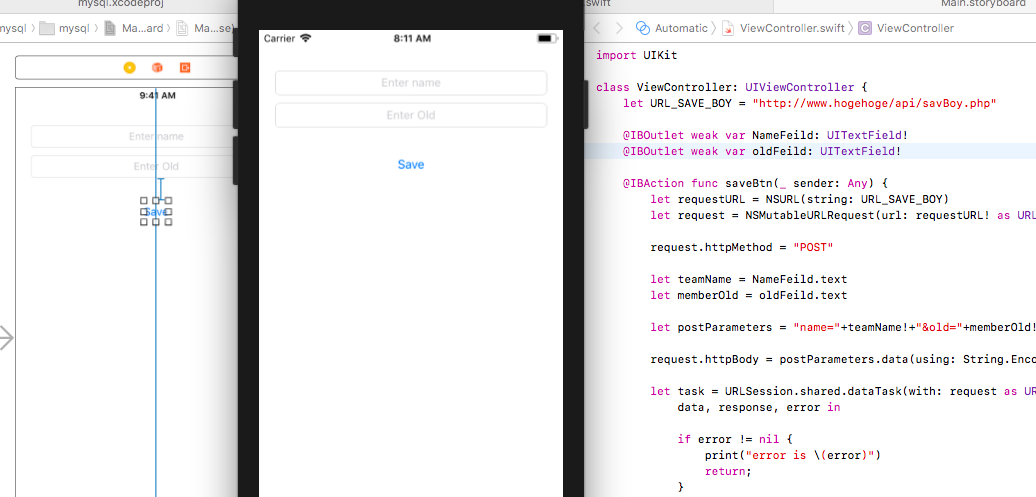
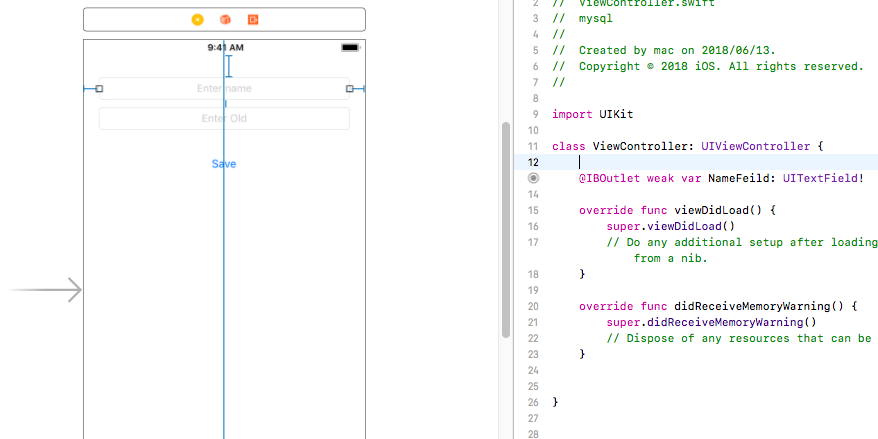
viewController.swift

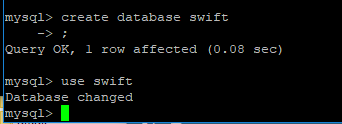
let URL_SAVE_BOY = "http://www.hogehoge/api/savBoy.php"
    
    @IBOutlet weak var NameFeild: UITextField!
    @IBOutlet weak var oldFeild: UITextField!
    
    @IBAction func saveBtn(_ sender: Any) {
        let requestURL = NSURL(string: URL_SAVE_BOY)
        let request = NSMutableURLRequest(url: requestURL! as URL)
        
        request.httpMethod = "POST"
        
        let teamName = NameFeild.text
        let memberOld = oldFeild.text
        
        let postParameters = "name="+teamName!+"&old="+memberOld!;
        
        request.httpBody = postParameters.data(using: String.Encoding.utf8)
        
        let task = URLSession.shared.dataTask(with: request as URLRequest){
            data, response, error in
            
            if error != nil {
                print("error is \(error)")
                return;
            }
            
            do {
                let myJSON = try JSONSerialization.jsonObject(with: data!, options: .mutableContainers) as? NSDictionary
                
                if let parseJSON = myJSON {
                    var msg : String!
                    msg = parseJSON["message"] as! String?
                    print(msg)
                }
            } catch {
                print(error)
            }
        }
        task.resume()
    }

swiftからPOSTされたデータをmysqlに入れる

php側をclassで書きます。mysqliでconnectしていますが、PDOで繋げたいですね。

$response = array();

if($_SERVER["REQUEST_METHOD"] == "POST"){
	$teamName = $_POST["name"];
	$memberCount = $_POST["old"];

	require_once '../includes/DbOperation.php';
	$db = new DbOperation();

	if($db->saveBoy($name,$Old)){
		$response['error'] = false;
		$response['message'] = '登録が完了しました';
	} else {
		$response['error'] = true;
		$response['message'] = '承認されていません';
	}
	echo json_encode($response)
}
class DbOperation {
	private $conn;

	function __construct(){
		require_once dirname(__FILE__).'/config.php';
		require_once dirname(__FILE__).'/DbConnect.php';

		$db = new DbConnect();
		$this -> conn = $db->connect();
	}

	public function saveBoy($name, $old)
	{
		$stmt = $this->conn->prepare("INSERT INTO boy(name, old) values(?, ?)");
		$stmt -> bind_param("ss", $name, $Old);
		$result = $stmt -> execute();
		$stmt -> close();
		if($result){
			return true;
		} else {
			return false;
		}
	}
}
calss DbConnect {
	private $conn;

	function __construct(){
	}

	function connect(){
		require_once 'config.php';

		$this -> conn = new mysqli(DB_HOST, DB_USERNAME, DB_PASSWORD, DB_NAME);

		if(mysqli_connect_errno()){
			echo "データベースに接続されませんでした" . mysqli_connect_errno();

			return $this -> conn;
		}
	}
}
define('DB_USERNAME', 'hoge');
define('DB_PASSWORD', 'hogehoge');
define('DB_HOST', 'local_host');
define('DB_NAME', 'swift');

続いて、X-codeでswiftを書いていきます。

swiftとmysqlを連携する

まず、mysqlにdbをつくります。適当に、swiftとしておきます。

table名はどうしましょう。まあ、後で考えます。
続いて、phpファイルをvagrantにつくっていきます。
フォルダはapiとincludes


ok!

では、phpをつくっていきます。

swift4でyoutube api

import UIKit
import Alamofire

class Model: NSObject {
    private var youtubeNextPageToken: String?
    
    func loadYoutubeList(callback: (youtubeList: YoutubeList) -> (), fail:((error: NSError) ->())){
        
        let req = request(.GET, AppConfig.youtubeURL())
        req.response { (request, response, responseData, error) -> Void in
            do {
                let jsonResult = try NSJSONSerialization.JSONObjectWthData(responseData!, options: NSJSONReadingOptions.MutableContainers) as! NSMutableDictionary
                
                self.youtubeNextPageToken = jsonResult["nextPageToken"] as! String?
                let ary = jsonResult["items"] as! NSArray
                let youtubeList = YoutubeList(ary: ary)
                callback(youtubeList: youtubeList)
            } catch {
                print("loadYoutubeList error")
            }
        }
    }
}

constrainをつけて行きます。

swift4でカメラアプリ

import UIKit
import AVFoundation

class ViewController: UIViewController {
    
    var captureSession = AVCaptureSession()
    var mainCamera: AVCaptureDevice?
    var innerCamera: AVCaptureDevice?
    var currentDevice: AVCaptureDevice?
    var photoOutput : AVCapturePhotoOutput?
    var cameraPreviewLayer : AVCaptureVideoPreviewLayer?
    

    override func viewDidLoad() {
        super.viewDidLoad()
        setupCaptureSession()
        setupDevice()
        setupInputOutput()
        setupPreviewLayer()
        captureSession.startRunning()
        // Do any additional setup after loading the view, typically from a nib.
    }

    override func didReceiveMemoryWarning() {
        super.didReceiveMemoryWarning()
        // Dispose of any resources that can be recreated.
    }


}

extension ViewController {
    func setupCaptureSession(){
        captureSession.sessionPreset = AVCaptureSession.Preset.photo
    }
    
    func setupDevice(){
        let deviceDiscoverySession = AVCaptureDevice.DiscoverySession(deviceTypes: [AVCaptureDevice.DeviceType.builtInWideAngleCamera], mediaType: AVMediaType.video, position: AVCaptureDevice.Position.unspecified)
        let devices = deviceDiscoverySession.devices
        
        for device in devices {
            if device.position == AVCaptureDevice.Position.back {
                mainCamera = device
            } else if device.position == AVCaptureDevice.Position.front {
                innerCamera = device
            }
        }
        currentDevice = mainCamera
    }
    func setupInputOutput(){
        do {
            let captureDeviceInput = try AVCaptureDeviceInput(device: currentDevice!)
            captureSession.addInput(captureDeviceInput)
            photoOutput = AVCapturePhotoOutput()
            photoOutput!.setPreparedPhotoSettingsArray([AVCapturePhotoSettings(format: [AVVideoCodecKey : AVVideoCodecType.jpeg])], completionHandler: nil)
            captureSession.addOutput(photoOutput!)
        } catch {
            print(error)
        }
    }
    func setupPreviewLayer(){
        self.cameraPreviewLayer = AVCaptureVideoPreviewLayer(session: captureSession)
        self.cameraPreviewLayer?.videoGravity = AVLayerVideoGravity.resizeAspectFill
        self.cameraPreviewLayer?.connection?.videoOrientation = AVCaptureVideoOrientation.portrait
        self.cameraPreviewLayer?.frame = view.frame
        self.view.layer.insertSublayer(self.cameraPreviewLayer!, at: 0)
    }
}

CameraUsageDescription

Info.plistで設定を加える。
Privacy – Camera Usage Description
Privacy – Photo Library Usage Description

retakeとuse photoが出るが、わからん。

あ、info.plistは、Photo Library Usage Descriptionではなく、 Photo Library Additions Usage Descriptionですね。
Privacy – Photo Library Additions Usage Description
これで、簡単に写真が取れるようになりました!

camera機能は用途が多そうなので、もう少し深掘りしたいと思います。

UIImagePicker

import UIKit

class ViewController: UIViewController, UIImagePickerControllerDelegate, UINavigationControllerDelegate  {

    override func viewDidLoad() {
        super.viewDidLoad()
        // Do any additional setup after loading the view, typically from a nib.
    }
    override func viewDidAppear(_ animated: Bool) {
        let picker = UIImagePickerController()
        picker.sourceType = .camera
        picker.delegate = self
        
        present(picker, animated: true, completion: nil)
    }
    override func didReceiveMemoryWarning() {
        super.didReceiveMemoryWarning()
        // Dispose of any resources that can be recreated.
    }
    
    func imagePickerController(_ picker: UIImagePickerController, didFinishPickingMediaWithInfo info: [String : Any]) {
        print(#function)
        // print(info[UIImagePickerControllerMediaType]!)
        let image = info[UIImagePickerControllerOriginalImage] as! UIImage
        // 撮影した画像をカメラロールに保存
        UIImageWriteToSavedPhotosAlbum(image, nil, nil, nil)
    }

    func imagePickerControllerDidCancel(_ picker: UIImagePickerController) {
        print(#function)
    }
}

console // なに?
This app has crashed because it attempted to access privacy-sensitive data without a usage description. The app’s Info.plist must contain an NSCameraUsageDescription key with a string value explaining to the user how the app uses this data.

iosでmp3を再生しよう

projectの下に、ケツメイシの涙のmp3を置きます。

storyboardに、buttonを配置し、autletとactionで接続します。

コーディングしていきます。

var audioPlayer:AVAudioPlayer!

    @IBOutlet weak var button: UIButton!
    
    override func viewDidLoad() {
        super.viewDidLoad()
        
        let audioPath = Bundle.main.path(forResource: "namida", ofType:"mp3")!
        let audioUrl = URL(fileURLWithPath: audioPath)
        
        var audioError:NSError?
        do {
            audioPlayer = try AVAudioPlayer(contentsOf: audioUrl)
        } catch let error as NSError {
            audioError = error
            audioPlayer = nil
        }
        
        if let error = audioError {
            print("Error \(error.localizedDescription)")
        }
        
        audioPlayer.delegate = self
        audioPlayer.prepareToPlay()
        
    }
    
    @IBAction func buttonTapped(_ sender: Any) {
        if ( audioPlayer.isPlaying ){
            audioPlayer.stop()
            button.setTitle("Stop", for: UIControlState())
        }
        else {
            audioPlayer.play()
            button.setTitle("Play", for: UIControlState())
        }
    }

普通に再生できました。

ちょっとハイペースですが、次はカメラいきましょう。
どうやらカメラもAVFoundationのようですね。

MapKitを使ってみよう

override func viewDidLoad() {
        super.viewDidLoad()
        
        let location:CLLocationCoordinate2D = CLLocationCoordinate2DMake(35.68154,139.752498)
        
        mapView.setCenter(location, animated:true)
        
        var region:MKCoordinateRegion = mapView.region
        region.center = location
        region.span.latitudeDelta = 0.02
        region.span.longitudeDelta = 0.02
        
        mapView.setRegion(region,animated:true)
        mapView.mapType = MKMapType.hybrid
        // Do any additional setup after loading the view, typically from a nib.
    }

あれ、これ凄くね? MKMapType.hybridとか、Google Map APIそっくりじゃん。Google Map API作った人が関わってるっぽいな。Google mapよりコード量は少ない。

でもこれ、latitude, longitudenの値を取得しないとダメですな。

0.02を0.01にすると、
region.span.latitudeDelta = 0.01
region.span.longitudeDelta = 0.01

大きくなりましたね。

CoreDataのrelational

MySQLのconcatに近いか。
userFetch.predicate = NSPredicate(format: “name = %@”, “John”) で条件一致を求める。

override func viewDidLoad() {
        super.viewDidLoad()
        
        let appDelegate = UIApplication.shared.delegate as! AppDelegate
        let managedContext = appDelegate.persistentContainer.viewContext
        let userEntity = NSEntityDescription.entity(forEntityName: "User", in: managedContext)!
        let user = NSManagedObject(entity: userEntity, insertInto: managedContext)
        
        user.setValue("John", forKeyPath: "name")
        user.setValue("john@test.com", forKey: "email")
        
        let formatter = DateFormatter()
        formatter.dateFormat = "yyyy/MM/dd"
        let date = formatter.date(from: "1990/10/08")
        user.setValue(date, forKey: "date_of_birth")
        
        user.setValue(0, forKey: "number_of_children")
        
        let carEntity = NSEntityDescription.entity(forEntityName: "Car", in:managedContext)!
        let car1 = NSManagedObject(entity: carEntity, insertInto: managedContext)
        car1.setValue("Audi TT", forKey: "model")
        car1.setValue(2010, forKey: "year")
        car1.setValue(user, forKey: "user")
        
        let car2 = NSManagedObject(entity: carEntity, insertInto: managedContext)
        car2.setValue("BMW X6", forKey: "model")
        car2.setValue(2014, forKey:"year")
        car2.setValue(user, forKey: "user")
        
        do {
            try managedContext.save()
        } catch {
            print("Failed saving")
        }

        let userFetch = NSFetchRequest<NSFetchRequestResult>(entityName: "User")
        userFetch.fetchLimit = 1
        userFetch.predicate = NSPredicate(format: "name = %@", "John")
        userFetch.sortDescriptors = [NSSortDescriptor.init(key: "email", ascending: true)]
        
        let users = try! managedContext.fetch(userFetch)
        
        let john: User = users.first as! User
        
        print("Email: \(john.email!)")
        let johnCars = john.cars?.allObjects as! [Car]
        print("has \(johnCars.count)")

    }

ちょっと雑だが、次は地図に行ってみよう。