CSRとは「Ceertificate Signing Request」の略でSSLサーバ証明書発行に必要なテキストデータ
公開鍵やコモンネーム(FQDN)、組織名、部署名等が含まれている。
認証局は、CSRと申し込み情報を元に内容を精査してSSLサーバ証明書を発行する
→つまり、認証局がSSL証明書発行に必要なファイルという意味ですね。
openssl req は証明要求(csr)の作成
-new 新規作成
-out 出力する要求ファイル名
-key filename 入力する秘密鍵のファイル名
作成したRSA秘密鍵からCSRをつくります
openssl req -new -key ca.key -out ca.csr
色々聞かれます。
Country Name
state or province name
locality name
organization name
organizational unit name
common name
email address
[vagrant@localhost ssl]$ openssl req -new -key ca.key -out ca.csr
You are about to be asked to enter information that will be incorporated
into your certificate request.
What you are about to enter is what is called a Distinguished Name or a DN.
There are quite a few fields but you can leave some blank
For some fields there will be a default value,
If you enter '.', the field will be left blank.
-----
Country Name (2 letter code) [AU]:ja
State or Province Name (full name) [Some-State]:tokyo
Locality Name (eg, city) []:shibuya
Organization Name (eg, company) [Internet Widgits Pty Ltd]:hpscript
Organizational Unit Name (eg, section) []:developement
Common Name (e.g. server FQDN or YOUR name) []:hpscript
Email Address []:info@hpscript.com

Please enter the following 'extra' attributes
to be sent with your certificate request
A challenge password []:hpscript
An optional company name []:hpscript
RSA秘密鍵を元に、CSRが作られます。
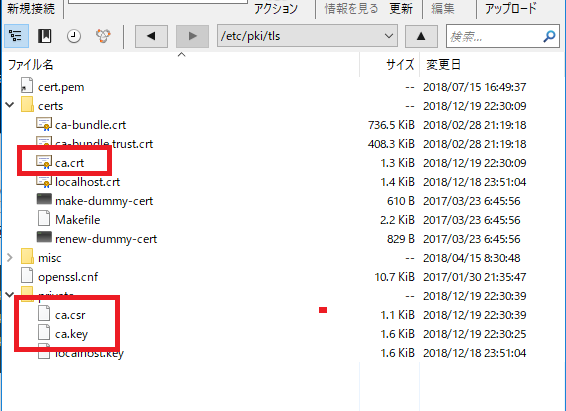
[vagrant@localhost ssl]$ ls
ca.csr  ca.key
作成されたCSR
-----BEGIN CERTIFICATE REQUEST-----
MIIDBjCCAe4CAQAwgY4xCzAJBgNVBAYTAmphMQ4wDAYDVQQIDAV0b2t5bzEQMA4G
A1UEBwwHc2hpYnV5YTERMA8GA1UECgwIaHBzY3JpcHQxFTATBgNVBAsMDGRldmVs
b3BlbWVudDERMA8GA1UEAwwIaHBzY3JpcHQxIDAeBgkqhkiG9w0BCQEWEWluZm9A
aHBzY3JpcHQuY29tMIIBIjANBgkqhkiG9w0BAQEFAAOCAQ8AMIIBCgKCAQEAmJ4B
3ZcX+fD+dDWaE+76QxYd8Z9ooLwGWneFfpZyOYBDP291rMMzVrSA/tAH0HfXFBKu
P8rmtEB23YEzcy4OKOrTXIZqoKfGO6tTgDQYFSTvGJoNWSpf3CZqqVy6nTyeOOUf
MiN6SdWgZV6ZNYx3OPpCacPCVpaYgmLAVL7MmQr+nTGsfFzB8G3acReKaEa1LFDU
bMf1TYj+pK6cNy5KDU3jKLbfWHf6o+n7rFi4ZhLw6DCDHEJpy2CLxO/RdjpC7Vil
hogehoge
-----END CERTIFICATE REQUEST-----
ほう、csrもハッシュ化されるのか^^