mysqlからcsvを作ろう

try {
	$dbh = new PDO('mysql:host=localhost;dbname=hoge;charset=utf8','hoge','hoge', array(PDO::ATTR_EMULATE_PREPARES => false));
} catch(PDOException $e){
	exit('データベース接続失敗。'.$e->getMessage());
}

$file_path = "../s3/article.csv";
$export_csv_title = ["id","login_id","role","name","password","mail","test_mail","updated_person","created_at","updated_at"];
$export_sql = "select * from articles";

foreach($export_csv_title as $key => $val){
	$export_header[] = mb_convert_encoding($val, 'SJIS-win', 'UTF-8');
	}

	if(touch($file_path)){
		$file = new SplFileObject($file_path, "w");

		$file->fputcsv($export_header);
		$stmt = $dbh->query($export_sql);

		while($row = $stmt->fetch(PDO::FETCH_ASSOC)){
			$file->fputcsv($row);
		}
		$dbh = null;

	}

echo "finish!!!!!!";

おいおい、ちょっと待てこれ。来てる!

次は、csvをs3に格納する。

mysqlのデータからcsvをつくろう

まず、mysqlからpdoでデータを取得し、csvデータを作りたいと思います。

まずvagrantでcsv保存用にs3というフォルダをつくります。

まず、mysqlに接続します。
Database changed
mysql> show tables;
+———————+
| Tables_in_laravel57 |
+———————+
| articles |
| documents |
| migrations |
+———————+
3 rows in set (0.00 sec)

mysql> select * from articles;
+—-+———-+——–+————–+———–+———————+————————–+—————-+———————+———————+
| id | login_id | role | name | password | mail | test_mail | updated_person | created_at | updated_at |
+—-+———-+——–+————–+———–+———————+————————–+—————-+———————+———————+
| 1 | user1 | master | taniguchi | passowrd | laravel@gmail.com | laravel_test@gmail.com | sasaki | 2018-09-21 21:39:07 | 2018-09-21 21:39:07 |
| 2 | user2 | master | goto | himitsu | laravel@hotmail.com | laravel_test@hotmail.com | sasaki | 2018-09-22 08:31:54 | 2018-09-22 08:51:32 |
| 3 | user3 | master | 橋本太郎 | password3 | laravel@gmail.com | laravel_test@gmail.com | こばやし | 2018-09-22 15:03:11 | 2018-09-22 15:03:11 |
| 4 | user4 | master | 後藤大輔 | password4 | laravel@gmail.com | laravel_test@gmail.com | こばやし | 2018-09-22 15:48:56 | 2018-09-22 15:48:56 |
| 9 | user2 | master | goto | himitsu | laravel@hotmail.com | laravel_test@hotmail.com | sasaki | 2018-09-22 17:41:59 | 2018-09-22 17:41:59 |
+—-+———-+——–+————–+———–+———————+————————–+—————-+———————+———————+
5 rows in set (0.00 sec)

データは入ってますね。続いて、batchというフォルダをつくり、そこからpdoを作ります。

try {
	$pdo = new PDO('mysql:host=localhost;dbname=laravel57;charset=utf8','root','', array(PDO::ATTR_EMULATE_PREPARES => false));
} catch(PDOException $e){
	exit('データベース接続失敗。'.$e->getMessage());
}

$stmt = $pdo->query("select * from articles");
while($row = $stmt -> fetch(PDO::FETCH_ASSOC)){
	$id[] = $row['id']; 
	$login_id[] = $row['login_id'];
	$role[] = $row['role'];
	$name[] = $row['name'];
	$password[] = $row['password'];
	$mail[] = $row['mail'];
	$test_mail[] = $row['test_mail'];
	$updated_person[] = $row['updated_person'];
	$created_at[] = $row['created_at'];
	$updated_at[] = $row['updated_at'];
}

var_dump($role);

ここまではOK。何の問題もなし。

続いて、CSVの作り方。

AWS ec2で複数ドメインを管理する

まずお名前.comでサブドメインを取得します。
valueにはインスタンスのipアドレスを入力する。

今回は、ここに置くとする
/var/www/dev/html/

NameVirtualHost *:80


ServerName hoge # 今まで使っていたドメイン
DocumentRoot “/var/www/html”


ServerName hogehoge # 新しいドメイン
DocumentRoot “/var/www/dev/html”

$ sudo service httpd restart
Starting httpd: AH00548: NameVirtualHost has no effect and will be removed in the next release

なんじゃこりゃー どないなってんねん。
do not stop, keep going

curl http://www.yahoo.co.jp
これは動いている。
/etc/resolv.conf ではなさそう。

phpのheader情報取得

<?php
  $headers = getallheaders();
  while (list ($header, $value) = each ($headers)) {
    echo "$header: $value" . "<br>";
  }
?>

Host: hpscript.com
X-Real-Ip: xxx.xx.xxx
X-Forwarded-Proto: http
Listen-Ipaddr: xxx.xx.xxx
Cache-Control: max-age=0
Upgrade-Insecure-Requests: 1
User-Agent: Mozilla/5.0 (Windows NT 10.0; Win64; x64) AppleWebKit/537.36 (KHTML, like Gecko) Chrome/69.0.3497.100 Safari/537.36
Accept: text/html,application/xhtml+xml,application/xml;q=0.9,image/webp,image/apng,*/*;q=0.8
Accept-Encoding: gzip, deflate
Accept-Language: ja,en-US;q=0.9,en;q=0.8
Cookie: _ga=GA1.2.792464320.1516407668; _gid=GA1.2.793830752.1537052174

なるほど、chunkedはないな。

git cloneからpull requestまでやってみよう

git cloneする。
[vagrant@localhost local]$ git clone https://github.com/githubix/article.git
Initialized empty Git repository in /home/vagrant/local/article/.git/
remote: Enumerating objects: 141, done.
remote: Counting objects: 100% (141/141), done.
remote: Compressing objects: 100% (109/109), done.
remote: Total 141 (delta 12), reused 141 (delta 12), pack-reused 0
Receiving objects: 100% (141/141), 197.50 KiB | 72 KiB/s, done.
Resolving deltas: 100% (12/12), done.
[vagrant@localhost local]$ ls
article
[vagrant@localhost local]$ cd article
[vagrant@localhost article]$ ls
README.md bootstrap config phpunit.xml resources storage
app composer.json database public routes tests
artisan composer.lock package.json readme.md server.php webpack.mix.js

git checkout -b 
git checkout コマンドに、パラメータでブランチ名を指定すれば、そのブランチに切り替える事ができる。
ブランチの作成と新しいブランチへの切り替えを同時に行うには、git checkout コマンドに -b スイッチをつけて実行
branch .. simply a lightweight movable pointer to one of commits.

git add ファイルやディレクトリをインデックスに登録.

developという新しいブランチを切る
[vagrant@localhost article]$ git checkout -b develop
Switched to a new branch ‘develop’

readmeを編集する。
README.md

# article
second changed

indexとの差異を見る。
[vagrant@localhost article]$ git diff
diff –git a/readme.md b/readme.md
index b0affd5..e5dca01 100644
— a/readme.md
+++ b/readme.md
@@ -1,65 +1,2 @@

[vagrant@localhost article]$ git push origin develop
Password:
error: The requested URL returned error: 403 Forbidden while accessing https://hpscript@github.com/githubix/article.git/info/refs

あれ、手順が違うか。。。forkしてないからか。。

forkして、pushする。
[vagrant@localhost article]$ git push origin develop
Password:
Counting objects: 5, done.
Compressing objects: 100% (2/2), done.
Writing objects: 100% (3/3), 289 bytes, done.
Total 3 (delta 1), reused 0 (delta 0)
remote: Resolving deltas: 100% (1/1), completed with 1 local object.
remote:
remote: Create a pull request for ‘develop’ on GitHub by visiting:
remote: https://github.com/hpscript/article/pull/new/develop
remote:
To https://hpscript@github.com/hpscript/article.git
* [new branch] develop -> develop

おおおおお、compare&prがでました。
なんかわかってきた~

pull requestのメッセージが届く。
なるほどなるほど。

margeする。

変更が保存されました。なるほど~ 変更内容をgithubから自動的にawsにデプロイするにはどうすればいいんだ?
要確認ですな。

githubでPR(pull request)をしよう2

新しいアカウントを作成します。

続いて、vagrantで新しいアカウントの作業者用のフォルダ、localを作成します。
[vagrant@localhost ~]$ mkdir local
[vagrant@localhost ~]$ cd local

ここで、git clone, add, commit, push, pullrequestをしたいとおもいます。

ところで、git commit -m の「-m」は…
「-m」オプションを指定することで、エディターを起動することなく、コミットメッセージも指定してコミットすることができる。

なるほど。
git remote add origin hogehoge
以下で、originのremoteレポジトリを指すようになる。なるほど、remoteだからね。

git push -u origin master でpushする。
ところで、git push -uの-uとは?
「-u」オプションをつければ、同名の上流ブランチを設定できる。上述の通り、git push が成功すれば、その後はパラメータを省略して push できるようになる。

[vagrant@localhost laravel]$ git push
Password:
Counting objects: 5, done.
Compressing objects: 100% (2/2), done.
Writing objects: 100% (3/3), 274 bytes, done.
Total 3 (delta 1), reused 0 (delta 0)
remote: Resolving deltas: 100% (1/1), completed with 1 local object.
To https://githubix@github.com/githubix/article.git
e71a232..e66ad76 master -> master

なるほど、git pushだけでいけるようになりました。

では、新しいアカウントでgit cloneして、編集、add, commit, push、prまでやりたいと思います。

githubでプルリクをする

1.Github上からローカルにファイルをclone(保存)する
2.GithubへPullRequest用のBranchをローカルで作成する
3.データを更新編集し、ローカルに add, commitする
4.Githubにpushする
5.GithubにPullRequestする

cloneではなく、githubにリポジトリを作成し、git initから、add commit

Branch…1つのレポジトリに複数のBranchを作ることで同時に複数のバージョンでレポジトリを管理することができるようになる

では、capistranoのプルリクの履歴を見てみましょう
https://github.com/capistrano/capistrano/pulls

[Doc] Add Capistrano::LazyCleanup to 3rd Party Plugin
https://github.com/capistrano/capistrano/pull/2001
コメントが記載されています。

This branch has no conflicts with the base branch
マージされたってことかな。

[CI] Test against Ruby 2.5
https://github.com/capistrano/capistrano/pull/1973
All checks have failed
これは、プルリクを拒否したってことか?

レビューしてPRをacceptするか、not acceptするかコメントしてますね。
On further review, I’ve decided not to accept this PR. There is a simple workaround, which is to add this to your deploy.rb if you’d like to disable the deleting of source on rollback:

なるほど、こういう風に複数人で開発するのか。。
なるほどねー

ということは、githubのアカウントがもう一つ必要だな。。

git hubのrepositoriesにpushしていこう

まずは create repository

vagrantのlaravelのディレクトリに移動します。
[vagrant@localhost agile]$ cd laravel
[vagrant@localhost laravel]$ ls
app composer.json database public routes tests
artisan composer.lock package.json readme.md server.php vendor
bootstrap config phpunit.xml resources storage webpack.mix.js

githubのインストラクションに沿って操作していきます。
[vagrant@localhost laravel]$ echo “# article” >> README.md

git initします。
[vagrant@localhost laravel]$ git init
Initialized empty Git repository in /home/vagrant/agile/laravel/.git/
[vagrant@localhost laravel]$ ls
README.md composer.json package.json resources tests
app composer.lock phpunit.xml routes vendor
artisan config public server.php webpack.mix.js
bootstrap database readme.md storage
[vagrant@localhost laravel]$ git add README.md

Gitの操作の基本中の基本、変更したファイルを「addしてcommit」
つまり、Readme.mdをaddしてcommitするという訳。

続いてgit commitします。
[vagrant@localhost laravel]$ git commit -m “first commit”
[master (root-commit) b32fcda] first commit
Committer: vagrant
Your name and email address were configured automatically based
on your username and hostname. Please check that they are accurate.
You can suppress this message by setting them explicitly:

git config –global user.name “Your Name”
git config –global user.email you@example.com

If the identity used for this commit is wrong, you can fix it with:

git commit –amend –author=’Your Name

1 files changed, 1 insertions(+), 0 deletions(-)
create mode 100644 README.md

[vagrant@localhost laravel]$ git remote add origin https://github.com/githubix/article.git
[vagrant@localhost laravel]$ git push -u origin master
error: The requested URL returned error: 403 Forbidden while accessing https://github.com/githubix/article.git/info/refs

ぬ? 403 Forbidden?
usernameを入れないと駄目のよう。
git pushします。
[vagrant@localhost laravel]$ git remote set-url origin https://githubix@github.com/githubix/article.git
[vagrant@localhost laravel]$ git push -u origin master
Password:
Counting objects: 3, done.
Writing objects: 100% (3/3), 221 bytes, done.
Total 3 (delta 0), reused 0 (delta 0)
remote:
remote: Create a pull request for ‘master’ on GitHub by visiting:
remote: https://github.com/githubix/article/pull/new/master
remote:
To https://githubix@github.com/githubix/article.git
* [new branch] master -> master
Branch master set up to track remote branch master from origin.

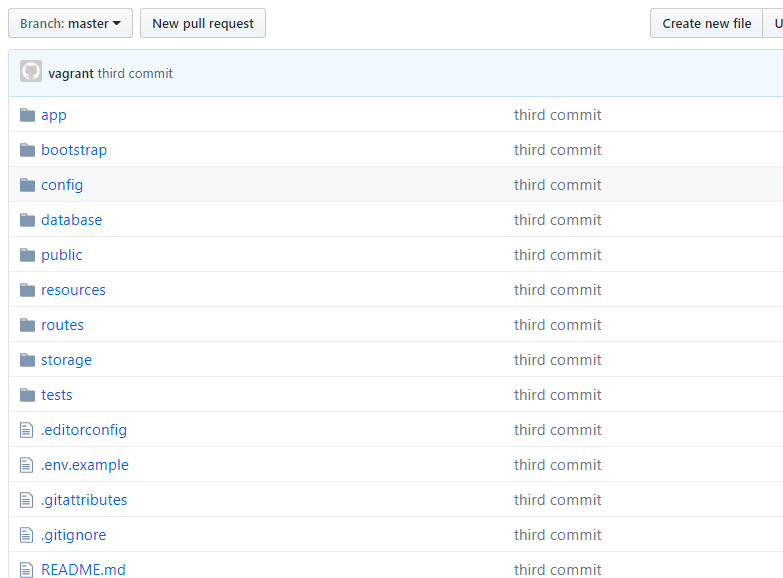
あれ、ファイルが、readme.mdだけ更新されとる。。
Untracked files:になってるからですな。

commitしてpushする。

[vagrant@localhost laravel]$ git commit -m “third commit”
[vagrant@localhost laravel]$ git add .
[vagrant@localhost laravel]$ git status

[vagrant@localhost laravel]$ git push -u origin master
Password:
Counting objects: 137, done.
Compressing objects: 100% (118/118), done.
Writing objects: 100% (135/135), 197.10 KiB, done.
Total 135 (delta 11), reused 0 (delta 0)
remote: Resolving deltas: 100% (11/11), done.
To https://githubix@github.com/githubix/article.git
b32fcda..e71a232 master -> master
Branch master set up to track remote branch master from origin.

なるほど、入りました。よし、ここはOKとしよう。

次は、awsのroute 53の複数設定。
Apacheでのマルチドメインの設定はバーチャルホストの設定だったような気がするが。。
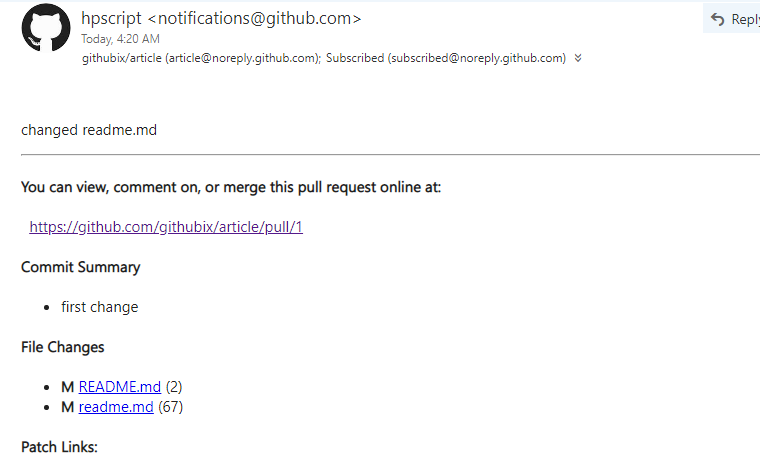
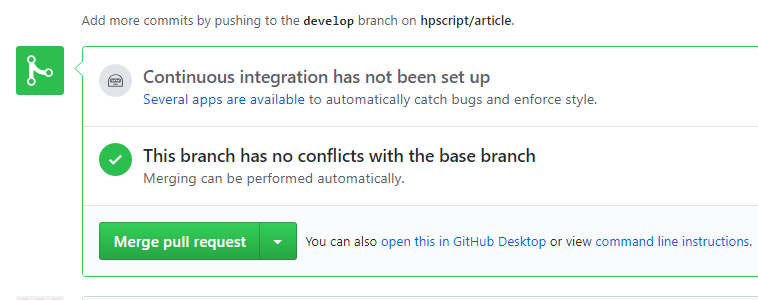
その前にプルリクをやってみたい。

戦略

1. git hub commit
2. aws route 53複数
3. mysql -> csv
4. mysql -> S3
5. s3-> mysql …. 9/23
5-2. SSL
6. Travis CI
7. Capistrano
8. Ansible
9. Mackerel …….. 9/24
10. ELB
11. laravel bootstrap
12. laravel TinyMCE …. 9/25
13. Vue.js ….9/27
14. sketch …9/28
15. mysql設計書 9/29
16. シェルスクリプトによるbatch …9/30
17. 設計(TR,概念図)
18. struts …10/1
19. TD …10/2
20. Fluentd / Embulk …10/3
21. 設計(TR,概念図)
22. Dancer …10/4
23. 提案書作成 …10/5
24. Zabbix
25. Oracle
その他: photoshop, illustrator、python, cdn, postfix, redmine

よし!行けるかな。。。。 いや、これで行ってみよう!

Document入力

show.blade.php
DocumentsController@storeにpostする。

<form method="post" action="{{ action('DocumentsController@store', $article) }}">
		{{ csrf_field()}}
	<p>
		<input type="text" name="login_id" placeholder="iphone/android" value="{{ old('mobile') }}">
		@if($errors->has('mobile'))
		<span class="error">{{ $errors->first('mobile') }}</span>
		@endif
	</p>
	<p>
		<input type="text" name="role" placeholder="配信日" value="{{ old('published_at') }}">
		@if($errors->has('published_at'))
		<span class="error">{{ $errors->first('published_at') }}</span>
		@endif
	</p>
	<p>
		<input type="text" name="name" placeholder="原稿" value="{{ old('body') }}">
		@if($errors->has('body'))
		<span class="error">{{ $errors->first('body') }}</span>
		@endif
	</p>
	<p>
		<input type="submit" value="登録">
	</p>
	</form>

routing
DocumentsController@storeを/articles/{article}/documentsと設定する。

Route::get('/', 'ArticlesController@index');
Route::get('/articles/create', 'ArticlesController@create');
Route::get('/articles/{id}', 'ArticlesController@show')->where('post','[0-9]+');
Route::post('/articles', 'ArticlesController@store');
Route::get('/articles/{id}/edit', 'ArticlesController@edit');
Route::patch('/articles/{article}', 'ArticlesController@update');
Route::delete('/articles/{article}', 'ArticlesController@destroy');
Route::post('/articles/{article}/documents', 'DocuumentsController@store');

mysqlにも値が入りました。
mysql> select * from documents;
+—-+————+——–+————–+——–+———————+———————+
| id | article_id | mobile | published_at | body | created_at | updated_at |
+—-+————+——–+————–+——–+———————+———————+
| 1 | 10 | iphone | 9/12 | aaaaaa | 2018-09-23 08:46:45 | 2018-09-23 08:46:45 |
+—-+————+——–+————–+——–+———————+———————+
1 row in set (0.00 sec)