laravel5.7のカスタムバリデーションでエラーメッセージを出す

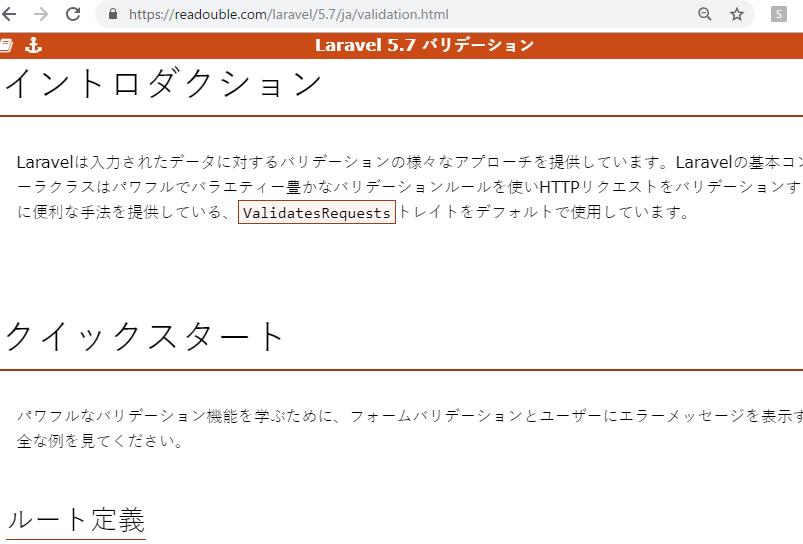
まず公式ドキュメントのバリデーションを見てみましょう。
https://readouble.com/laravel/5.7/ja/validation.html

*.blade.phpを作ります。

@extends('layouts.account')
@section('title', '原稿管理会社登録')

@section('breadcrumb')
	@@parent
	<ul class="breadcrumb">
      <li itemscope="itemscope" itemtype="http://data-vocabulary.org/Breadcrumb" >
        <a href="/top" itemprop="url">
          <span itemprop="title">ホーム</span>
        </a>
      </li>
      <li itemscope="itemscope" itemtype="http://data-vocabulary.org/Breadcrumb" >
        <a href="/top" itemprop="url">
          <span itemprop="title">原稿管理会社登録</span>
        </a>
      </li>
    </ul>
@endsection

@section('content')
<h2>原稿管理会社登録</h2>
      <hr>
      <form action="/company/confirm" method="post" id="form1">
      <table id="tbl">
        @csrf        
        <tr>
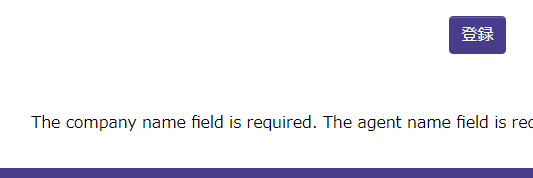
          <th>会社名</th><td><input type="text" name="company_name" size="40"  value="{{ old('company_name') }}">{{$errors->first('company_name')}}</td>
        </tr>
        <tr>
          <th>代理店</th><td><input type="text" name="agent_name" size="40"  value="{{ old('agent_name') }}">{{$errors->first('agent_name')}}</td>
        </tr>
      </table>      

      <div class="button_wrapper remodal-bg">
         <button type="submit" value="送信" id="square_btn" onClick="location.href='#modal'">登録</button>
      </div>
      </form>

      <!-- remodal -->
      <div class="remodal" data-remodal-id="modal">
        <button data-remodal-action="close" class="remodal-close"></button>
        <h1>登録しますか</h1>
        <p>
          入力した内容で宜しいでしょうか?
        </p>
        <br>
        <button data-remodal-action="cancel" class="remodal-cancel">Cancel</button>
        <button data-remodal-action="confirm" class="remodal-confirm">OK</button>
      </div>
@endsection

で、どうするか?
→ フォームリクエストを使う。

イベントドリブンで処理を行えるNetty

公式を覗いてみます。
https://netty.io/

Netty is an asynchronous event-driven network application framework
for rapid development of maintainable high performance protocol servers & clients. と記載があります。
asynchronous event-driven network とは、イベントドリブンということですが。。

It greatly simplifies and streamlines network programming such as TCP and UDP socket server.
TCPとUDPをシンプル化したと書いてあります。プロトコルサポートが充実しているのがわかります。

非同期通信というとajaxがまず思いつきますが、ajaxのようなフレームワークと考えてよいでしょうか?
うわあああああああああああああ、これは片手間では無理だ。しっかりjavaやらんと。とりあえず、表層を覗くだけにしておきます。

psコマンドの見方

psコマンドとは?

psコマンドは、Linux上で現在動作しているプロセスを表示するコマンド。
とりあえずコマンドラインで叩いてみよう。

[vagrant@localhost test]$ ps
PID TTY TIME CMD
15686 pts/3 00:00:00 bash
17690 pts/3 00:00:00 ps

PID:実行しているプロセスの番号
CMD:コマンド

Linuxのシンボリックリンクとは?

シンボリックリンク(symbolic link)って何?
イメージ的にはこんな感じ?

それはシンプルリングやねん。

シンボリックリンクとは、ファイルやフォルダの代理ファイルのことです。
よく分からないので、作ってみましょう。

[vagrant@localhost test]$ ls
test.php
[vagrant@localhost test]$ ln -s test.php ./test.php
ln: creating symbolic link `./test.php': ファイルが存在します

あれ!?
lnコマンドは、ディレクトリやファイルへのリンクを登録するコマンド
-sオプションは、シンボリックリンクを作成するオプション

ってことは、再度やり直します。
[vagrant@localhost test]$ ls
test.php
[vagrant@localhost test]$ ln -s test.php s.php
[vagrant@localhost test]$ ls
s.php test.php
[vagrant@localhost test]$

あれ、なんかそれっぽいのが出来ている!?

シンボリックリンクを叩く
なんでもいいですが、catコマンドを使ってみます。


[vagrant@localhost test]$ cat s.php
";
echo "addign git tag!";

?>

test.phpをcatしているのと同じ結果になりました。

やるわねー

Git tag(タグ)って何?

ねーねー、これGit Tagらしいよ。

あー知ってる、知ってる、Git tagね。(やべ、全く知らねー。。)

ということでGit tagを学びたいと思います。

まず、gitの公式を見ます。
Git タグ
公式ページの見出しを拾うと、色々な機能や種類があることがわかります。
タグの一覧表示、タグの作成、注釈付きのタグ、署名付きのタグ、軽量版のタグ、タグの検証、後からのタグ付け、タグの共有

まず、Githubのレポジトリにファイルを作成します。適当にtest.phpとしておきます。

vagrantにgit cloneします。

[vagrant@localhost test]$ git clone https://github.com/githubix/test.git
Initialized empty Git repository in /home/vagrant/local/test/test/.git/
remote: Enumerating objects: 3, done.
remote: Total 3 (delta 0), reused 0 (delta 0), pack-reused 3
Unpacking objects: 100% (3/3), done.

1.git tagの一覧表示
コマンドラインでgit tagと打ちます。何も表示されません。タグはついていない状態です。

[vagrant@localhost test]$ git tag

git cloneしたファイルを適当に編集します。

echo "this is test<br>";
echo "addign git tag!";

2.git add .
[vagrant@localhost test]$ git add .

3.git commit -m “comment”
git commit します。
[vagrant@localhost test]$ git commit -m “tag commit”
[master a74bdba] tag commit
Committer: vagrant
Your name and email address were configured automatically based
on your username and hostname. Please check that they are accurate.
You can suppress this message by setting them explicitly:

git config –global user.name “Your Name”
git config –global user.email you@example.com

If the identity used for this commit is wrong, you can fix it with:

git commit –amend –author=’Your Name

1 files changed, 2 insertions(+), 1 deletions(-)

4.git tag -a でタグ作成
git tag -a tagname -m “comment”でタグを生成します。
[vagrant@localhost test]$ git tag -a gittag -m “first tag”

5.git tagでタグ一覧表示
タグが生成されていることがわかります。
[vagrant@localhost test]$ git tag
gittag

6.リポジトリへpush
git remote set-url origin hogehogeとしてから、git pushします。
[vagrant@localhost test]$ git remote set-url origin https://githubix@github.com/githubix/test.git
[vagrant@localhost test]$ git push -u origin master
Password:
Counting objects: 5, done.
Compressing objects: 100% (2/2), done.
Writing objects: 100% (3/3), 291 bytes, done.
Total 3 (delta 0), reused 0 (delta 0)
To https://githubix@github.com/githubix/test.git
e44f89c..a74bdba master -> master
Branch master set up to track remote branch master from origin.

7.tag も git push
[vagrant@localhost test]$ git push origin gittag
Password:
Counting objects: 1, done.
Writing objects: 100% (1/1), 161 bytes, done.
Total 1 (delta 0), reused 0 (delta 0)
To https://githubix@github.com/githubix/test.git
* [new tag] gittag -> gittag

8.githubで確認
tagもpushされているのがわかります。

お疲れ様でしたー

Laravel5.7 でバリデーションメッセージを表示する

Laravel5.7 でバリデーションメッセージを表示したいと思います。

Controllerの編集
まずformの確認画面のcontrollerで、送られてきたリクエストに対し、’required’として入力必須にします。

class CompanyConfirmController extends Controller
{
    public function confirm(Request $request){
    	$validatedData = $request->validate([
            'company_name' => 'required',
            'agent_name' => 'required',
        ]);
    	$confirm = new Company($request->all());

    	return view('companyconfirm', compact('confirm'));
    }
}

View(*.blade.php)の編集
デフォルトのメッセージを表示させます。

<span>{{$errors->first('company_name')}}</span>
<span>{{$errors->first('agent_name')}}</span>

特にメッセージをカスタマイズしなければ、英語のメッセージが表示されます。
これでもいいような気はします。

httpd start/restart と httpd gracefulの違い

httpd restart/gracefulはapacheのプロセス停止・再開を行うが、方法が異なる。

httpd restart
restartの場合は、以下のように、完全にhttpdプロセスを一旦停止してから再起動しています。

[vagrant@localhost ~]$ sudo service httpd restart
httpd を停止中: [ OK ]
httpd を起動中: [ OK ]

httpd graceful
httpdの通信が終わるのを待って、順次新しい設定を反映したhttpdを起動させる方法。
[vagrant@localhost ~]$ sudo service httpd graceful

サービスの停止ができない場合は「graceful」の使用をおすすめ。

apache公式ドキュメントを見てみましょう。
https://httpd.apache.org/docs/2.4/stopping.html
Apache HTTP Serverの再起動には、実行されている httpd プロセスにシグナルを送る必要がある。

公式ドキュメントのrestart
restart シグナルを親プロセスに送ると、 TERM と同様に子プロセスを kill しますが、 親プロセスは終了しません。 設定ファイルを再読込して、ログファイル全てを開き直します。 その後、新しい子プロセスを起動して応答を続けます。

公式ドキュメントgraceful
graceful シグナルを受け取ると、子プロセスに現在のリクエストの処理の後に終了する (あるいは何もしていなければすぐに終了する) ように助言します。 親プロセスは設定ファイルを再読込して、ログファイルを開き直します。 子プロセスが徐々になくなるに従って、 新しい世代の設定による子プロセスに置き換えていきます。 そして、これらが新たなリクエストに即座に応答し始めます。

公式には、どんな時にどのコマンドを推奨などは書かれていませんが、サービス運用者およびコンピュータサイエンスとしての考え方は、急にkillするのではなく、緩やかに停止した方が良さそうに見えます。

TSVファイルとは?

TSVファイルとはなにか?
– テキストファイル
– 項目間がタブ区切りになっている
– CSVファイルに近い

例えば、適当にテキストファイルを開き、名前を付けて保存で、.tsvファイルとする。

すると、保存したファイルがTSVファイルになっていることがわかる。

CSVファイルとは?
– CSVファイルのカンマがタブになった版
csvファイル
php,ソーシャル開発,データベース移行
TSVファイル
php ソーシャル開発 データベース移行

タブ記号(タブ文字)を間に挟んでいます。
また、このtsvファイルをExcelで開くこともできます。

Laravel5.7 バリデーションエラー表示

まず公式を見ます。
https://readouble.com/laravel/5.7/ja/validation.html

リクエストの入力が指定したバリデーションルールに当てはまらなかった場合はどうなるか?
→自動的にユーザを以前のページへリダイレクトする。加えて、バリデーションエラーは自動的にフラッシュデータとしてセッションへ保存される。

ん?フラッシュデータって何?
>セッションにアイテムを保存したいことは良くあります。flashメソッドを使ってください。flashメソッドは直後のHTTPリクエストの間だけセッションにデータを保存します。それ以降は削除されます

なるほど、セッションに保持されるデータのことね。$errors変数はIlluminate\Support\MessageBagのインスタンス

う、う、急激に眠くなってきた。

続けて、エラー表示の例
$errors->all()で表示しています。

<h1>ポスト作成</h1>

@if ($errors->any())
    <div class="alert alert-danger">
        <ul>
            @foreach ($errors->all() as $error)
                <li>{{ $error }}</li>
            @endforeach
        </ul>
    </div>
@endif

Laravel5.7 バリデーションの種類

Laravel5.7のバリデーションにはどんなものがあるのか?
Webの記事を見ていてもよくわからない。。

ということで、公式ドキュメントを読み進めて行きたいと思います。
https://readouble.com/laravel/5.7/ja/validation.html

– イントロダクション
ValidatesRequestsトレイトをデフォルトで使用
→ なんじゃそりゃ? とりあえず、phpのマニュアルを見てみよう。凄いな、ループだ。キリがないな。 

トレイトは、PHP のような単一継承言語でコードを再利用するための仕組みのひとつです。 トレイトは、単一継承の制約を減らすために作られたもので、 いくつかのメソッド群を異なるクラス階層にある独立したクラスで再利用できるようにします。

トレイトの例
http://php.net/manual/ja/language.oop5.traits.php

trait ezcReflectionReturnInfo {
    function getReturnType() { /*1*/ }
    function getReturnDescription() { /*2*/ }
}

class ezcReflectionMethod extends ReflectionMethod {
    use ezcReflectionReturnInfo;
    /* ... */
}

class ezcReflectionFunction extends ReflectionFunction {
    use ezcReflectionReturnInfo;
    /* ... */
}

バリデーションに戻ります。
1.ルート定義
ここは想定通り。

Route::get('post/create', 'PostController@create');
Route::post('post', 'PostController@store');

コントローラ作成
getとstoreのメソッドを書いています。これも想定通り。

namespace App\Http\Controllers;

use Illuminate\Http\Request;
use App\Http\Controllers\Controller;

class PostController extends Controller
{
    public function create()
    {
        return view('post.create');
    }
    public function store(Request $request)
    {
    }
}

バリデーションロジック
Illuminate\Http\Requestオブジェクトが提供する、validateメソッドを使用する。バリデーションに失敗すると、例外が投げられ、ユーザーに対し自動的に適切なエラーレスポンスが返される。
公式ドキュメントの例

public function store(Request $request)
{
    $validatedData = $request->validate([
        'title' => 'required|unique:posts|max:255',
        'body' => 'required',
    ]);
}

最初のバリデーション失敗時に停止

$request->validate([
    'title' => 'bail|required|unique:posts|max:255',
    'body' => 'required',
]);

とりあえず、ここまででやってみましょうか。

public function store(Request $request){
        $request->validate([
            'company_name' => 'required',
            'agent_name' => 'required',
        ]);
    	$company = new Company([
    		'company_name' => $request->get('company_name'),
    	]);
    	$company->save();
    	$agent_mst = new Agent_mst([
    		'agent_name' => $request->get('agent_name'),
    	]);
    	$agent_mst->save();
    	$data = new Company();
        $table = $data::all();
        return view('companyindex', ['data'=> $table]);
    }

OK!!!
ただバリデーションエラー表示がこれだと、エラー時に何も表示されません。エラー表示を出すようにしましょう。