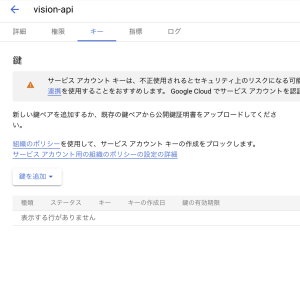
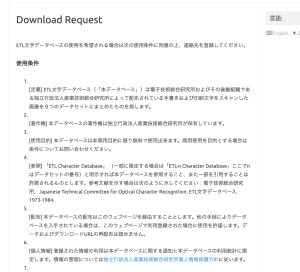
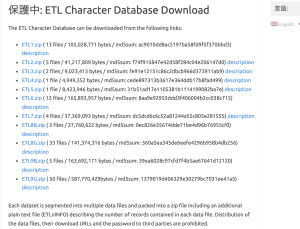
ETLを使って手書きの文字認識をやりたい

ETL

使用条件

会員登録を行い、ETLをDLする

binaryから画像にする

import struct
from PIL import Image, ImageEnhance
import glob, os

RECORD_SIZE = 2052

outdir = "ETL7-img/"
if not os.path.exists(outdir): os.mkdir(outdir)

files = glob.glob("ETL7/*")
fc = 0
for fname in files:
	fc = fc + 1
	print(fname)

	f = open(fname, "rb")
	f.seek(0)
	i = 0
	while True:
		i = i + 1
		s = f.read(RECORD_SIZE)
		if not s: break
		r = struct.unpack('>H2sH6BI4H4B4x2016s4x', s)
		iF = Image.frombytes('F', (64, 63), r[18], 'bit', 4)
		iP = iF.convert('L')
		code_jis = r[3]
		dir = outdir + "/" + str(code_jis)
		if not os.path.exists(dir): os.mkdir(dir)
		fn = "{0:02x}-{1:02x}{2:04x}.png".format(code_jis, r[0], r[2])
		fullpath = dir + "/" + fn
		enhancer = ImageEnhance.Brightness(iP)
		iE = enhancer.enhance(16)
		iE.save(fullpath, "PNG")
print("ok")

pickleの作成

import numpy as np
import cv2
import matplotlib.pyplot as plt
import glob
import pickle

out_dir = "./ETL7-img"
im_size = 32

save_file = out_dir + "/JapaneseHiragana.pickle"
plt.figure(figsize=(9, 17))

hiraganadir = list(range(177, 223+1))
hiraganadir.append(166)
result = []

for i, code in enumerate(hiraganadir):
	img_dir = out_dir + "/" + str(code)
	fs = glob.glob(img_dir + "/*")
	print("dir=", img_dir)

	for j, f in enumerate(fs):
		img = cv2.imread(f)
		img_gray = cv2.cvtColor(img, cv2.COLOR_BGR2GRAY)
		img = cv2.resize(img_gray, (im_size, im_size))
		result.append([i, img])

		if j == 3:
			plt.subplot(11, 5, i + 1)
			plt.axis("off")
			plt.title(str(i))
			plt.imshow(img, cmap="gray")

pickle.dump(result, open(save_file,  "wb"))
plt.show

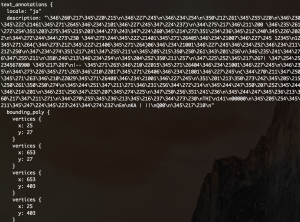
正解率 0.973809540271759 loss 0.09567940980195999
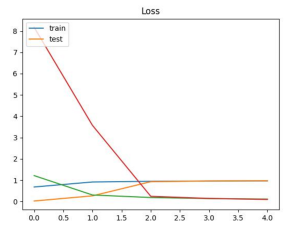
なんか出来てるっぽい

[画像認識] MNISTによる手書き文字の認識

手書き文字認識はMNISTのデータセットを使って、keras, kaggleからデータを取り込むことができる。

import tensorflow as tf
import numpy as np
import matplotlib.pyplot as plt

mnist = tf.keras.datasets.mnist.load_data()
train, test = mnist
(x_train, y_train),(x_test, y_test) = mnist

print(x_train.shape)
print(y_train.shape)
print(x_test.shape)
print(y_test.shape)

(60000, 28, 28) // 28x28pxのデータが60000枚
(60000,)
(10000, 28, 28) // 28x28pxのデータが10000枚
(10000,)

データセットを画像で確認

print(x_train[0])

plt.imshow(x_train[0])
plt.savefig('image.jpg',dpi=100)

### モデルの作成

x_train = x_train / 255.0  # 0-1の間に抑えるよう正規化する
x_test = x_test / 255.0

# Sequential(系列)モデル構築 インスタンスにリストを追加する
model = tf.keras.models.Sequential()
model.add(tf.keras.layers.Input((28, 28))) # 入力層は28x28
model.add(tf.keras.layers.Flatten()) # 一元配列1, 784 に変換

# 入力層から情報を受け継いで計算を行う中間層
model.add(tf.keras.layers.Dense(128)) # 128個に全結合
model.add(tf.keras.layers.Activation(tf.keras.activations.relu)) # 中間層の活性化関数の設定, reluは0以下は0、0以上は入力値を出力
model.add(tf.keras.layers.Dropout(0.2)) # 過学習を防ぐため20%ドロップアウト

# 出力
model.add(tf.keras.layers.Dense(10)) # 出力層0~9の10個
model.add(tf.keras.layers.Activation(tf.keras.activations.softmax)) # softmax関数は出力値の合計が100%になる

# コンパイル
model.compile(
	optimizer=tf.keras.optimizers.Adam(), # optimizerは逆伝播モジュール 手本と出力を比較して重みw, バイアスbを修正, AdamはAdaptive Moment Estimationの略でmomentumSGDとRMSpropを合わせたアルゴリズム
	loss=tf.keras.losses.sparse_categorical_crossentropy, # 誤差関数モジュール 正解値と予想値のズレを計算
	metrics=[tf.keras.metrics.sparse_categorical_accuracy] # 評価関数
)

# fitで学習 epochsで5回
model.fit(x_train, y_train, epochs=5)

print(model.evaluate(x_test, y_test))

plt.imshow(x_test[0])
plt.savefig('data/test_img.jpg',dpi=100)

# predict
pred = model.predict(x_test[0][np.newaxis]) # numpyのnewaxis
print(np.argmax(pred)) # 一番大きい要素


img = Image.open("data/handwriting.jpg").convert('L')
img.thumbnail((28, 28))
img = np.array(img)
pred = model.predict(img[np.newaxis]) # numpyのnewaxis
print(np.argmax(pred)) # 一番大きい要素


[0.0724998340010643, 0.9782000184059143]
7
3

ほう

[Python] labelImageを使って運転免許証を読み込み

lavelImageをやり直します

import os
os.environ["GOOGLE_APPLICATION_CREDENTIALS"] = "data/vision.json"

import io
import cv2
import matplotlib.pyplot as plt
import matplotlib
from google.cloud import vision
import xml.etree.ElementTree as ET

img = cv2.imread("img/license.jpeg")

client = vision.ImageAnnotatorClient()
with io.open("img/license.jpeg", 'rb') as image_file:
	content = image_file.read()
image = vision.Image(content=content)
response = client.document_text_detection(image=image)

text_infos = []
document = response.full_text_annotation
for page in document.pages:
  for block in page.blocks:
    for paragraph in block.paragraphs:
      for word in paragraph.words:
        for symbol in word.symbols:
          bounding_box = symbol.bounding_box
          xmin = bounding_box.vertices[0].x
          ymin = bounding_box.vertices[0].y
          xmax = bounding_box.vertices[2].x
          ymax = bounding_box.vertices[2].y
          xcenter = (xmin+xmax)/2
          ycenter = (ymin+ymax)/2
          text = symbol.text
          text_infos.append([text, xcenter, ycenter])

tree = ET.parse("data/license.xml")
root = tree.getroot()
result_dict = {}
for obj in root.findall("./object"):
  name = obj.find('name').text
  xmin = obj.find('bndbox').find('xmin').text
  ymin = obj.find('bndbox').find('ymin').text
  xmax = obj.find('bndbox').find('xmax').text
  ymax = obj.find('bndbox').find('ymax').text
  xmin, ymin, xmax, ymax = int(xmin), int(ymin), int(xmax), int(ymax)
  texts = ''
  for text_info in text_infos:
    text = text_info[0]
    xcenter = text_info[1]
    ycenter = text_info[2]
    if xmin <= xcenter <= xmax and ymin <= ycenter <= ymax:
      texts += text
  result_dict[name] = texts
  
for k, v in result_dict.items():
    print('{} : {}'.format(k, v))

$ python3 app.py
name : 日本花子
birthday : 昭和61年5月1日生)
address : 東京都千代田区霞加喂2-1-2
data of issue : 令和01年05月07日12345
expiration date : 12024年(今和06年)06月01日未有动
driver license : 運転免許証
number : 第012345678900号
Public Safety Commission : 00000公安委員会

Finally
やっと来たね
というか、サイズが一定なら免許証以外でもOCRできるね

[GCP] VisonAPIを使いたい

tesseractよりvison APIの方が性能が良さそうなので、
vison APIを触ってみる

こちらの公式の
https://cloud.google.com/vision/docs/quickstart-client-libraries?hl=JA

1. GCPアカウントに行く
2. Vison APIを有効にする

3. サービスアカウントの作成

ロールを基本 -> オーナーで設定

4. 作成したサービスアカウントでキーを作成

鍵を追加でjsonタイプの新しい鍵を追加する

5. jsonをubuntuに配置
L vison.jsonとしますww

$ pip3 install –no-cache-dir –force-reinstall -Iv grpcio==1.43.0
$ pip3 install google-cloud-vision

image/license.jpeg

main.py

import os
os.environ["GOOGLE_APPLICATION_CREDENTIALS"] = "vision.json"

import io
from google.cloud import vision


client = vision.ImageAnnotatorClient()
with io.open("img/license.jpeg", 'rb') as image_file:
	content = image_file.read()
image = vision.Image(content=content)
response = client.document_text_detection(image=image)
print(response)

print(response.text_annotations[0].description)

$ python3 main.py
氏名


花子
昭和61年5月1日生)
住所 東京都千代田区霞加喂2-1-2
交付 令和01年05月07日 12345
12024年(今和06年)06月01日未有动
眼鏡等
免許の
条件等
見本
優良
番号| 第 012345678900 号
|– 平成15年04月01日

他平成17年06月01日
(三種平成29年08月01日
運転免許証
天特普二
大自天持
普皇引
種類
大型小特
中型原付
THI
141
00000
公安委員会
Em
KA | ||
Q00

うおおおおおおおおおおおおおおおおおおおおおおお
萎えたああああああああああああああああ

[tesseract] 免許証の文字を読み込みたい : tesseract_layoutの検証

免許証画像は以下を使用する

tesseract_layoutの値を1から10まで変更して検証する

### tesseract_layout=1
$ python3 main.py
(mm| 日 本 花 子 軌和61年 5月

]1 日生

人誠| 東京都生代田区霞が関2ー 1一2
け| 令和01年05807H 12345

### tesseract_layout=2
$ python3 main.py
Traceback (most recent call last):
File “main.py”, line 9, in
txt = tools[0].image_to_string(
File “/home/vagrant/.local/lib/python3.8/site-packages/pyocr/tesseract.py”, line 386, in image_to_string
raise TesseractError(
pyocr.error.TesseractError: (-1, “Unable to find output file (tested [‘/tmp/tmpuiijvfgx/output.txt’])”)

### tesseract_layout=3
$ python3 main.py
(mm| 日 本 花 子 軌和61年 5月

]1 日生

人誠| 東京都生代田区霞が関2ー 1一2
信和01年05』07H 12345

### tesseract_layout=4
$ python3 main.py
(名| 日 本 花 子 昭和61年 5月 1日生

人誠| 東京都生代田区霞が関2ー 1一2
交付| 令和O1年05』07H 12345

2024箇(06$06有O1Hまで勧

%の 眼鏡等
条件等

見 本
き引第 012345678900 号

0
を人 ト民捧人構誠還| 〇〇OOO
=層衣2908』018導笛にに回較固 ま中

### tesseract_layout=5
$ python3 main.py
| |
に 5
中 M
加 9
9
避 Ok
ら 呈較っ
守 CN OS
| 較 抽| |睦旧旧計員
ー|。居 則遇|
| mp
– 還 RE 逢遇
| | 国~園 必g式還
玲|上 O、 は半較|
陸中 8
| 錠 [壮 加|
| 略叶RS sss
是 陸中
| 還|二 地
| 層間 ら5 8さき
EE ーーベ
[es = 絆|還> 証庄計
首日 EHP

### tesseract_layout=6
$ python3 main.py
(信所| 東京都寺代田区霞が関2-1一2

$和01キ05』07B 12345

天の 眼鏡等 に

条件等

見本 *

*引012345678900 呈 叶

に天上1 5404』01H話司にに放還 ま
に17108801間 汗天市生天 )
にafW29*08801 只間四時間 Sgms 583

### tesseract_layout=7
$ python3 main.py
で 敵 ーー an

### tesseract_layout=8
$ python3 main.py
で 敵

### tesseract_layout=9
$ python3 main.py
|

### tesseract_layout=10
$ python3 main.py
er

### 結論
tesseract_layout=4, lang=’jpn’ が一番まともな気がするけど、
なんでだろう?
きちんと精度高く読み取るにはGoogleのVison APIで実装するっぽいな…

[Ubuntu] tesseractをinstallして使いたい

$ sudo apt -y install tesseract-ocr tesseract-ocr-jpn libtesseract-dev libleptonica-dev tesseract-ocr-script-jpan tesseract-ocr-script-jpan-vert
$ tesseract -v
tesseract 4.1.3
leptonica-1.79.0
libgif 5.1.4 : libjpeg 8d (libjpeg-turbo 2.0.3) : libpng 1.6.37 : libtiff 4.1.0 : zlib 1.2.11 : libwebp 0.6.1 : libopenjp2 2.3.1
Found AVX2
Found AVX
Found SSE
Found libarchive 3.4.0 zlib/1.2.11 liblzma/5.2.4 bz2lib/1.0.8 liblz4/1.9.2 libzstd/1.4.4
$ tesseract –list-langs
List of available languages (5):
Japanese
Japanese_vert
eng
jpn
osd
※osdとは、言語の判定、文字角度の識別を行う

$ tesseract test1.png output
->
$ tesseract test1.png stdout
Hello world
$ tesseract test2.png stdout -l jpn
こんにちは

### Pythonで使えるようにする
$ pip3 install pyocr

from PIL import Image
import sys
import pyocr

tools = pyocr.get_available_tools()
langs = tools[0].get_available_languages()

img = Image.open('test1.png')
txt = tools[0].image_to_string(
	img,
	lang=langs[0],
	builder=pyocr.builders.TextBuilder(tesseract_layout=6)
)
print(txt)

※tesseract_layout=6 が精度に重要

$ python3 main.py
Hello world

lang=’jpn’に変更すると、日本語も出力できる
$ python3 main.py
とこんにちは
|
tesseract_layout=3で実行すると…
$ python3 main.py
こんにちは

#### tesseract_layoutの意味
0 = Orientation and script detection (OSD) only.
1 = Automatic page segmentation with OSD.
2 = Automatic page segmentation, but no OSD, or OCR
3 = Fully automatic page segmentation, but no OSD. (Default)
4 = Assume a single column of text of variable sizes.
5 = Assume a single uniform block of vertically aligned text.
6 = Assume a single uniform block of text.
7 = Treat the image as a single text line.
8 = Treat the image as a single word.
9 = Treat the image as a single word in a circle.
10 = Treat the image as a single character.

0 =方向とスクリプトの検出(OSD)のみ。
1 = OSDによる自動ページセグメンテーション。
2 =自動ページセグメンテーション、ただしOSDまたはOCRなし
3 =完全自動のページセグメンテーション。ただし、OSDはありません。 (ディフォルト)
4 =可変サイズのテキストの単一列を想定します。
5 =垂直に配置されたテキストの単一の均一なブロックを想定します。
6 =単一の均一なテキストブロックを想定します。
7 =画像を単一のテキスト行として扱います。
8 =画像を1つの単語として扱います。
9 =画像を円の中の1つの単語として扱います。
10 =画像を1文字として扱います。

6で設定されているのが多いですね
文字角度を考慮しなければ3で、文字角度を考慮する場合は6でしょうか?
読み取りたい文字に併せて設定を変えながら試していくイメージか…

dockerでmysqlを操作2

$ sudo docker pull mysql
$ sudo docker run -it –name test-wolrd-mysql -e MYSQL_ROOT_PASSWORD=mysql -d mysql:latest
sudo docker exec -it test-wolrd-mysql bash -p
mysql -u root -p -h 127.0.0.1

$ tree
.
├── docker-compose.yml
└── mysql
├── DB
│   └── world.sql
├── Dockerfile
└── my.cnf

docker-compose.yml

version: "3"
services:
  mysql:
    build: ./mysql/
    volumes:
      - ./mysql/db:/docker-entrypoint-initdb.d
    image: original_mysql_world
    environment:
      - MYSQL_ROOT_PASSWORD=mysql

world.sql

-- MySQL dump 10.13  Distrib 5.1.51, for pc-linux-gnu (i686)
--
-- Host: 127.0.0.1    Database: world
-- ------------------------------------------------------
-- Server version       5.1.51-debug-log

Dockerfile

FROM mysql

EXPOSE 3306

ADD ./my.cnf /etc/mysql/conf.d/my.cnf

CMD ["mysqld"]

my.cnf

[mysqld]
character-set-server=utf8

[mysql]
default-character-set=utf8

[client]
default-character-set=utf8

$ sudo docker-compose build
$ sudo docker-compose up -d
$ sudo docker exec -it mysql_mysql_1 bash -p

flaskをmysqlに接続

from flask import Flask, render_template
import pymysql

app = Flask(__name__)

def getConnection():
	return pymysql.connect(
		host="localhost",
		db="hoge",
		user="fuga",
		password="hou",
		charset="utf8",
		cursorclass=pymysql.cursors.DictCursor
	)

@app.route("/")
def index():

	connection = getConnection()

	sql = "SELECT * FROM avalanche where id = 1"
	cursor = connection.cursor()
	cursor.execute(sql)
	results = cursor.fetchall()

	cursor.close()
	connection.close()
	return render_template('index.html', results=results)

if __name__ == "__main__":
	app.run(debug=True, host='0.0.0.0', port=5000)

なるほど
これをdockerでやりたい

flaskをDockerで起動したい

$ docker -v
Docker version 20.10.12, build e91ed57
$ pwd
/home/vagrant/dev/docker/flask

Dockerfile

FROM python:alpine

WORKDIR /app

COPY ./app /app

RUN pip install Flask

CMD ["python", "index.py"]

app/index.py

from flask import Flask
app = Flask(__name__)

@app.route("/")
def index():
	return "<h1>Hello, Flask</h1>"

if __name__ == "__main__":
	app.run(debug=True, host='0.0.0.0', port=80)

$ sudo docker image build -t flask .
$ sudo docker run -p 5000:80 -v /home/vagrant/dev/docker/flask/app:/app -d flask

from flask import Flask, render_template
app = Flask(__name__)

@app.route("/")
def index():
	values = {"name": "Taro"}
	return render_template('index.html', data=values)

@app.route("/test")
def test():
	values = {"message": "Hello! This is test page"}
	return render_template('test.html', data=values)


if __name__ == "__main__":
	app.run(debug=True, host='0.0.0.0', port=80)

$ sudo docker stop 0ef266c41263

### htmlの場合


$ docker build -t some-content-nginx .
$ sudo docker run –name some-nginx -d -p 8080:80 some-content-nginx

pythonでmysqlを操作2

mysql-connector-pythonでも良いが、pymysqlを使う場合

$ pip3 install pymysql

import pymysql

print("hello world")

connection = pymysql.connect(
	host="localhost",
	db="hoge",
	user="fuga",
	password="asdf",
	charset="utf8",
	cursorclass=pymysql.cursors.DictCursor
)

sql = "SELECT * FROM avalanche"
cursor = connection.cursor()
cursor.execute(sql)
posts = cursor.fetchall()

cursor.close()
connection.close()

for post in posts:
	print(post["title"])

ほう